This is a blog post of hugging face a smol course summary.
Hugging Face A Smol Course
课程链接:https://huggingface.co/learn/smol-course/

0. Welcome to the Fine-Tuning Course
Welcome to the comprehensive (and smollest) course to Fine-Tuning Language Models!
This free course will take you on a journey, from beginner to expert, in understanding, implementing, and optimizing fine-tuning techniques for large language models.
This course is smol but fast! It’s for software developers and engineers looking to fast track their LLM fine-tuning skills.
What to expect from this course?
In this course, you will:
- 📖 Study instruction tuning, supervised fine-tuning, preference alignment, evaluation, vision language models… and more!
- 🧑💻 Learn to use established fine-tuning frameworks and tools like TRL and Transformers.
- 💾 Share your projects and explore fine-tuning applications created by the community.
- 🏆 Participate in challenges where you will evaluate your fine-tuned models against other students.
- 🎓 Earn a certificate of completion by completing assignments.
At the end of this course, you’ll understand how to fine-tune language models effectively and build specialized AI applications using the latest fine-tuning techniques.
Don’t forget to sign up to the course!
What does the course look like?
The course is composed of:
- Foundational Units: where you learn fine-tuning concepts in theory.
- Hands-on: where you’ll learn to use established fine-tuning frameworks to adapt your models. These hands-on sections will have pre-configured environments.
- Use case assignments: where you’ll apply the concepts you’ve learned to solve a real-world problem that you’ll choose.
- Collaborations: We’re collaborating with Hugging Face’s partners to give you the latest fine-tuning implementations and tools.
This course is a living project, evolving with your feedback and contributions! Feel free to open issues and PRs in GitHub, and engage in discussions in our Discord server.
What’s the syllabus?
Here is the general syllabus for the course. A more detailed list of topics will be released with each unit.
Each chapter in this course is designed to be completed in 1 week, with approximately 3-4 hours of work per week.
| # | Topic | Description |
|---|
| 1 | Instruction Tuning | Supervised fine-tuning, chat templates, instruction following |
| 2 | Evaluation | Benchmarks and custom domain evaluation |
| 3 | Preference Alignment | Aligning models to human preferences with algorithms like DPO. |
| 4 | Vision Language Models | Adapt and use multimodal models |
| 5 | Reinforcement Learning | Optimizing models with based on reinforcement policies. |
| 6 | Synthetic Data | Generate synthetic datasets for custom domains |
| 7 | Award Ceremony | Showcase projects and celebrate |
What are the prerequisites?
To be able to follow this course, you should have:
- Basic understanding of AI and LLM concepts
- Familiarity with Python programming and machine learning fundamentals
- Experience with PyTorch or similar deep learning frameworks
- Understanding of transformers architecture basics
[!TIP] If you don’t have any of these, don’t worry. Check out the LLM Course to get started. The above courses are not prerequisites in themselves, so if you understand the concepts of LLMs and transformers, you can start the course now!
Acknowledgments
We would like to extend our gratitude to the following individuals and partners for their invaluable contributions and support:
1. Instruction Tuning
Introduction to Instruction Tuning with SmolLM3
Welcome to the smollest course of fine-tuning! This module will guide you through instruction tuning using SmolLM3, Hugging Face’s latest 3B parameter model that achieves state-of-the-art performance for its size, while remaining accessible for learning and experimentation.
[!TIP] By the end of this course you will be fine tuning an LLM with SFT. This course is smol but fast! If you’re like for a smoother gradient, check out the The LLM Course.
After completing this unit (and the assignment), don’t forget to test your knowledge with the quiz!
What is Instruction Tuning?
Instruction tuning is the process of adapting pre-trained language models to follow human instructions and engage in conversations. While base models like SmolLM3-3B-Base are trained to predict the next token, instruction-tuned models like SmolLM3-3B are specifically trained to:
- Follow user instructions accurately
- Engage in natural conversations
- Provide helpful, harmless, and honest responses
- Maintain context across multi-turn interactions
- Use tools or MCP servers to perform tasks
This transformation from a text completion model to an instruction-following assistant is achieved through supervised fine-tuning on carefully curated datasets.
[!TIP] We dive into the instruction tuning here in the LLM Course.
Why SmolLM3 for Learning?
SmolLM3 is perfect for learning instruction tuning because it:
- Fits in a single GPU at a reasonable cost
- Achieves competitive performance
- Supports multilingual conversations
- Supports extended context length up to 8k tokens (with some variants supporting longer contexts up to 128k tokens)
- Features dual-mode reasoning with explicit thinking capabilities
- Comes with complete training recipes so you understand exactly how it was built
Module Overview
In this comprehensive module, we will explore four key areas:
Chat Templates
Chat templates are the foundation of instruction tuning - they structure interactions between users and AI models, ensuring consistent and contextually appropriate responses. You’ll learn:
- How SmolLM3’s chat template works
- Converting conversations to the proper format
- Working with system prompts and multi-turn conversations
- Using the Transformers library’s built-in template support
For detailed information, see Chat Templates.
Supervised Fine-Tuning (SFT)
Supervised Fine-Tuning is the core technique for adapting pre-trained models to follow instructions. You’ll master:
- The theory behind SFT and when to use it
- Working with the SmolTalk2 dataset
- Using TRL’s
SFTTrainer for efficient training - Best practices for data preparation and training configuration
For a comprehensive guide, see Supervised Fine-Tuning.
Hands-on Exercises
Put your knowledge into practice with progressively challenging exercises:
- Process datasets for instruction tuning
- Fine-tune SmolLM3 on different tasks
- Use both Python APIs and CLI tools
- Compare base model vs fine-tuned model performance
Complete exercises and examples are in Exercises.
Hugging Face Jobs
Hugging Face Jobs is a fully managed cloud infrastructure for training models without the hassle of setting up GPUs, managing dependencies, or configuring environments locally. This is particularly valuable for SFT training, which can be resource-intensive and time-consuming.
For a comprehensive guide, see Hugging Face Jobs.
What You’ll Build
By the end of this module, you’ll have:
- Fine-tuned your own SmolLM3 model on a custom dataset
- Understanding of chat template formatting and conversation structure
- Experience with both programmatic and CLI-based training workflows
- A model deployed to Hugging Face Hub that others can use
- Foundation knowledge for more advanced fine-tuning techniques
Let’s dive into the fascinating world of instruction tuning!
References
Chat Templates
Chat templates are the foundation of instruction tuning - they provide a consistent format for structuring interactions between language models, users, and external tools. Think of them as the “grammar” that teaches models how to understand conversations, distinguish between different speakers, and respond appropriately.
Base Models vs Instruct Models
First, we need to understand the difference between base and instruct models. This is crucial for effective fine-tuning.
Base Model (SmolLM3-3B-Base): Trained on raw text to predict the next token. If you give it “The weather today is”, it might continue with “sunny and warm” or any plausible continuation.
Instruct Model (SmolLM3-3B): Fine-tuned to follow instructions and engage in conversations. If you ask “What’s the weather like?”, it understands this as a question requiring a response as a new message.
The journey from base to instruct model involves:
- Chat template: A structured format for interactions between language models, users, and external tools.
- Supervised fine-tuning: The technique used to train the model to generate appropriate responses.
SmolLM3 uses the ChatML (Chat Markup Language) format, which has become a standard in the industry due to its clarity and flexibility.
[!TIP] Markup 是一种通用术语,指通过在文本中插入标签(tags)来定义结构、样式或语义的系统。典型代表:HTML、XML;Markdown 是一种 轻量级 Markup 语言。
In the next chapter, we will go in to preference alignment. This is a technique that allows you to fine-tune a model to generate responses that are preferred by a human.
Pipeline Usage: Automated Chat Processing
The easiest way to use an open source large language model is to use the pipeline abstraction in 🤗 Transformers. It handles chat templates seamlessly, making it easy to use chat models without manual template management. So much so, you won’t even need to know the chat template format.
from transformers import pipeline

### Initialize the pipeline
pipe = pipeline("text-generation", "HuggingFaceTB/SmolLM3-3B", device_map="auto")

### Define your conversation
messages = [
    {"role": "system", "content": "You are a friendly chatbot who always responds in the style of a pirate"},
    {"role": "user", "content": "How many helicopters can a human eat in one sitting?"},
]

### Generate response - pipeline handles chat templates automatically
response = pipe(messages, max_new_tokens=128, temperature=0.7)
print(response[0]['generated_text'][-1])  ### Print the assistant's response
Output:
{
    'role': 'assistant',
    'content': "Matey, I'm afraid I must inform ye that humans cannot eat helicopters. Helicopters are not food, they are flying machines. Food is meant to be eaten, like a hearty plate o' grog, a savory bowl o' stew, or a delicious loaf o' bread. But helicopters, they be for transportin' and movin' around, not for eatin'. So, I'd say none, me hearties. None at all."
}
In this example, the pipeline automatically:
- Applies the correct chat template for the model based on the model’s tokenizer configuration on the Hugging Face Hub repo.
- Handles tokenization and generation automatically based on the model’s tokenizer configuration.
- Returns structured output with role information
- Manages generation parameters and stopping criteria
Advanced Pipeline Usage
We can take fine-grained control of the generation process by passing in a generation_config dictionary to the pipeline abstraction.
### Configure generation parameters
generation_config = {
    "max_new_tokens": 200,
    "temperature": 0.8,
    "do_sample": True,
    "top_p": 0.9,
    "repetition_penalty": 1.1
}

### Multi-turn conversation
conversation = [
    {"role": "system", "content": "You are a helpful math tutor."},
    {"role": "user", "content": "Can you help me with calculus?"},
]

### Generate first response
response = pipe(conversation, **generation_config)
conversation = response[0]['generated_text']

### Continue the conversation
conversation.append({"role": "user", "content": "What is a derivative?"})
response = pipe(conversation, **generation_config)

print("Final conversation:")
for message in response[0]['generated_text']:
    print(f"{message['role']}: {message['content']}")
Understanding SmolLM3’s Chat Template
Now that we understand basic inference with a chat model, let’s dive into the chat template format. SmolLM3 uses a common chat template that handles multiple conversation types. Let’s examine how it works:
If you want to explore chat templates hand-on, you can try out the chat template playground:
SmolLM3 uses the ChatML format with special tokens that clearly delineate different parts of the conversation. You can this format in https://huggingface.co/HuggingFaceTB/SmolLM3-3B/blob/main/chat_template.jinja. For example, the system message is marked with <|im_start|>system and <|im_end|>.
<|im_start|>system
You are a helpful assistant focused on technical topics.<|im_end|>
<|im_start|>user
Hi there!<|im_end|>
<|im_start|>assistant
Nice to meet you!<|im_end|>
<|im_start|>user
Can I ask a question?<|im_end|>
<|im_start|>assistant
Key Components:
<|im_start|> and <|im_end|>: Special tokens that mark the beginning and end of each message- Roles:
system, user, assistant (and tool for function calling) - Content: The actual message text between the role declaration and
<|im_end|>
Dual-Mode Reasoning Support
SmolLM3’s is a new category of models that can reason, or not. It enables this feature through special formatting and a parameter. If the parameter is set to think, the model will show its reasoning process. This is communicated to the model through the thinking token.
Standard Mode (no_think):
<|im_start|>user
What is 15 × 24?<|im_end|>
<|im_start|>assistant
15 × 24 = 360<|im_end|>
Thinking Mode (think):
<|im_start|>user
What is 15 × 24?<|im_end|>
<|im_start|>assistant
<|thinking|>
I need to multiply 15 by 24. Let me break this down:
15 × 24 = 15 × (20 + 4) = (15 × 20) + (15 × 4) = 300 + 60 = 360
</|thinking|>

15 × 24 = 360<|im_end|>
This dual-mode capability allows SmolLM3 to show its reasoning process when needed, making it perfect for combining complex and simple tasks.
Working with SmolLM3 Chat Templates in Code
The transformers library automatically handles chat template formatting through the tokenizer. This means you only need to structure your messages correctly, and the library takes care of the special token formatting. Here’s how to work with SmolLM3’s chat template:
from transformers import AutoTokenizer

### Load SmolLM3's tokenizer
tokenizer = AutoTokenizer.from_pretrained("HuggingFaceTB/SmolLM3-3B")

### Structure your conversation as a list of message dictionaries
messages = [
    {"role": "system", "content": "You are a helpful assistant focused on technical topics."},
    {"role": "user", "content": "Can you explain what a chat template is?"},
    {"role": "assistant", "content": "A chat template structures conversations between users and AI models by providing a consistent format that helps the model understand different roles and maintain context."}
]

### Apply the chat template
formatted_chat = tokenizer.apply_chat_template(
    messages,
    tokenize=False,  ### Return string instead of tokens
    add_generation_prompt=True  ### Add prompt for next assistant response
)

print(formatted_chat)
Output:
<|im_start|>system
You are a helpful assistant focused on technical topics.<|im_end|>
<|im_start|>user
Can you explain what a chat template is?<|im_end|>
<|im_start|>assistant
A chat template structures conversations between users and AI models by providing a consistent format that helps the model understand different roles and maintain context.<|im_end|>
<|im_start|>assistant
Understanding the Message Structure
Each message in the conversation follows a simple dictionary format:
role: Identifies who is speaking (system, user, assistant, or tool).content: The actual message content.
Message Types:
- System Messages: Set behavior and context for the entire conversation
- User Messages: Questions, requests, or statements from the human user
- Assistant Messages: Responses from the AI model
- Tool Messages: Results from function calls (for advanced use cases)
System Messages: Setting the Context
System messages are crucial for controlling SmolLM3’s behavior. They act as persistent instructions that influence all subsequent interactions. To create a system message, you can use the system role and the content key:
### Professional assistant
system_message = {
    "role": "system",
    "content": "You are a professional customer service agent. Always be polite, clear, and helpful."
}

### Technical expert
system_message = {
    "role": "system",
    "content": "You are a senior software engineer. Provide detailed technical explanations with code examples when appropriate."
}

### Creative assistant
system_message = {
    "role": "system",
    "content": "You are a creative writing assistant. Help users craft engaging stories and provide constructive feedback."
}
[!TIP] System messages have a significant impact on the model’s behavior. They are the first message in the conversation and they set the tone for the entire conversation. They should be specific, set boundaries, provide context, and use examples.
Multi-Turn Conversations
SmolLM3 can maintain context across multiple conversation turns. Each message builds upon the previous context. For example, the following code creates a conversation with a helpful programming tutor:
conversation = [
    {"role": "system", "content": "You are a helpful programming tutor."},
    {"role": "user", "content": "I'm learning Python. Can you explain functions?"},
    {"role": "assistant", "content": "Functions in Python are reusable blocks of code that perform specific tasks. They're defined using the 'def' keyword."},
    {"role": "user", "content": "Can you show me an example?"},
    {"role": "assistant", "content": "Sure! Here's a simple function:\n\n```python\ndef greet(name):\n    return f'Hello, {name}!'\n\nresult = greet('Alice')\nprint(result)  ### Output: Hello, Alice!\n```"},
    {"role": "user", "content": "How do I make it return multiple values?"},
]
Generation Prompts: Controlling Model Behavior
One of the most important concepts in chat templates is the generation prompt. This tells the model when it should start generating a response versus continuing existing text.
Understanding add_generation_prompt
The add_generation_prompt parameter controls whether the template adds tokens that indicate the start of a bot response:
from transformers import AutoTokenizer

tokenizer = AutoTokenizer.from_pretrained("HuggingFaceTB/SmolLM3-3B")

messages = [
    {"role": "user", "content": "Hi there!"},
    {"role": "assistant", "content": "Nice to meet you!"},
    {"role": "user", "content": "Can I ask a question?"}
]

### Without generation prompt - for completed conversations
formatted_without = tokenizer.apply_chat_template(
    messages,
    tokenize=False,
    add_generation_prompt=False
)

print("Without generation prompt:")
print(formatted_without)
print("\n" + "="*50 + "\n")

### With generation prompt - for inference
formatted_with = tokenizer.apply_chat_template(
    messages,
    tokenize=False,
    add_generation_prompt=True
)

print("With generation prompt:")
print(formatted_with)
Output:
Without generation prompt:
<|im_start|>user
Hi there!<|im_end|>
<|im_start|>assistant
Nice to meet you!<|im_end|>
<|im_start|>user
Can I ask a question?<|im_end|>

==================================================

With generation prompt:
<|im_start|>user
Hi there!<|im_end|>
<|im_start|>assistant
Nice to meet you!<|im_end|>
<|im_start|>user
Can I ask a question?<|im_end|>
<|im_start|>assistant
The generation prompt ensures that when the model generates text, it will write a bot response instead of doing something unexpected like continuing the user’s message.
When to Use Generation Prompts
- For inference: Use
add_generation_prompt=True when you want the model to generate a response. - For training: Use
add_generation_prompt=False when preparing training data with complete conversations. - For evaluation: Use
add_generation_prompt=True to test model responses.
Continuing Final Messages: Advanced Response Control
The continue_final_message parameter allows you to make the model continue the last message in a conversation instead of starting a new one. This is particularly useful for “prefilling” responses or ensuring specific output formats.
Basic Example
### Prefill a JSON response
chat = [
    {"role": "user", "content": "Can you format the answer in JSON?"},
    {"role": "assistant", "content": '{"name": "'},
]

### Continue the final message
formatted_chat = tokenizer.apply_chat_template(
    chat,
    tokenize=False,
    continue_final_message=True
)

print("Continuing final message:")
print(formatted_chat)
print("\n" + "="*50 + "\n")

### Compare with starting a new message
formatted_new = tokenizer.apply_chat_template(
    chat,
    tokenize=False,
    add_generation_prompt=True
)

print("Starting new message:")
print(formatted_new)
Output:
Continuing final message:
<|im_start|>user
Can you format the answer in JSON?<|im_end|>
<|im_start|>assistant
{"name": "

==================================================

Starting new message:
<|im_start|>user
Can you format the answer in JSON?<|im_end|>
<|im_start|>assistant
{"name": "<|im_end|>
<|im_start|>assistant
Practical Applications
1. Structured Output Generation:
### Force the model to complete a specific format
messages = [
    {"role": "system", "content": "You are a helpful assistant that always responds in JSON format."},
    {"role": "user", "content": "What's the capital of France?"},
    {"role": "assistant", "content": '{\n  "question": "What\'s the capital of France?",\n  "answer": "'}
]

### The model will continue with just the answer, maintaining JSON structure
2. Code Completion:
### Guide the model to complete code
messages = [
    {"role": "user", "content": "Write a Python function to calculate factorial"},
    {"role": "assistant", "content": "def factorial(n):\n    if n == 0:\n        return 1\n    else:\n        return n * "}
]

### Model will complete the recursive call
3. Step-by-Step Reasoning:
### Guide the model through structured thinking
messages = [
    {"role": "user", "content": "Solve: 2x + 5 = 13"},
    {"role": "assistant", "content": "Let me solve this step by step:\n\nStep 1: "}
]

### Model will continue with the first step
Important Notes
- You cannot use
add_generation_prompt=True and continue_final_message=True together - The final message must have the “assistant” role when using
continue_final_message=True - This feature removes end-of-sequence tokens from the final message
Working with Reasoning Mode
SmolLM3’s dual-mode reasoning can be controlled through special formatting:
Standard vs Thinking Mode
### Standard mode - direct answer
standard_messages = [
    {"role": "user", "content": "What is 15 × 24?"},
    {"role": "assistant", "content": "15 × 24 = 360"}
]

### Thinking mode - show reasoning process
thinking_messages = [
    {"role": "user", "content": "What is 15 × 24?"},
    {"role": "assistant", "content": "<|thinking|>\nI need to multiply 15 by 24. Let me break this down:\n15 × 24 = 15 × (20 + 4) = (15 × 20) + (15 × 4) = 300 + 60 = 360\n</|thinking|>\n\n15 × 24 = 360"}
]

### Apply templates
standard_formatted = tokenizer.apply_chat_template(standard_messages, tokenize=False)
thinking_formatted = tokenizer.apply_chat_template(thinking_messages, tokenize=False)

print("Standard mode:")
print(standard_formatted)
print("\nThinking mode:")
print(thinking_formatted)
Training with Thinking Mode
When preparing datasets with thinking mode, you can control whether to include the reasoning:
def create_thinking_example(question, answer, reasoning=None):
    """Create a training example with optional thinking"""
    if reasoning:
        assistant_content = f"<|thinking|>\n{reasoning}\n</|thinking|>\n\n{answer}"
    else:
        assistant_content = answer

    return [
        {"role": "user", "content": question},
        {"role": "assistant", "content": assistant_content}
    ]

### Example usage
math_example = create_thinking_example(
    question="What is the derivative of x²?",
    answer="The derivative of x² is 2x",
    reasoning="Using the power rule: d/dx(x^n) = n·x^(n-1)\nFor x²: n=2, so d/dx(x²) = 2·x^(2-1) = 2x"
)
Modern chat templates support tool usage and function calling. Here’s how to work with tools in SmolLM3:
### Define available tools
tools = [
    {
        "type": "function",
        "function": {
            "name": "get_weather",
            "description": "Get the current weather for a location",
            "parameters": {
                "type": "object",
                "properties": {
                    "location": {
                        "type": "string",
                        "description": "The city and state, e.g. San Francisco, CA"
                    },
                    "unit": {
                        "type": "string",
                        "enum": ["celsius", "fahrenheit"],
                        "description": "The temperature unit"
                    }
                },
                "required": ["location"]
            }
        }
    },
    {
        "type": "function",
        "function": {
            "name": "calculate",
            "description": "Perform mathematical calculations",
            "parameters": {
                "type": "object",
                "properties": {
                    "expression": {
                        "type": "string",
                        "description": "Mathematical expression to evaluate"
                    }
                },
                "required": ["expression"]
            }
        }
    }
]
### Conversation with tool usage
messages = [
    {"role": "system", "content": "You are a helpful assistant with access to tools."},
    {"role": "user", "content": "What's the weather like in Paris?"},
    {
        "role": "assistant",
        "content": "I'll check the weather in Paris for you.",
        "tool_calls": [
            {
                "id": "call_1",
                "type": "function",
                "function": {
                    "name": "get_weather",
                    "arguments": '{"location": "Paris, France", "unit": "celsius"}'
                }
            }
        ]
    },
    {
        "role": "tool",
        "tool_call_id": "call_1",
        "content": '{"temperature": 22, "condition": "sunny", "humidity": 60}'
    },
    {
        "role": "assistant",
        "content": "The weather in Paris is currently sunny with a temperature of 22°C and 60% humidity. It's a beautiful day!"
    }
]

### Apply chat template with tools
formatted_with_tools = tokenizer.apply_chat_template(
    messages,
    tools=tools,
    tokenize=False,
    add_generation_prompt=False
)

print("Chat template with tools:")
print(formatted_with_tools)
The output of the chat template with tools is:
Chat template with tools:
<|im_start|>system
#### Metadata

Knowledge Cutoff Date: June 2025
Today Date: 01 September 2025
Reasoning Mode: /think

#### Custom Instructions

You are a helpful assistant with access to tools.

##### Tools

You may call one or more functions to assist with the user query.
You are provided with function signatures within <tools></tools> XML tags:

<tools>
{'type': 'function', 'function': {'name': 'get_weather', 'description': 'Get the current weather for a location', 'parameters': {'type': 'object', 'properties': {'location': {'type': 'string', 'description': 'The city and state, e.g. San Francisco, CA'}, 'unit': {'type': 'string', 'enum': ['celsius', 'fahrenheit'], 'description': 'The temperature unit'}}, 'required': ['location']}}}
{'type': 'function', 'function': {'name': 'calculate', 'description': 'Perform mathematical calculations', 'parameters': {'type': 'object', 'properties': {'expression': {'type': 'string', 'description': 'Mathematical expression to evaluate'}}, 'required': ['expression']}}}
</tools>

For each function call, return a json object with function name and arguments within <tool_call></tool_call> XML tags:
<tool_call>
{"name": <function-name>, "arguments": <args-json-object>}
...
{"temperature": 22, "condition": "sunny", "humidity": 60}<|im_end|>
<|im_start|>assistant
The weather in Paris is currently sunny with a temperature of 22°C and 60% humidity. It's a beautiful day!<|im_end|>
def format_tool_dataset(examples):
    """Format dataset with tool usage for training"""
    formatted_texts = []

    for messages, tools in zip(examples["messages"], examples.get("tools", [None] * len(examples["messages"]))):
        formatted_text = tokenizer.apply_chat_template(
            messages,
            tools=tools,
            tokenize=False,
            add_generation_prompt=False
        )
        formatted_texts.append(formatted_text)

    return {"text": formatted_texts}
Advanced Template Customization
For advanced use cases, you might need to customize or understand chat templates more deeply:
Inspecting a Model’s Chat Template
### View the actual template
print("SmolLM3 Chat Template:")
print(tokenizer.chat_template)

### See what special tokens are used
print("\nSpecial tokens:")
print(f"BOS: {tokenizer.bos_token}")
print(f"EOS: {tokenizer.eos_token}")
print(f"UNK: {tokenizer.unk_token}")
print(f"PAD: {tokenizer.pad_token}")

### Check for custom tokens
special_tokens = tokenizer.special_tokens_map
for name, token in special_tokens.items():
    print(f"{name}: {token}")
Custom Template Creation
"""
...

### Apply custom template (be very careful with this!)
### tokenizer.chat_template = custom_template
Template Debugging
def debug_chat_template(messages, tokenizer):
    """Debug chat template application"""

    ### Apply template
    formatted = tokenizer.apply_chat_template(
        messages,
        tokenize=False,
        add_generation_prompt=True
    )

    ### Tokenize and decode to see actual tokens
    tokens = tokenizer(formatted, return_tensors="pt")

    print("=== TEMPLATE DEBUG ===")
    print(f"Input messages: {len(messages)}")
    print(f"Formatted length: {len(formatted)} chars")
    print(f"Token count: {tokens['input_ids'].shape[1]}")
    print("\nFormatted text:")
    print(repr(formatted))  ### Shows escape characters
    print("\nTokens:")
    print(tokens['input_ids'][0].tolist()[:20], "...")  ### First 20 tokens
    print("\nDecoded tokens:")
    for i, token_id in enumerate(tokens['input_ids'][0][:20]):
        token = tokenizer.decode([token_id])
        print(f"{i:2d}: {token_id:5d} -> {repr(token)}")

### Example usage
debug_messages = [
    {"role": "user", "content": "Hello!"},
    {"role": "assistant", "content": "Hi there!"}
]

debug_chat_template(debug_messages, tokenizer)
Key Takeaways
Understanding chat templates is crucial for effective instruction tuning. Here are the essential points to remember:
Core Concepts
- Template Consistency: Always use the same template format for training and inference - mismatches can significantly hurt performance
- Generation Prompts: Use
add_generation_prompt=True for inference, False for training data preparation - Role Structure: Clear role definitions (
system, user, assistant, tool) help models understand conversation flow - Context Management: Leverage SmolLM3’s extended context window efficiently by managing conversation history
- Special Token Handling: Let templates handle special tokens - avoid adding them manually
Advanced Features
- Dual-Mode Reasoning: Use
<|thinking|> tags for complex problems requiring step-by-step reasoning - Message Continuation: Use
continue_final_message=True for structured output and prefilling responses - Tool Integration: Modern templates support function calling and tool usage for enhanced capabilities
- Pipeline Automation: Text generation pipelines handle templates automatically for production use
- Multi-Dataset Training: Standardize different dataset formats before combining for training
Training Best Practices
- Dataset Preparation: Apply templates with
add_generation_prompt=False and add_special_tokens=False for training - Quality Control: Debug templates thoroughly to ensure proper formatting
- Performance Monitoring: Incorrect template usage can significantly impact model performance
- Multimodal Support: Templates extend to vision and audio models with appropriate modifications
Common Pitfalls to Avoid
- Template mismatch: Using a different template than the model was trained on.
- Double special tokens: Adding special tokens when the template already includes them.
- Missing system messages: Not providing enough context for consistent model behavior.
- Inconsistent formatting: Mixing different conversation formats in the same dataset.
- Wrong generation prompts: Using incorrect
add_generation_prompt settings for your use case. - Ignoring tool syntax: Not properly formatting tool calls and responses.
- Context overflow: Not managing long conversations within token limits.
Production Considerations
- Pipeline usage: Use automated pipelines for consistent template application in production.
- Error handling: Implement validation for message formats and role sequences.
- Performance optimization: Cache formatted templates when possible for repeated use.
- Monitoring: Track template application success rates and formatting consistency.
- Version control: Maintain template versions alongside model versions for reproducibility.
Beyond Basic Templates: Advanced Topics
This guide covered the fundamentals, but chat templates support many advanced features:
- Multimodal templates: Handling images, audio, and video in conversations.
- Document integration: Including external documents and knowledge bases.
- Custom template creation: Building specialized templates for domain-specific applications.
- Template optimization: Performance tuning for high-throughput applications.
For these advanced topics, refer to the specialized documentation linked below.
Next Steps
Now that you have a comprehensive understanding of chat templates, you’re ready to learn about supervised fine-tuning, where we’ll use these templates to train SmolLM3 on custom datasets.
Next: Supervised Fine-Tuning
Comprehensive Resources and Further Reading
Official Documentation
Model and Dataset Resources
Technical References
Supervised Fine-Tuning with SmolLM3
Supervised Fine-Tuning (SFT) is the cornerstone of instruction tuning - it’s how we transform a base language model into an instruction-following assistant. In this section, you’ll learn to fine-tune SmolLM3 using real-world datasets and production-ready tools.
What is Supervised Fine-Tuning?
SFT is the process of continuing to train a pre-trained model on task-specific datasets with labeled examples. Think of it as specialized education:
- Pre-training teaches the model general language understanding (like learning to read).
- Supervised fine-tuning teaches specific skills and behaviors (like learning to do a specific task).
The key insight behind SFT is that we’re not teaching the model new knowledge from scratch. Instead, we’re reshaping how existing knowledge is applied. The pre-trained model already understands language, grammar, and has absorbed vast amounts of factual information. SFT focuses this general capability toward specific application patterns, response styles, and task-specific requirements.
This approach is effective because it leverages the rich representations learned during pre-training while requiring significantly less computational resources than training from scratch. The model learns to recognize instruction patterns, maintain conversation context, follow safety guidelines, and generate responses in desired formats.
[!TIP] Before starting SFT, consider whether using an existing instruction-tuned model with well-crafted prompts would suffice for your use case. SFT involves significant computational resources and engineering effort, so it should only be pursued when prompting existing models proves insufficient. Learn more about this decision process in the Hugging Face LLM Course.
The SmolLM3 SFT Journey
SmolLM3’s instruction-following capabilities come from a sophisticated SFT process:
- Base Model (
SmolLM3-3B-Base): Trained on 11T tokens of general text - SFT Training: Fine-tuned on curated instruction datasets including SmolTalk2
- Preference Alignment: Further refined using techniques like APO (Anchored Preference Optimization)
This multi-stage approach creates a model that’s both knowledgeable and helpful.
Why SFT Works: The Science Behind It
SFT is effective because it leverages the rich representations learned during pre-training while adapting the model’s behavior patterns. During SFT, the model’s parameters are fine-tuned through gradient descent on task-specific examples, causing subtle but important changes in how the model processes and generates text.
Specifically, the process works through several key mechanisms:
Behavioral Adaptation: The model learns to recognize instruction patterns and respond appropriately. This involves updating the attention mechanisms to focus on instruction cues in language and adjusting the output distribution to favor the desired responses. Research has shown that instruction tuning primarily affects the model’s surface-level behavior rather than its underlying knowledge (Wei et al., 2021).
Task Specialization: Rather than learning entirely new concepts, the model learns to apply its existing knowledge in specific contexts. This is why SFT is much more efficient than pre-training - we’re refining existing capabilities rather than building them from scratch. Studies indicate that most of the factual knowledge comes from pre-training, while SFT teaches the model how to format and present this knowledge appropriately (Ouyang et al., 2022).
Safety Alignment: Through exposure to carefully curated examples, the model learns to be more helpful, harmless, and honest. This involves both learning what to say and what not to say in various situations. The effectiveness of this approach has been demonstrated in works like InstructGPT (Ouyang et al., 2022) and Constitutional AI (Bai et al., 2022).
[!TIP] SFT doesn’t teach new facts - it teaches new behaviors. The model already knows about the world from pre-training; SFT teaches it how to be a helpful assistant using that knowledge.
The mathematical foundation involves minimizing the cross-entropy loss between the model’s predictions and the target responses in your training dataset. This process gradually shifts the model’s probability distributions to favor the types of responses demonstrated in your training examples.
When to Use Supervised Fine-Tuning
The key question is: “Does my use case require behavior that differs significantly from general-purpose conversation?” If yes, SFT is likely beneficial.
Decision framework: Use this checklist to determine if SFT is appropriate for your project:
- Have you tried prompt engineering with existing instruction-tuned models?
- Do you need consistent output formats that prompting cannot achieve?
- Is your domain specialized enough that general models struggle?
- Do you have high-quality training data (at least 1,000 examples)?
- Do you have the computational resources for training and evaluation?
If you answered “yes” to most of these, SFT is likely worth pursuing.
The SFT Process
Now let’s move on to the process of SFT itself. The SFT process follows a systematic approach that ensures high-quality results:
1. Dataset Preparation and Selection
The quality of your training data is the most critical factor for successful SFT. Unlike pre-training where quantity often matters most, SFT prioritizes quality and relevance. Your dataset should contain input-output pairs that demonstrate exactly the behavior you want your model to learn.
Choose the Right Dataset:
- SmolTalk2: The dataset used to train SmolLM3, containing high-quality instruction-response pairs.
- Domain-specific datasets: For specialized applications (medical, legal, technical).
- Custom datasets: Your own curated examples for specific use cases.
Each training example should consist of:
- Input prompt: The user’s instruction or question
- Expected response: The ideal assistant response
- Context (optional): Any additional information needed
[!TIP] Dataset size guidelines:
- Minimum: 1,000 high-quality examples for basic fine-tuning.
- Recommended: 10,000+ examples for robust performance.
- Quality over quantity: 1,000 well-curated examples often outperform 10,000 mediocre ones.
Remember: Your model will learn to mimic the patterns in your training data, so invest time in data curation.
2. Environment Setup and Configuration
To set up an environment for SFT, we will need advance compute resources. We have three main options:
- Local GPU: If you are lucky enough to have a access to a GPU with (at least 16GB of VRAM), you can train your model locally!
- Hugging Face Jobs: If you don’t have a GPU and don’t want to use a cloud provider, you can use Hugging Face Jobs! We’ll go into more detail about this in the next section.
- Notebook GPUs: If you like to use a notebook provider like Google Colab, you can use their GPUs!
- Cloud GPU: If you want to take control of your compute resources, you can use a cloud provider like AWS, GCP, or Azure.
In terms of hardware requirements, you will need a GPU with at least 16GB of VRAM, for example an Nvidia RTX 4080 or A10G.
3. Training Configuration
Choosing the right hyperparameters is crucial for successful SFT. The goal is to find the sweet spot where the model learns effectively without overfitting or becoming unstable. Here’s a detailed breakdown of each parameter and how to choose them:
Key Hyperparameters:
Learning Rate (5e-5 to 1e-4): Controls how much the model weights change with each update
- Start with 5e-5 for SmolLM3; this is conservative and stable.
- Too high: The model becomes unstable; loss oscillates or explodes.
- Too low: The model learns very slowly and may not converge in reasonable time.
Batch Size (4-16): Number of examples processed simultaneously
- Larger batches: More stable gradients, but require more GPU memory.
- Smaller batches: Less memory usage, but noisier gradients.
- Use gradient accumulation to achieve larger effective batch sizes.
Max Sequence Length (2048-4096): Maximum tokens per training example
- Longer sequences: Can handle more complex conversations.
- Shorter sequences: Faster training, less memory usage.
- Match your use case: Use the typical length of your target conversations.
Training Steps (1000-5000): Total number of parameter updates
- Depends on dataset size: More data usually requires more steps.
- Monitor validation loss: Stop when it stops improving.
- Rule of thumb: Three to five epochs through your dataset.
Warmup Steps (10% of total): Gradual learning rate increase at start
- Prevents early instability: Helps the model adapt gradually.
- Typical range: 100-500 steps for most SFT tasks.
[!TIP] Hyperparameter starting points for SmolLM3:
To bootstrap your training, you can use the following hyperparameters:
Learning Rate:
### Conservative (stable, slower)
learning_rate = 5e-5

### Balanced (recommended)
learning_rate = 1e-4

### Aggressive (faster, less stable)
learning_rate = 2e-4
Batch Size:
We can reduce GPU device batch size by using gradient accumulation.
### Limited GPU Memory
per_device_train_batch_size = 2
gradient_accumulation_steps = 8

### Balanced GPU Memory
per_device_train_batch_size = 4
gradient_accumulation_steps = 4

### More GPU Memory
per_device_train_batch_size = 8
gradient_accumulation_steps = 2
Max Sequence Length:
### Very short sequences
max_length = 512

### Short sequences
max_length = 1024

### Long sequences
max_length = 2048

### Very long sequences
max_length = 4096
4. Monitoring and Evaluation
Effective monitoring is crucial for successful SFT. Unlike pre-training where you primarily watch loss decrease, SFT requires careful attention to both quantitative metrics and qualitative outputs. The goal is to ensure your model is learning the desired behaviors without overfitting or developing unwanted patterns.
Key Metrics to Monitor:
Training Loss: Should decrease steadily but not too rapidly
- Healthy pattern: Smooth, gradual decrease.
- Warning signs: Sudden spikes, oscillations, or plateaus.
- Typical range: Starts around 2-4, should decrease to 0.5-1.5.
Validation Loss: Most important metric for preventing overfitting
- Should track training loss: A small gap indicates good generalization.
- Growing gap: Sign of overfitting; the model may be memorizing training data.
- Use for early stopping: Stop training when validation loss stops improving.
Sample Outputs: Regular qualitative checks are essential
- Generate responses: Test the model on held-out prompts during training.
- Check format consistency: Ensure the model follows desired response patterns.
- Monitor for degradation: Watch for repetitive or nonsensical outputs.
Resource Usage: Track GPU memory and training speed
- Memory spikes: May indicate batch size is too large.
- Slow training: Could suggest inefficient data loading or processing.
Understanding Loss Patterns in SFT
Training loss typically follows three distinct phases, as illustrated in this example from the Hugging Face LLM Course:
- Initial Sharp Drop: Rapid adaptation to new data distribution
- Gradual Stabilization: Learning rate slows as model fine-tunes
- Convergence: Loss values stabilize, indicating training completion
Healthy Training Pattern: The key indicator of successful training is a small gap between training and validation loss, suggesting the model is learning generalizable patterns rather than memorizing specific examples.
Warning Signs to Watch For
Several patterns in the loss curves can indicate potential issues:
Overfitting Pattern
If validation loss increases while training loss continues to decrease, your model is overfitting. Consider:
- Reducing training steps or epochs
- Increasing dataset size or diversity
- Adding regularization techniques
- Using early stopping based on validation loss
Underfitting Pattern
If loss doesn’t show significant improvement, the model might be:
- Learning too slowly (try increasing learning rate)
- Struggling with task complexity (check data quality)
- Hitting architectural limitations (consider different model size)
Potential Memorization
Extremely low loss values could suggest memorization rather than learning. This is concerning if:
- Model performs poorly on new, similar examples
- Outputs lack diversity or creativity
- Responses are too similar to training examples
[!TIP] Learn more about loss interpretation in the Hugging Face LLM Course.
Experiment Tracking with Trackio: For comprehensive experiment tracking, we recommend Trackio - a lightweight, free experiment tracking library built on Hugging Face infrastructure. Trackio provides:
- Drop-in replacement: API compatible with
wandb.init, wandb.log, and wandb.finish. - Local-first design: Dashboard runs locally by default, with optional Hugging Face Spaces hosting.
- Free hosting: Everything, including hosting on Hugging Face Spaces, is free.
- Lightweight: Fewer than 3,000 lines of Python code, easily extensible.
We can track any metrics during training, for example:
### Simple Trackio integration
import trackio

### Initialize tracking
trackio.init(project="smollm3-sft")

### Log metrics during training
trackio.log({"train_in_loss": 0.5, "learning_rate": 5e-5})

### Finish tracking
trackio.finish()
The most convenient way to track your training is to use trackio’s transformers integration. You can specify your Trackio project name and space ID using environment variables:
export TRACKIO_PROJECT_NAME="my-project"
export TRACKIO_SPACE_ID="username/space_id"
Or you can set them in your code:
import os

os.environ["TRACKIO_PROJECT_NAME"] = "my-project"
os.environ["TRACKIO_SPACE_ID"] = "username/space_id"
Then you can use the SFTTrainer class from TRL to track your training and let it handle the tracking for you.
from trl import SFTTrainer

trainer = SFTTrainer(
    model=model,
    train_dataset=dataset["train"],
    args=config,
)
Trackio will serve an application with the metrics from training that looks like this:
Logged metrics
While training and evaluating we record the following reward metrics:
global_step: The total number of optimizer steps taken so far.epoch: The current epoch number, based on dataset iteration.num_tokens: The total number of tokens processed so far.loss: The average cross-entropy loss computed over non-masked tokens in the current logging interval.entropy: The average entropy of the model’s predicted token distribution over non-masked tokens.mean_token_accuracy: The proportion of non-masked tokens for which the model’s top-1 prediction matches the ground truth token.learning_rate: The current learning rate, which may change dynamically if a scheduler is used.grad_norm: The L2 norm of the gradients, computed before gradient clipping.
SFT supports both language modeling and prompt-completion datasets. The [SFTTrainer] is compatible with both standard and conversational dataset formats. When provided with a conversational dataset, the trainer will automatically apply the chat template to the dataset.
### Standard language modeling
{"text": "The sky is blue."}

### Conversational language modeling
{"messages": [{"role": "user", "content": "What color is the sky?"},
              {"role": "assistant", "content": "It is blue."}]}

### Standard prompt-completion
{"prompt": "The sky is",
 "completion": " blue."}

### Conversational prompt-completion
{"prompt": [{"role": "user", "content": "What color is the sky?"}],
 "completion": [{"role": "assistant", "content": "It is blue."}]}
If your dataset is not in one of these formats, you can preprocess it to convert it into the expected format. Here is an example with the FreedomIntelligence/medical-o1-reasoning-SFT dataset:
from datasets import load_dataset

dataset = load_dataset("FreedomIntelligence/medical-o1-reasoning-SFT", "en")

def preprocess_function(example):
    return {
        "prompt": [{"role": "user", "content": example["Question"]}],
        "completion": [
            {"role": "assistant", "content": f"<think>{example['Complex_CoT']}</think>{example['Response']}"}
        ],
    }

dataset = dataset.map(preprocess_function, remove_columns=["Question", "Response", "Complex_CoT"])
print(next(iter(dataset["train"])))
{
    "prompt": [
        {
            "content": "Given the symptoms of sudden weakness in the left arm and leg, recent long-distance travel, and the presence of swollen and tender right lower leg, what specific cardiac abnormality is most likely to be found upon further evaluation that could explain these findings?",
            "role": "user",
        }
    ],
    "completion": [
        {
            "content": "<think>Okay, let's see what's going on here. We've got sudden weakness [...] clicks into place!</think>The specific cardiac abnormality most likely to be found in [...] the presence of a PFO facilitating a paradoxical embolism.",
            "role": "assistant",
        }
    ],
}
Chat Templates in Training
We’ll return briefly to chat templates in the context of training. Using chat templates correctly during training is crucial for model performance. Here are the key considerations and best practices:
Preprocessing and tokenization
During training, each example is expected to contain a text field or a (prompt, completion) pair, depending on the dataset format. For more details on the expected formats, see Dataset formats. The SFTTrainer tokenizes each input using the model’s tokenizer. If both prompt and completion are provided separately, they are concatenated before tokenization.
Computing the loss

The loss used in SFT is the token-level cross-entropy loss, defined as:
\[\mathcal{L}_{\text{SFT}}(\theta) = - \sum_{t=1}^{T} \log p_\theta(y_t \mid y_{<t}),\]where \( y_t \) is the target token at timestep \( t \), and the model is trained to predict the next token given the previous ones. In practice, padding tokens are masked out during loss computation.
TRL is the go-to toolkit for training language models, built specifically for instruction tuning and alignment. It’s what we’ll use throughout this course.
Why TRL?
- Production ready: Used by major organizations and research labs.
- Comprehensive: Supports SFT, DPO, ORPO, PPO, and more advanced techniques.
- Efficient: Optimized for memory usage and training speed.
- Flexible: Works with any Hugging Face model.
- CLI support: Command-line tools for scalable training workflows.
Key Components
- SFTTrainer: The core class for supervised fine-tuning
- SFTConfig: Configuration management for training parameters
- CLI Tools: Command-line interface for production workflows
- Integration: Seamless integration with Hugging Face Hub, Trackio, Weights & Biases, and more
TRL’s Architecture
TRL is built on top of the Hugging Face ecosystem:
- Transformers: Model loading and inference.
- Datasets: Data processing and management.
- Accelerate: Distributed training and optimization.
- PEFT: Parameter-efficient fine-tuning (LoRA, QLoRA).
This integrated approach means you get all the benefits of the Hugging Face ecosystem while using state-of-the-art training techniques.
[!TIP] TRL versus other training libraries:
- TRL: Specialized for LLM training, built for instruction tuning.
- Transformers Trainer: General purpose, suitable for basic fine-tuning.
- DeepSpeed: Focuses on large-scale distributed training.
- Accelerate: Provides low-level distributed training primitives.
TRL provides the best balance of ease-of-use and advanced features for SFT. For more details on training approaches, see the Hugging Face LLM Course.
Hands-On: Your First SmolLM3 Fine-Tune
Ready to put theory into practice? Here’s a preview of what you’ll build in the exercises. You can use either Python or CLI approach:
```python from transformers import AutoModelForCausalLM, AutoTokenizer from trl import SFTTrainer, SFTConfig from datasets import load_dataset import trackio as wandb ### Initialize experiment tracking wandb.init(project="smollm3-sft", name="my-first-sft-run") ### Load SmolLM3 base model model = AutoModelForCausalLM.from_pretrained("HuggingFaceTB/SmolLM3-3B-Base") tokenizer = AutoTokenizer.from_pretrained("HuggingFaceTB/SmolLM3-3B-Base") ### Load SmolTalk2 dataset dataset = load_dataset("HuggingFaceTB/smoltalk2_everyday_convs_think") ### Configure training with Trackio integration config = SFTConfig( output_dir="./smollm3-finetuned", per_device_train_batch_size=4, learning_rate=5e-5, max_steps=1000, report_to="trackio", ### Enable Trackio logging ) ### Train! trainer = SFTTrainer( model=model, train_dataset=dataset["train"], args=config, ) trainer.train() ``` ```bash ### Fine-tune SmolLM3 using TRL CLI with Trackio tracking trl sft \ --model_name_or_path HuggingFaceTB/SmolLM3-3B-Base \ --dataset_name HuggingFaceTB/smoltalk2_everyday_convs_think \ --output_dir ./smollm3-sft-model \ --per_device_train_batch_size 4 \ --learning_rate 5e-5 \ --max_steps 1000 \ --logging_steps 50 \ --save_steps 200 \ --report_to trackio \ --push_to_hub \ --hub_model_id your-username/smollm3-custom ``` Severless Training Options
While you can train models locally, cloud infrastructure offers significant advantages for SFT training. For users who want to skip the complexity of GPU setup and environment management, Hugging Face Jobs provides a seamless solution.
See Training with Hugging Face Jobs for fully managed cloud infrastructure with high-end GPUs, automatic scaling, and integrated monitoring.
Key Takeaways
- SFT is Essential: It’s the bridge between base models and instruction-following assistants
- Data Quality Matters: High-quality datasets lead to better fine-tuned models - invest time in curation
- Monitor Carefully: Watch both loss curves and actual outputs to catch issues early
- TRL Simplifies Everything: From research to production, TRL provides the tools you need
- SmolLM3 is Perfect for Learning: Powerful enough to be useful, small enough to be accessible
- Multiple Approaches: Both programmatic and CLI workflows for different use cases
[!TIP] 🎓 Continue Learning: This introduction covers the fundamentals, but SFT is a deep topic. For more advanced techniques, evaluation methods, and troubleshooting tips, explore the Hugging Face LLM Course which provides comprehensive coverage of modern LLM training techniques.
Next Steps
Now that you understand the theory, choose your training approach:
Training with Hugging Face Jobs - Use cloud infrastructure for training Hands-On Exercises - Fine-tune your own SmolLM3 model locally or in the cloud
Resources and Further Reading
LoRA and PEFT: Efficient Fine-Tuning
Parameter-Efficient Fine-Tuning (PEFT) lets you adapt large models by training a small number of additional parameters while keeping the base model frozen. The most widely used PEFT method is LoRA (Low-Rank Adaptation), which injects trainable low-rank updates into linear layers. This often reduces trainable parameters by ~90% while preserving performance.
When to use PEFT
- You have limited compute or memory budget
- You need to quickly adapt a base model to multiple tasks/domains
- You want fast iteration and small artifacts (adapter weights are usually a few MB)
Understanding LoRA
LoRA has become the most widely adopted PEFT method. It works by adding small rank decomposition matrices to the attention weights, typically reducing trainable parameters by about 90%.
LoRA (Low-Rank Adaptation) is a parameter-efficient fine-tuning technique that freezes the pre-trained model weights and injects trainable rank decomposition matrices into the model’s layers. Instead of training all model parameters during fine-tuning, LoRA decomposes the weight updates into smaller matrices through low-rank decomposition, significantly reducing the number of trainable parameters while maintaining model performance. For example, when applied to GPT-3 175B, LoRA reduced trainable parameters by 10,000x and GPU memory requirements by 3x compared to full fine-tuning. You can read more about LoRA in the LoRA paper.
LoRA works by adding pairs of rank decomposition matrices to transformer layers, typically focusing on attention weights. During inference, these adapter weights can be merged with the base model, resulting in no additional latency overhead. LoRA is particularly useful for adapting large language models to specific tasks or domains while keeping resource requirements manageable.
Loading LoRA Adapters
Adapters can be loaded onto a pretrained model with load_adapter(), which is useful for trying out different adapters whose weights aren’t merged. Set the active adapter weights with the set_adapter() function. To return the base model, you could use unload() to unload all of the LoRA modules. This makes it easy to switch between different task-specific weights.
from transformers import AutoModelForCausalLM
from peft import PeftModel

base_model = AutoModelForCausalLM.from_pretrained("<base_model_name>")
peft_model_id = "<peft_adapter_id>"
model = PeftModel.from_pretrained(base_model, peft_model_id)

Merging LoRA Adapters
After training with LoRA, you might want to merge the adapter weights back into the base model for easier deployment. This creates a single model with the combined weights, eliminating the need to load adapters separately during inference.
The merging process requires attention to memory management and precision. Since you’ll need to load both the base model and adapter weights simultaneously, ensure sufficient GPU/CPU memory is available. Using device_map="auto" in transformers will help with automatic memory management. Maintain consistent precision (e.g., float16) throughout the process, matching the precision used during training and saving the merged model in the same format for deployment. Before deploying, always validate the merged model by comparing its outputs and performance metrics with the adapter-based version.
Adapters are also be convenient for switching between different tasks or domains. You can load the base model and adapter weights separately. This allows for quick switching between different task-specific weights.
[!TIP] When implementing PEFT methods, start with small rank values (4-8) for LoRA and monitor training loss. Use validation sets to prevent overfitting and compare results with full fine-tuning baselines when possible. The effectiveness of different methods can vary by task, so experimentation is key.
OLoRA
OLoRA utilizes QR decomposition to initialize the LoRA adapters. OLoRA translates the base weights of the model by a factor of their QR decompositions, i.e., it mutates the weights before performing any training on them. This approach significantly improves stability, accelerates convergence speed, and ultimately achieves superior performance.
Using TRL with PEFT
PEFT methods can be combined with TRL (Transformers Reinforcement Learning) for efficient fine-tuning. This integration is particularly useful for RLHF (Reinforcement Learning from Human Feedback) as it reduces memory requirements.
from peft import LoraConfig
from trl import SFTTrainer

### Load model with PEFT config
lora_config = LoraConfig(
    r=16,
    lora_alpha=32,
    lora_dropout=0.05,
    bias="none",
    task_type="CAUSAL_LM"
)

trainer = SFTTrainer(
    model="your-model-name",
    train_dataset=dataset["train"]
    peft_config=lora_config
)
Basic Merging Implementation
After training a LoRA adapter, you can merge the adapter weights back into the base model. Here’s how to do it:
import torch
from transformers import AutoModelForCausalLM
from peft import PeftModel

### 1. Load the base model
base_model = AutoModelForCausalLM.from_pretrained(
    "base_model_name",
    dtype=torch.bfloat16,
    device_map="auto"
)

### 2. Load the PEFT model with adapter
peft_model = PeftModel.from_pretrained(
    base_model,
    "path/to/adapter",
    dtype=torch.bfloat16
)

### 3. Merge adapter weights with base model
try:
    merged_model = peft_model.merge_and_unload()
except RuntimeError as e:
    print(f"Merging failed: {e}")
    ### Implement fallback strategy or memory optimization

### 4. Save the merged model
merged_model.save_pretrained("path/to/save/merged_model")
If you encounter size discrepancies in the saved model, ensure you’re also saving the tokenizer:
### Save both model and tokenizer
tokenizer = AutoTokenizer.from_pretrained("base_model_name")
merged_model.save_pretrained("path/to/save/merged_model")
tokenizer.save_pretrained("path/to/save/merged_model")
Quick start with TRL + LoRA
The TRL SFTTrainer integrates natively with PEFT. Define a LoraConfig, pass it to the trainer, and train only the adapter weights.
from peft import LoraConfig
from trl import SFTTrainer, SFTConfig

### 1) Configure LoRA
peft_config = LoraConfig(
    r=8,
    lora_alpha=16,
    lora_dropout=0.05,
    bias="none",
    task_type="CAUSAL_LM",
)

### 2) Create trainer (example)
trainer = SFTTrainer(
    model=model,
    args=SFTConfig(output_dir="lora-adapter", num_train_epochs=1, per_device_train_batch_size=2, packing=True),
    train_dataset=dataset["train"],
    peft_config=peft_config,
)
trainer.train()
After training, you can either:
- Load adapters at inference time alongside the base model, or
- Merge adapters into the base model for simplified deployment.
Resources
Hands-On Exercises: Fine-Tuning SmolLM3
<CourseFloatingBanner chapter={10} classNames=”absolute z-10 right-0 top-0” notebooks={[ {label: “Google Colab”, value: “https://colab.research.google.com/github/huggingface/smol-course/blob/main/notebooks/1/4.ipynb”}, ]} />
Welcome to the practical section! Here you’ll apply everything you’ve learned about chat templates and supervised fine-tuning using SmolLM3. These exercises progress from basic concepts to advanced techniques, giving you real-world experience with instruction tuning.
Learning Objectives
By completing these exercises, you will:
- Master SmolLM3’s chat template system
- Fine-tune SmolLM3 on real datasets using both Python APIs and CLI tools
- Work with the SmolTalk2 dataset that was used to train the original model
- Compare base model vs fine-tuned model performance
- Deploy your models to Hugging Face Hub
- Understand production workflows for scaling fine-tuning
Exercise 1: Exploring SmolLM3’s Chat Templates
Objective: Understand how SmolLM3 handles different conversation formats and reasoning modes.
SmolLM3 is a hybrid reasoning model which can follow instructions or generated tokens that ‘reason’ on a complex problem. When post-trained effectively, the model will reason on hard problems and generate direct responses on easy problems.
Environment Setup
[!WARNING]
- You need a GPU with at least 8GB VRAM for training. CPU/MPS can run formatting and dataset exploration, but training larger models will likely fail.
- First run will download several GB of model weights; ensure 15GB+ free disk and a stable connection.
- If you need access to private repos, authenticate with Hugging Face Hub via
login().
Let’s start by setting up our environment.
### Install required packages (run in Colab or your environment)
pip install "transformers>=4.36.0" "trl>=0.7.0" "datasets>=2.14.0" "torch>=2.0.0"
pip install "accelerate>=0.24.0" "peft>=0.7.0" "trackio"
Then, let’s import the necessary libraries and set up the accelerator device. below we validate whether we’re using a Nvidia GPU, an Apple Metal accelerator or the CPU. In reality, we can’t train models on the CPU, so we’ll use an accelerator.
### Import necessary libraries
import torch
from transformers import AutoModelForCausalLM, AutoTokenizer, pipeline
from datasets import load_dataset
import json
from typing import Optional, Dict, Any

if torch.cuda.is_available():
    device = "cuda"
    print(f"Using CUDA GPU: {torch.cuda.get_device_name()}")
    print(f"GPU memory: {torch.cuda.get_device_properties(0).total_memory / 1e9:.1f}GB")
elif hasattr(torch.backends, 'mps') and torch.backends.mps.is_available():
    device = "mps"
    print("Using Apple MPS")
else:
    device = "cpu"
    print("Using CPU - you will need to use a GPU to train models")

### Authenticate with Hugging Face (optional, for private models)
from huggingface_hub import login
### login()  ### Uncomment if you need to access private models
Take a note of the device you’re using and your available GPU memory. If this is below 8GB, you will not be able to do some exercises.
Output
```python output Using CUDA GPU: NVIDIA A100-SXM4-40GB GPU memory: 42.5GB ``` Load SmolLM3 Models
Now let’s load the base and instruct models for comparison.
### Load both base and instruct models for comparison
base_model_name = "HuggingFaceTB/SmolLM3-3B-Base"
instruct_model_name = "HuggingFaceTB/SmolLM3-3B"

### Load tokenizers
base_tokenizer = AutoTokenizer.from_pretrained(base_model_name)
instruct_tokenizer = AutoTokenizer.from_pretrained(instruct_model_name)

### Load models (use smaller precision for memory efficiency)
base_model = AutoModelForCausalLM.from_pretrained(
    base_model_name,
    dtype=torch.bfloat16,
    device_map="auto"
)

instruct_model = AutoModelForCausalLM.from_pretrained(
    instruct_model_name,
    dtype=torch.bfloat16,
    device_map="auto"
)

print("Models loaded successfully!")
This will download the models and tokenizers to your local machine from the Hugging Face Hub. This includes the model’s parameter weights, tokenizer, and other model configuration defined by the model authors.
Output
You should see green bars loading the model weights. This may take a few minutes. ```python output tokenizer_config.json: 50.4k/? [00:00<00:00, 5.09MB/s] tokenizer.json: 100% 17.2M/17.2M [00:02<00:00, 10.7MB/s] special_tokens_map.json: 100% 151/151 [00:00<00:00, 21.5kB/s] tokenizer_config.json: 50.4k/? [00:00<00:00, 5.45MB/s] tokenizer.json: 100% 17.2M/17.2M [00:00<00:00, 472kB/s] special_tokens_map.json: 100% 289/289 [00:00<00:00, 35.0kB/s] chat_template.jinja: 5.60k/? [00:00<00:00, 577kB/s] config.json: 100% 943/943 [00:00<00:00, 121kB/s] model.safetensors.index.json: 26.9k/? [00:00<00:00, 2.81MB/s] Fetching 2 files: 100% 2/2 [00:32<00:00, 32.11s/it] model-00001-of-00002.safetensors: 100% 4.97G/4.97G [00:31<00:00, 247MB/s] model-00002-of-00002.safetensors: 100% 1.18G/1.18G [00:17<00:00, 57.2MB/s] Loading checkpoint shards: 100% 2/2 [00:01<00:00, 1.18it/s] generation_config.json: 100% 126/126 [00:00<00:00, 17.1kB/s] config.json: 1.92k/? [00:00<00:00, 229kB/s] model.safetensors.index.json: 26.9k/? [00:00<00:00, 3.14MB/s] Fetching 2 files: 100% 2/2 [00:32<00:00, 32.38s/it] model-00002-of-00002.safetensors: 100% 1.18G/1.18G [00:17<00:00, 92.1MB/s] model-00001-of-00002.safetensors: 100% 4.97G/4.97G [00:31<00:00, 182MB/s] Loading checkpoint shards: 100% 2/2 [00:01<00:00, 1.14it/s] generation_config.json: 100% 182/182 [00:00<00:00, 21.0kB/s] Models loaded successfully! ``` Now let’s explore the chat template formatting. We will create different types of conversations to test.
### Create different types of conversations to test
conversations = {
    "simple_qa": [
        {"role": "user", "content": "What is machine learning?"},
    ],

    "with_system": [
        {"role": "system", "content": "You are a helpful AI assistant specialized in explaining technical concepts clearly."},
        {"role": "user", "content": "What is machine learning?"},
    ],

    "multi_turn": [
        {"role": "system", "content": "You are a math tutor."},
        {"role": "user", "content": "What is calculus?"},
        {"role": "assistant", "content": "Calculus is a branch of mathematics that deals with rates of change and accumulation of quantities."},
        {"role": "user", "content": "Can you give me a simple example?"},
    ],

    "reasoning_task": [
        {"role": "user", "content": "Solve step by step: If a train travels 120 miles in 2 hours, what is its average speed?"},
    ]
}

for conv_type, messages in conversations.items():
    print(f"--- {conv_type.upper()} ---")

    ### Format without generation prompt (for completed conversations)
    formatted_complete = instruct_tokenizer.apply_chat_template(
        messages,
        tokenize=False,
        add_generation_prompt=False
    )

    ### Format with generation prompt (for inference)
    formatted_prompt = instruct_tokenizer.apply_chat_template(
        messages,
        tokenize=False,
        add_generation_prompt=True
    )

    print("Complete conversation format:")
    print(formatted_complete)
    print("\nWith generation prompt:")
    print(formatted_prompt)
    print("\n" + "="*50 + "\n")
Output
```python output --- SIMPLE_QA --- Complete conversation format: <|im_start|>system #### Metadata Knowledge Cutoff Date: June 2025 Today Date: 03 September 2025 Reasoning Mode: /no_think #### Custom Instructions You are a helpful AI assistant named SmolLM, trained by Hugging Face. <|im_start|>user What is machine learning?<|im_end|> With generation prompt: <|im_start|>system #### Metadata Knowledge Cutoff Date: June 2025 Today Date: 03 September 2025 Reasoning Mode: /no_think #### Custom Instructions You are a helpful AI assistant named SmolLM, trained by Hugging Face. <|im_start|>user What is machine learning?<|im_end|> <|im_start|>assistant ================================================== --- WITH_SYSTEM --- Complete conversation format: <|im_start|>system #### Metadata Knowledge Cutoff Date: June 2025 Today Date: 03 September 2025 Reasoning Mode: /no_think #### Custom Instructions You are a helpful AI assistant specialized in explaining technical concepts clearly. <|im_start|>user What is machine learning?<|im_end|> With generation prompt: <|im_start|>system #### Metadata Knowledge Cutoff Date: June 2025 Today Date: 03 September 2025 Reasoning Mode: /no_think #### Custom Instructions You are a helpful AI assistant specialized in explaining technical concepts clearly. <|im_start|>user What is machine learning?<|im_end|> <|im_start|>assistant ================================================== --- MULTI_TURN --- Complete conversation format: <|im_start|>system #### Metadata Knowledge Cutoff Date: June 2025 Today Date: 03 September 2025 Reasoning Mode: /no_think #### Custom Instructions You are a math tutor. <|im_start|>user What is calculus?<|im_end|> <|im_start|>assistant Calculus is a branch of mathematics that deals with rates of change and accumulation of quantities.<|im_end|> <|im_start|>user Can you give me a simple example?<|im_end|> With generation prompt: <|im_start|>system #### Metadata Knowledge Cutoff Date: June 2025 Today Date: 03 September 2025 Reasoning Mode: /no_think #### Custom Instructions You are a math tutor. <|im_start|>user What is calculus?<|im_end|> <|im_start|>assistant Calculus is a branch of mathematics that deals with rates of change and accumulation of quantities.<|im_end|> <|im_start|>user Can you give me a simple example?<|im_end|> <|im_start|>assistant ================================================== --- REASONING_TASK --- Complete conversation format: <|im_start|>system #### Metadata Knowledge Cutoff Date: June 2025 Today Date: 03 September 2025 Reasoning Mode: /think #### Custom Instructions You are a helpful AI assistant named SmolLM, trained by Hugging Face. Your role as an assistant involves thoroughly exploring questions through a systematic thinking process before providing the final precise and accurate solutions. This requires engaging in a comprehensive cycle of analysis, summarizing, exploration, reassessment, reflection, backtracking, and iteration to develop well-considered thinking process. Please structure your response into two main sections: Thought and Solution using the specified format: Thought section Solution section. In the Thought section, detail your reasoning process in steps. Each step should include detailed considerations such as analysing questions, summarizing relevant findings, brainstorming new ideas, verifying the accuracy of the current steps, refining any errors, and revisiting previous steps. In the Solution section, based on various attempts, explorations, and reflections from the Thought section, systematically present the final solution that you deem correct. The Solution section should be logical, accurate, and concise and detail necessary steps needed to reach the conclusion. <|im_start|>user Solve step by step: If a train travels 120 miles in 2 hours, what is its average speed?<|im_end|> With generation prompt: <|im_start|>system #### Metadata Knowledge Cutoff Date: June 2025 Today Date: 03 September 2025 Reasoning Mode: /think #### Custom Instructions You are a helpful AI assistant named SmolLM, trained by Hugging Face. Your role as an assistant involves thoroughly exploring questions through a systematic thinking process before providing the final precise and accurate solutions. This requires engaging in a comprehensive cycle of analysis, summarizing, exploration, reassessment, reflection, backtracking, and iteration to develop well-considered thinking process. Please structure your response into two main sections: Thought and Solution using the specified format: Thought section Solution section. In the Thought section, detail your reasoning process in steps. Each step should include detailed considerations such as analysing questions, summarizing relevant findings, brainstorming new ideas, verifying the accuracy of the current steps, refining any errors, and revisiting previous steps. In the Solution section, based on various attempts, explorations, and reflections from the Thought section, systematically present the final solution that you deem correct. The Solution section should be logical, accurate, and concise and detail necessary steps needed to reach the conclusion. <|im_start|>user Solve step by step: If a train travels 120 miles in 2 hours, what is its average speed?<|im_end|> <|im_start|>assistant ================================================== ``` Compare Base vs Instruct Model Responses
In this section, we run the same prompt through the base and instruct variants to observe formatting differences and how the chat template impacts generation quality and style.
### Test the same prompt on both models
test_prompt = "Explain quantum computing in simple terms."

### Prepare the prompt for base model (no chat template)
base_inputs = base_tokenizer(test_prompt, return_tensors="pt").to(device)

### Prepare the prompt for instruct model (with chat template)
instruct_messages = [{"role": "user", "content": test_prompt}]
instruct_formatted = instruct_tokenizer.apply_chat_template(
    instruct_messages,
    tokenize=False,
    add_generation_prompt=True
)
instruct_inputs = instruct_tokenizer(instruct_formatted, return_tensors="pt").to(device)

### Generate responses
print("=== Model comparison ===\n")

print("🤖 BASE MODEL RESPONSE:")
with torch.no_grad():
    base_outputs = base_model.generate(
        **base_inputs,
        max_new_tokens=150,
        temperature=0.7,
        do_sample=True,
        pad_token_id=base_tokenizer.eos_token_id
    )
    base_response = base_tokenizer.decode(base_outputs[0], skip_special_tokens=True)
    print(base_response[len(test_prompt):])  ### Show only the generated part

print("\n" + "="*50)
print("Instruct model response:")
with torch.no_grad():
    instruct_outputs = instruct_model.generate(
        **instruct_inputs,
        max_new_tokens=150,
        temperature=0.7,
        do_sample=True,
        pad_token_id=instruct_tokenizer.eos_token_id
    )
    instruct_response = instruct_tokenizer.decode(instruct_outputs[0], skip_special_tokens=True)
    ### Extract only the assistant's response
    assistant_start = instruct_response.find("<|im_start|>assistant\n") + len("<|im_start|>assistant\n")
    assistant_response = instruct_response[assistant_start:].split("<|im_end|>")[0]
    print(assistant_response)
If we dive into the out put below, we can see the differences between the base model and the instruct model. In short, the base model continues the string, while the instruct model uses the chat template. For example, the base model starts with " What are the differences between the classical bit and the quantum bit?", while the instruct model starts by answering the question: "Quantum computing is a type of computing that uses quantum bits".
Output
```python output === Model comparison === 🤖 BASE MODEL RESPONSE: Why is it thought to be superior to our current technology? How is it superior? What is it's limit? Quantum computing is based on the fact that in quantum mechanics, a particle can be in multiple states at the same time. This is called superposition. But a single particle can not be in multiple locations at the same time. That is called entanglement. So, how can you have a particle in multiple locations at the same time? Quantum mechanics says that if you measure the location of a particle, it will randomly jump to a particular location. So, if you have 1000 particles, you can have each particle in 1000 different locations at the same time. This is very useful for solving problems. For example ================================================== Instruct model response: nowledge Cutoff Date: June 2025 Today Date: 03 September 2025 Reasoning Mode: /no_think #### Custom Instructions You are a helpful AI assistant named SmolLM, trained by Hugging Face. user Explain quantum computing in simple terms. assistant Quantum computing is a type of computing that uses quantum bits, or qubits, to perform calculations. In traditional computers, we use bits, which can be either 0 or 1. But in quantum computing, we use qubits that can exist in multiple states at once, like both 0 and 1 simultaneously. Think of it like flipping a coin. A regular coin can land on either heads or tails, but a quantum coin can land on both heads and tails at the same time. This property is called superposition. Another unique aspect of quantum computing is entanglement. Imagine two coins that are linked together. If one coin lands on heads, the other coin will always land on tails, no matter how far apart they are ``` Test Dual-Mode Reasoning
Here we probe SmolLM3’s reasoning mode with math and proportionality problems, keeping temperature low for consistency and extracting only the assistant’s response from the chat-formatted output.
### Test SmolLM3's reasoning capabilities
reasoning_prompts = [
    "What is 15 × 24? Show your work.",
    "A recipe calls for 2 cups of flour for 12 cookies. How much flour is needed for 30 cookies?",
    "If I have $50 and spend $18.75 on lunch and $12.30 on a book, how much money do I have left?"
]

print("=== TESTING REASONING CAPABILITIES ===\n")

for i, prompt in enumerate(reasoning_prompts, 1):
    print(f"Problem {i}: {prompt}")

    messages = [{"role": "user", "content": prompt}]
    formatted_prompt = instruct_tokenizer.apply_chat_template(
        messages, tokenize=False, add_generation_prompt=True
    )
    inputs = instruct_tokenizer(formatted_prompt, return_tensors="pt").to(device)

    with torch.no_grad():
        outputs = instruct_model.generate(
            **inputs,
            max_new_tokens=200,
            temperature=0.3,  ### Lower temperature for more consistent reasoning
            do_sample=True,
            pad_token_id=instruct_tokenizer.eos_token_id
        )
        response = instruct_tokenizer.decode(outputs[0], skip_special_tokens=True)
        assistant_start = response.find("<|im_start|>assistant\n") + len("<|im_start|>assistant\n")
        assistant_response = response[assistant_start:].split("<|im_end|>")[0]
        print(f"Answer: {assistant_response}")

    print("\n" + "-"*50 + "\n")
If we dive into the out put below, we can see that the instruct model’s hybrid reasoning being applied with the /no_think mode. When the mode is activated, the model will enclose thinking process in <think> tags. It uses these tokens to explore possible solutions and answer the question. After the thinking process, the model will provide the final answer, which we can extract with the chat template, or string manipulation here.
Output
```python output === TESTING REASONING CAPABILITIES === Thinking prompt: /no_think Problem 1: What is 15 × 24? Show your work. Answer: nowledge Cutoff Date: June 2025 Today Date: 03 September 2025 Reasoning Mode: /no_think #### Custom Instructions You are a helpful AI assistant named SmolLM, trained by Hugging Face. user What is 15 × 24? Show your work. assistant To find the product of 15 and 24, we can use the standard multiplication algorithm. Here's how we can do it step by step: First, we multiply 15 by 4 (the units digit of 24): 60 (15 × 4) Next, we multiply 15 by 20 (the tens digit of 24, shifted one place to the left): 300 (15 × 20) Now, we add the two partial products: 360 So, 15 × 24 = 360. -------------------------------------------------- Problem 2: A recipe calls for 2 cups of flour for 12 cookies. How much flour is needed for 30 cookies? Answer: nowledge Cutoff Date: June 2025 Today Date: 03 September 2025 Reasoning Mode: /no_think #### Custom Instructions You are a helpful AI assistant named SmolLM, trained by Hugging Face. user A recipe calls for 2 cups of flour for 12 cookies. How much flour is needed for 30 cookies? assistant To solve this problem, we need to determine the amount of flour needed per cookie and then multiply that by the number of cookies we want to make. First, let's find out how much flour is needed per cookie. The recipe calls for 2 cups of flour for 12 cookies. To find the amount of flour per cookie, we divide the total amount of flour by the number of cookies: 2 cups / 12 cookies = 1/6 cup per cookie Now that we know how much flour is needed per cookie, we can multiply that by the number of cookies we want to make (30): 1/6 cup per cookie * 30 cookies = 5 cups So, to make 30 cookies, you would need 5 cups of flour. -------------------------------------------------- Problem 3: If I have $50 and spend $18.75 on lunch and $12.30 on a book, how much money do I have left? Answer: nowledge Cutoff Date: June 2025 Today Date: 03 September 2025 Reasoning Mode: /no_think #### Custom Instructions You are a helpful AI assistant named SmolLM, trained by Hugging Face. user If I have $50 and spend $18.75 on lunch and $12.30 on a book, how much money do I have left? assistant To find out how much money you have left, you need to subtract the total amount spent from your initial amount. First, calculate the total amount spent on lunch and the book: $18.75 (lunch) + $12.30 (book) = $31.05 Now, subtract the total amount spent from your initial amount: $50 (initial amount) - $31.05 (total spent) = $18.95 So, you have $18.95 left. -------------------------------------------------- Thinking prompt: /think Problem 1: What is 15 × 24? Show your work. Answer: nowledge Cutoff Date: June 2025 Today Date: 03 September 2025 Reasoning Mode: /think #### Custom Instructions You are a helpful AI assistant named SmolLM, trained by Hugging Face. Your role as an assistant involves thoroughly exploring questions through a systematic thinking process before providing the final precise and accurate solutions. This requires engaging in a comprehensive cycle of analysis, summarizing, exploration, reassessment, reflection, backtracking, and iteration to develop well-considered thinking process. Please structure your response into two main sections: Thought and Solution using the specified format: Thought section Solution section. In the Thought section, detail your reasoning process in steps. Each step should include detailed considerations such as analysing questions, summarizing relevant findings, brainstorming new ideas, verifying the accuracy of the current steps, refining any errors, and revisiting previous steps. In the Solution section, based on various attempts, explorations, and reflections from the Thought section, systematically present the final solution that you deem correct. The Solution section should be logical, accurate, and concise and detail necessary steps needed to reach the conclusion. user What is 15 × 24? Show your work. assistant Okay, let's see. I need to calculate 15 multiplied by 24. Hmm, how do I do that? I remember there are a few methods. Maybe the standard multiplication algorithm? Or maybe breaking it down into smaller parts. Let me try both ways to make sure I get the right answer. First, the standard way. Let me write it out like I'm doing long multiplication. So, 15 times 24. I can think of 24 as 20 + 4. So maybe I can break it down into 15 times 20 plus 15 times 4. That might be easier. Starting with 15 times 20. Well, 15 times 2 is 30, so adding a zero at the end makes it 300. So 15 × 20 = 300. Got that part. Now, 15 times 4. Let me calculate that. 15 times 4 is 60. Right? Because 10 -------------------------------------------------- Problem 2: A recipe calls for 2 cups of flour for 12 cookies. How much flour is needed for 30 cookies? Answer: nowledge Cutoff Date: June 2025 Today Date: 03 September 2025 Reasoning Mode: /think #### Custom Instructions You are a helpful AI assistant named SmolLM, trained by Hugging Face. Your role as an assistant involves thoroughly exploring questions through a systematic thinking process before providing the final precise and accurate solutions. This requires engaging in a comprehensive cycle of analysis, summarizing, exploration, reassessment, reflection, backtracking, and iteration to develop well-considered thinking process. Please structure your response into two main sections: Thought and Solution using the specified format: Thought section Solution section. In the Thought section, detail your reasoning process in steps. Each step should include detailed considerations such as analysing questions, summarizing relevant findings, brainstorming new ideas, verifying the accuracy of the current steps, refining any errors, and revisiting previous steps. In the Solution section, based on various attempts, explorations, and reflections from the Thought section, systematically present the final solution that you deem correct. The Solution section should be logical, accurate, and concise and detail necessary steps needed to reach the conclusion. user A recipe calls for 2 cups of flour for 12 cookies. How much flour is needed for 30 cookies? assistant Okay, so I need to figure out how much flour is needed for 30 cookies if the recipe calls for 2 cups of flour for 12 cookies. Hmm, let's see. I think this is a proportion problem. If 12 cookies require 2 cups, then I need to find out how much flour is needed for 30 cookies. First, maybe I should determine how much flour is needed per cookie. If 12 cookies take 2 cups, then per cookie it would be 2 divided by 12. Let me write that down: 2 cups / 12 cookies. That simplifies to 1/6 cup per cookie. Wait, 2 divided by 12 is 1/6? Let me check that again. 2 divided by 12 is indeed 1/6. Yeah, because 12 divided by 6 is 2, so 2 divided by 12 is 1/6. So each cookie needs -------------------------------------------------- Problem 3: If I have $50 and spend $18.75 on lunch and $12.30 on a book, how much money do I have left? Answer: nowledge Cutoff Date: June 2025 Today Date: 03 September 2025 Reasoning Mode: /think #### Custom Instructions You are a helpful AI assistant named SmolLM, trained by Hugging Face. Your role as an assistant involves thoroughly exploring questions through a systematic thinking process before providing the final precise and accurate solutions. This requires engaging in a comprehensive cycle of analysis, summarizing, exploration, reassessment, reflection, backtracking, and iteration to develop well-considered thinking process. Please structure your response into two main sections: Thought and Solution using the specified format: Thought section Solution section. In the Thought section, detail your reasoning process in steps. Each step should include detailed considerations such as analysing questions, summarizing relevant findings, brainstorming new ideas, verifying the accuracy of the current steps, refining any errors, and revisiting previous steps. In the Solution section, based on various attempts, explorations, and reflections from the Thought section, systematically present the final solution that you deem correct. The Solution section should be logical, accurate, and concise and detail necessary steps needed to reach the conclusion. user If I have $50 and spend $18.75 on lunch and $12.30 on a book, how much money do I have left? assistant Okay, let's see. The problem is about calculating how much money is left after spending on lunch and a book. I need to start with the initial amount of $50 and then subtract the amounts spent on lunch and the book. First, I should add up the total amount spent. The lunch cost $18.75 and the book cost $12.30. To add these two amounts together, I need to make sure they are in the same units, which they already are since both are in dollars. So, adding $18.75 and $12.30. Let me do that step by step. Starting with the dollars: 18 dollars plus 12 dollars is 30 dollars. Then the cents: 75 cents plus 30 cents is 105 cents. Now, 105 cents is equal to $1.05 because 100 cents make a dollar, so 105 cents is 1 dollar and 5 cents. Therefore, adding the dollars and cents together -------------------------------------------------- ``` </details> ##### Validation Run the code above and verify that you can see: 1. Different chat template formats for various conversation types 2. Clear differences between base model and instruct model responses 3. SmolLM3's reasoning capabilities in action --- #### Exercise 2: Dataset Processing for SFT **Objective**: Learn to process and prepare datasets for supervised fine-tuning using SmolTalk2 and other datasets. ##### Explore the SmolTalk2 Dataset We load the SmolTalk2 SFT split, inspect its structure and a few samples to understand fields (e.g., `messages`) and available subsets before preparing data for training. ```python ### Load and explore the SmolTalk2 dataset print("=== EXPLORING SMOLTALK2 DATASET ===\n") ### Load the SFT subset dataset_dict = load_dataset("HuggingFaceTB/smoltalk2", "SFT") print(f"Total splits: {len(dataset_dict)}") print(f"Available splits: {list(dataset_dict.keys())}") print(f"Number of total rows: {sum([dataset_dict[d].num_rows for d in dataset_dict])}") print(f"Dataset structure: {dataset_dict}") ``` If we dive into the out put below, we can see the structure of the dataset. It has 25 splits, and the total number of rows is 3,383,242. Output
```python output === EXPLORING SMOLTALK2 DATASET === Resolving data files: 100% 124/124 [00:00<00:00, 9963.48it/s] Resolving data files: 100% 113/113 [00:00<00:00, 57.54it/s] Resolving data files: 100% 113/113 [00:00<00:00, 114.07it/s] Loading dataset shards: 100% 105/105 [00:00<00:00, 2570.62it/s] Total splits: 25 Available splits: ['LongAlign_64k_Qwen3_32B_yarn_131k_think', 'OpenThoughts3_1.2M_think', 'aya_dataset_Qwen3_32B_think', 'multi_turn_reasoning_if_think', 's1k_1.1_think', 'smolagents_toolcalling_traces_think', 'smoltalk_everyday_convs_reasoning_Qwen3_32B_think', 'smoltalk_multilingual8_Qwen3_32B_think', 'smoltalk_systemchats_Qwen3_32B_think', 'table_gpt_Qwen3_32B_think', 'LongAlign_64k_context_lang_annotated_lang_6_no_think', 'Mixture_of_Thoughts_science_no_think', 'OpenHermes_2.5_no_think', 'OpenThoughts3_1.2M_no_think_no_think', 'hermes_function_calling_v1_no_think', 'smoltalk_multilingual_8languages_lang_5_no_think', 'smoltalk_smollm3_everyday_conversations_no_think', 'smoltalk_smollm3_explore_instruct_rewriting_no_think', 'smoltalk_smollm3_smol_magpie_ultra_no_think', 'smoltalk_smollm3_smol_rewrite_no_think', 'smoltalk_smollm3_smol_summarize_no_think', 'smoltalk_smollm3_systemchats_30k_no_think', 'table_gpt_no_think', 'tulu_3_sft_personas_instruction_following_no_think', 'xlam_traces_no_think'] Number of total rows: 3383242 Dataset structure: DatasetDict({ LongAlign_64k_Qwen3_32B_yarn_131k_think: Dataset({ features: ['messages', 'chat_template_kwargs', 'source'], num_rows: 7526 }) OpenThoughts3_1.2M_think: Dataset({ features: ['messages', 'chat_template_kwargs', 'source'], num_rows: 1133524 }) aya_dataset_Qwen3_32B_think: Dataset({ features: ['messages', 'chat_template_kwargs', 'source'], num_rows: 15222 }) multi_turn_reasoning_if_think: Dataset({ features: ['messages', 'chat_template_kwargs', 'source'], num_rows: 28217 }) s1k_1.1_think: Dataset({ features: ['messages', 'chat_template_kwargs', 'source'], num_rows: 835 }) smolagents_toolcalling_traces_think: Dataset({ features: ['messages', 'chat_template_kwargs', 'source'], num_rows: 9079 }) smoltalk_everyday_convs_reasoning_Qwen3_32B_think: Dataset({ features: ['messages', 'chat_template_kwargs', 'source'], num_rows: 2057 }) smoltalk_multilingual8_Qwen3_32B_think: Dataset({ features: ['messages', 'chat_template_kwargs', 'source'], num_rows: 244736 }) smoltalk_systemchats_Qwen3_32B_think: Dataset({ features: ['messages', 'chat_template_kwargs', 'source'], num_rows: 27436 }) table_gpt_Qwen3_32B_think: Dataset({ features: ['messages', 'chat_template_kwargs', 'source'], num_rows: 13201 }) LongAlign_64k_context_lang_annotated_lang_6_no_think: Dataset({ features: ['messages', 'chat_template_kwargs', 'source'], num_rows: 6249 }) Mixture_of_Thoughts_science_no_think: Dataset({ features: ['messages', 'chat_template_kwargs', 'source'], num_rows: 86110 }) OpenHermes_2.5_no_think: Dataset({ features: ['messages', 'chat_template_kwargs', 'source'], num_rows: 384900 }) OpenThoughts3_1.2M_no_think_no_think: Dataset({ features: ['messages', 'chat_template_kwargs', 'source'], num_rows: 435193 }) hermes_function_calling_v1_no_think: Dataset({ features: ['messages', 'chat_template_kwargs', 'source'], num_rows: 8961 }) smoltalk_multilingual_8languages_lang_5_no_think: Dataset({ features: ['messages', 'chat_template_kwargs', 'source'], num_rows: 254047 }) smoltalk_smollm3_everyday_conversations_no_think: Dataset({ features: ['messages', 'chat_template_kwargs', 'source'], num_rows: 2260 }) smoltalk_smollm3_explore_instruct_rewriting_no_think: Dataset({ features: ['messages', 'chat_template_kwargs', 'source'], num_rows: 30391 }) smoltalk_smollm3_smol_magpie_ultra_no_think: Dataset({ features: ['messages', 'chat_template_kwargs', 'source'], num_rows: 406843 }) smoltalk_smollm3_smol_rewrite_no_think: Dataset({ features: ['messages', 'chat_template_kwargs', 'source'], num_rows: 53262 }) smoltalk_smollm3_smol_summarize_no_think: Dataset({ features: ['messages', 'chat_template_kwargs', 'source'], num_rows: 96061 }) smoltalk_smollm3_systemchats_30k_no_think: Dataset({ features: ['messages', 'chat_template_kwargs', 'source'], num_rows: 33997 }) table_gpt_no_think: Dataset({ features: ['messages', 'chat_template_kwargs', 'source'], num_rows: 13203 }) tulu_3_sft_personas_instruction_following_no_think: Dataset({ features: ['messages', 'chat_template_kwargs', 'source'], num_rows: 29970 }) xlam_traces_no_think: Dataset({ features: ['messages', 'chat_template_kwargs', 'source'], num_rows: 59962 }) }) ``` ##### Process Different Dataset Types The SmolTalk2 dataset is a collection of open source datasets compiled together for convenience. It contains a mixture of useful post training use cases, like tool use, long context, and more. They are all in chat format, which is easy to use for training. However, not all datasets are shared in consistent format so often we need to process them into a unified chat `messages` layout. For this exercise, we will standardize multiple dataset formats into a unified chat `messages` layout. We define lightweight processors for QA and instruction datasets and walk through a concrete example using GSM8K. ```python ### Function to process different dataset formats def process_qa_dataset(examples, question_col, answer_col): """Process Q&A datasets into chat format""" processed = [] for question, answer in zip(examples[question_col], examples[answer_col]): messages = [ {"role": "user", "content": question}, {"role": "assistant", "content": answer} ] processed.append(messages) return {"messages": processed} def process_instruction_dataset(examples): """Process instruction-following datasets""" processed = [] for instruction, response in zip(examples["instruction"], examples["response"]): messages = [ {"role": "user", "content": instruction}, {"role": "assistant", "content": response} ] processed.append(messages) return {"messages": processed} ### Example: Process GSM8K math dataset print("=== PROCESSING GSM8K DATASET ===\n") gsm8k = load_dataset("openai/gsm8k", "main", split="train[:100]") ### Small subset for demo print(f"Original GSM8K example: {gsm8k[0]}") ### Convert to chat format def process_gsm8k(examples): processed = [] for question, answer in zip(examples["question"], examples["answer"]): messages = [ {"role": "system", "content": "You are a math tutor. Solve problems step by step."}, {"role": "user", "content": question}, {"role": "assistant", "content": answer} ] processed.append(messages) return {"messages": processed} gsm8k_processed = gsm8k.map(process_gsm8k, batched=True, remove_columns=gsm8k.column_names) print(f"Processed example: {gsm8k_processed[0]}") ``` Below we find two samples from the two separate datasets in the same format. Output
```python output === PROCESSING GSM8K DATASET === README.md: 7.94k/? [00:00<00:00, 572kB/s] main/train-00000-of-00001.parquet: 100% 2.31M/2.31M [00:01<00:00, 42.6kB/s] main/test-00000-of-00001.parquet: 100% 419k/419k [00:00<00:00, 813kB/s] Generating train split: 100% 7473/7473 [00:00<00:00, 321312.49 examples/s] Generating test split: 100% 1319/1319 [00:00<00:00, 97120.71 examples/s] Original GSM8K example: {'question': 'Natalia sold clips to 48 of her friends in April, and then she sold half as many clips in May. How many clips did Natalia sell altogether in April and May?', 'answer': 'Natalia sold 48/2 = <<48/2=24>>24 clips in May.\nNatalia sold 48+24 = <<48+24=72>>72 clips altogether in April and May.\n###### 72'} Map: 100% 100/100 [00:00<00:00, 4792.50 examples/s] Processed example: {'messages': [{'content': 'You are a math tutor. Solve problems step by step.', 'role': 'system'}, {'content': 'Natalia sold clips to 48 of her friends in April, and then she sold half as many clips in May. How many clips did Natalia sell altogether in April and May?', 'role': 'user'}, {'content': 'Natalia sold 48/2 = <<48/2=24>>24 clips in May.\nNatalia sold 48+24 = <<48+24=72>>72 clips altogether in April and May.\n###### 72', 'role': 'assistant'}]} ``` ##### Apply Chat Templates to Datasets Once messages are normalized, we apply the model's chat template to convert each example into plain training text (`text` column) suitable for language modeling with SFT. ```python ### Function to apply chat templates to processed datasets def apply_chat_template_to_dataset(dataset, tokenizer): """Apply chat template to dataset for training""" def format_messages(examples): formatted_texts = [] for messages in examples["messages"]: ### Apply chat template formatted_text = tokenizer.apply_chat_template( messages, tokenize=False, add_generation_prompt=False ### We want the complete conversation ) formatted_texts.append(formatted_text) return {"text": formatted_texts} return dataset.map(format_messages, batched=True) ### Apply to our processed GSM8K dataset gsm8k_formatted = apply_chat_template_to_dataset(gsm8k_processed, instruct_tokenizer) print("=== FORMATTED TRAINING DATA ===") print(gsm8k_formatted[0]["text"]) ``` Output
```python output === PROCESSING GSM8K DATASET === README.md: 7.94k/? [00:00<00:00, 572kB/s] main/train-00000-of-00001.parquet: 100% 2.31M/2.31M [00:01<00:00, 42.6kB/s] main/test-00000-of-00001.parquet: 100% 419k/419k [00:00<00:00, 813kB/s] Generating train split: 100% 7473/7473 [00:00<00:00, 321312.49 examples/s] Generating test split: 100% 1319/1319 [00:00<00:00, 97120.71 examples/s] Original GSM8K example: {'question': 'Natalia sold clips to 48 of her friends in April, and then she sold half as many clips in May. How many clips did Natalia sell altogether in April and May?', 'answer': 'Natalia sold 48/2 = <<48/2=24>>24 clips in May.\nNatalia sold 48+24 = <<48+24=72>>72 clips altogether in April and May.\n###### 72'} Map: 100% 100/100 [00:00<00:00, 4792.50 examples/s] Processed example: {'messages': [{'content': 'You are a math tutor. Solve problems step by step.', 'role': 'system'}, {'content': 'Natalia sold clips to 48 of her friends in April, and then she sold half as many clips in May. How many clips did Natalia sell altogether in April and May?', 'role': 'user'}, {'content': 'Natalia sold 48/2 = <<48/2=24>>24 clips in May.\nNatalia sold 48+24 = <<48+24=72>>72 clips altogether in April and May.\n###### 72', 'role': 'assistant'}]} ``` --- #### Exercise 3: Fine-Tuning SmolLM3 with SFTTrainer **Objective**: Perform supervised fine-tuning on SmolLM3 using TRL's SFTTrainer with real datasets. > [!WARNING] > You will need a GPU with at least 8GB VRAM. ##### Step 1: Setup and Model Loading We load the base model and tokenizer, set padding behavior, and move the model to an appropriate device to prepare for fine-tuning. ```python ### Import required libraries for fine-tuning from transformers import AutoModelForCausalLM, AutoTokenizer, TrainingArguments from trl import SFTTrainer, SFTConfig, DataCollatorForCompletionOnlyLM from datasets import load_dataset import torch import wandb ### Optional: for experiment tracking ### Initialize Weights & Biases (optional) ### wandb.init(project="smollm3-finetuning") ### Load SmolLM3 base model for fine-tuning model_name = "HuggingFaceTB/SmolLM3-3B-Base" new_model_name = "SmolLM3-Custom-SFT" print(f"Loading {model_name}...") model = AutoModelForCausalLM.from_pretrained( model_name, dtype=torch.bfloat16, device_map="auto", trust_remote_code=True ) tokenizer = AutoTokenizer.from_pretrained(model_name) tokenizer.pad_token = tokenizer.eos_token ### Set padding token tokenizer.padding_side = "right" ### Padding on the right for generation print(f"Model loaded! Parameters: {model.num_parameters():,}") ``` ```python output Loading HuggingFaceTB/SmolLM3-3B-Base... Model loaded! Parameters: 3,075,098,624 ``` ##### Dataset Preparation Here we select a manageable subset for speed, then map each example to a single `text` string by applying the chat template—this is the field the trainer will read. ```python ### Load and prepare training dataset print("=== PREPARING DATASET ===\n") ### Option 1: Use SmolTalk2 (recommended for beginners) dataset = load_dataset("HuggingFaceTB/smoltalk2", "SFT") train_dataset = dataset["smoltalk_everyday_convs_reasoning_Qwen3_32B_think"].select(range(1000)) ### Use subset for faster training ### Option 2: Use your own processed dataset from Exercise 2 ### train_dataset = gsm8k_formatted.select(range(500)) print(f"Training examples: {len(train_dataset)}") print(f"Example: {train_dataset[0]}") ### Prepare the dataset for SFT def format_chat_template(example): """Format the messages using the chat template""" if "messages" in example: ### SmolTalk2 format messages = example["messages"] else: ### Custom format - adapt as needed messages = [ {"role": "user", "content": example["instruction"]}, {"role": "assistant", "content": example["response"]} ] ### Apply chat template text = instruct_tokenizer.apply_chat_template( messages, tokenize=False, add_generation_prompt=False ) return {"text": text} ### Apply formatting formatted_dataset = train_dataset.map(format_chat_template) formatted_dataset = formatted_dataset.remove_columns( [col for col in formatted_dataset.column_names if col != "text"] ) print(f"Formatted example: {formatted_dataset[0]['text'][:200]}...") ``` Output
```python output === PREPARING DATASET === Training examples: 1000 Example: {'messages': [{'content': 'Solve the problem step by step.', 'role': 'system'}, {'content': 'Natalia sold clips to 48 of her friends in April, and then she sold half as many clips in May. How many clips did Natalia sell altogether in April and May?', 'role': 'user'}]} Formatted example: You are a math tutor. Solve problems step by step. Natalia sold clips to 48 of her friends in April, and then she sold half as many clips in May. How many clips did Natalia sell altogether in April and May?... ``` ##### Training Configuration We configure key knobs for SFT (batch size, sequence length, learning rate, logging/saving cadence) and enable optional tracking and Hub integration. ```python ### Configure training parameters training_config = SFTConfig( ### Model and data output_dir=f"./{new_model_name}", dataset_text_field="text", max_length=2048, ### Training hyperparameters per_device_train_batch_size=2, ### Adjust based on your GPU memory gradient_accumulation_steps=2, learning_rate=5e-5, num_train_epochs=1, ### Start with 1 epoch max_steps=500, ### Limit steps for demo ### Optimization warmup_steps=50, weight_decay=0.01, optim="adamw_torch", ### Logging and saving logging_steps=10, save_steps=100, eval_steps=100, save_total_limit=2, ### Memory optimization dataloader_num_workers=0, group_by_length=True, ### Group similar length sequences ### Hugging Face Hub integration push_to_hub=False, ### Set to True to upload to Hub hub_model_id=f"your-username/{new_model_name}", ### Experiment tracking report_to=["trackio"], ### Use trackio for experiment tracking run_name=f"{new_model_name}-training", ) print("Training configuration set!") print(f"Effective batch size: {training_config.per_device_train_batch_size * training_config.gradient_accumulation_steps}") ``` ```python output Training configuration set! Effective batch size: 4 ``` ##### Optional: Train with LoRA/PEFT (memory-efficient) If you have limited GPU memory or want faster iterations, use LoRA via PEFT. This trains only small adapter weights while keeping the base model frozen, then you can either keep using adapters or merge them later for deployment. ```python ### LoRA configuration with PEFT from peft import LoraConfig peft_config = LoraConfig( r=8, lora_alpha=16, lora_dropout=0.05, bias="none", task_type="CAUSAL_LM", ) ### Create SFTTrainer with LoRA enabled from trl import SFTTrainer lora_trainer = SFTTrainer( model=model, train_dataset=formatted_dataset, ### dataset with a "text" field or messages + dataset_text_field in config args=training_config, peft_config=peft_config, ### << enable LoRA ) print("Starting LoRA training…") lora_trainer.train() ``` ##### Step 4: Initialize SFTTrainer and Train We instantiate the trainer, capture a pre-training baseline generation, launch `train()`, and save the resulting checkpoints to the configured output directory. ```python trainer = SFTTrainer( model=model, train_dataset=formatted_dataset, args=config, ) ``` And we can train the model. ```python trainer.train() ``` ##### Test the Fine-Tuned Model Finally, we regenerate the same prompt to qualitatively compare outputs before vs after training, and optionally push the model to the Hub for sharing. ```python ### Test the fine-tuned model print("=== AFTER TRAINING ===") with torch.no_grad(): outputs = model.generate( **inputs, max_new_tokens=100, temperature=0.7, do_sample=True, pad_token_id=tokenizer.eos_token_id ) response = tokenizer.decode(outputs[0], skip_special_tokens=True) print(response[len(formatted_prompt):]) ### Optional: Push to Hugging Face Hub if training_config.push_to_hub: trainer.push_to_hub( commit_message="Fine-tuned SmolLM3 with custom dataset", tags=["smol-course", "sft", "instruction-tuning"] ) print(f"Model pushed to Hub: {training_config.hub_model_id}") ``` --- #### Exercise 4: Production Workflow with TRL CLI In the previous exercises we've dived deep into using TRL's Python API for fine-tuning and explored the data we're using and generating. In this exercise we'll explore using the TRL CLI to fine-tune a model. This will be the most common way to fine-tune a model in production. We can define a command in TRL CLI to fine-tune a model. We'll be able to run it with `trl sft` command. The CLI command and Python API share the same configuration options. We preprocessed the `smoltalk_everyday_convs_reasoning_Qwen3_32B_think` subset of SmolTalk2 so that is easier to work with it when using the TRL CLI. ```bash ### Fine-tune SmolLM3 using TRL CLI trl sft \ --model_name_or_path HuggingFaceTB/SmolLM3-3B-Base \ --dataset_name HuggingFaceTB/smoltalk2_everyday_convs_think \ --output_dir ./smollm3-sft-cli \ --per_device_train_batch_size 4 \ --gradient_accumulation_steps 2 \ --learning_rate 5e-5 \ --num_train_epochs 1 \ --max_length 2048 \ --logging_steps 10 \ --save_steps 500 \ --warmup_steps 100 \ --bf16 True \ --push_to_hub \ --hub_model_id your-username/smollm3-sft-cli ``` For convenience and reproducibility, we can also create a configuration file to fine-tune a model. For example, we could create a file called `sft_config.yaml` and put the following content in it: ```yaml ### Model and dataset model_name_or_path: HuggingFaceTB/SmolLM3-3B-Base dataset_name: HuggingFaceTB/smoltalk2_everyday_convs_think output_dir: ./smollm3-advanced-sft ### Training hyperparameters per_device_train_batch_size: 2 gradient_accumulation_steps: 4 learning_rate: 3e-5 num_train_epochs: 2 max_length: 4096 ### Optimization warmup_steps: 200 weight_decay: 0.01 optim: adamw_torch lr_scheduler_type: cosine ### Memory and performance bf16: true dataloader_num_workers: 4 group_by_length: true remove_unused_columns: false ### Logging and evaluation logging_steps: 25 eval_steps: 250 save_steps: 500 eval_strategy: steps load_best_model_at_end: true metric_for_best_model: eval_loss ### Hub integration push_to_hub: true hub_model_id: your-username/smollm3-advanced hub_strategy: every_save ``` We could then commit this file to the repository and track it with Git. ```bash ### Run training with config file trl sft --config sft_config.yaml ``` ##### Troubleshooting **If you get GPU out of memory errors:** - Reduce `per_device_train_batch_size` to 1 - Reduce `max_length` to 1024 or 512 - Use `torch.cuda.empty_cache()` to clear GPU memory **If models fail to load:** - Check your internet connection - Try using `device_map="cpu"` for CPU loading - Use a smaller model like `HuggingFaceTB/SmolLM3-1.7B` for testing **If training fails:** - Make sure your dataset is properly formatted - Check that all examples have reasonable length (not too long) - Monitor the training loss - it should decrease steadily #### Conclusion Congratulations! You've completed comprehensive hands-on exercises covering: - SmolLM3's chat template system and dual-mode reasoning - Dataset processing and preparation techniques - Supervised fine-tuning with Python APIs - Production workflows using CLI tools - Distributed training setups These skills form the foundation for building sophisticated instruction-tuned models. In the next modules, we'll explore preference alignment, parameter-efficient fine-tuning, and advanced evaluation techniques. #### Resources for Further Learning - [TRL Documentation](https://huggingface.co/docs/trl) - Complete reference - [SmolLM3 Model Card](https://huggingface.co/HuggingFaceTB/SmolLM3-3B) - Model details - [SmolTalk2 Dataset](https://huggingface.co/datasets/HuggingFaceTB/smoltalk2) - Training data - [Hugging Face Hub](https://huggingface.co/models) - Share your models - [Discord Community](https://discord.gg/UrrTSsSyjb) - Get help and discuss ### Training with Hugging Face Jobs **Hugging Face Jobs** provides fully managed cloud infrastructure for training models without the hassle of setting up GPUs, managing dependencies, or configuring environments locally. This is particularly valuable for SFT training, which can be resource-intensive and time-consuming. #### Why Use Jobs for SFT Training? - **Scalable Infrastructure**: Access to high-end GPUs (A100, L4, etc.) without hardware investment - **Zero Setup**: No need to manage CUDA drivers, Docker containers, or environment configurations - **Cost Effective**: Pay only for compute time used, with automatic shutdown after completion - **Integrated Workflow**: Seamless integration with Hugging Face Hub for model storage and sharing - **Monitoring**: Built-in logging and progress tracking through the Hub interface #### Requirements To use Hugging Face Jobs, you need: - A **Pro, Team, or Enterprise** Hugging Face plan which you can get [here](https://huggingface.co/pricing) - Authentication via `hf auth login` #### Running SFT with Jobs: Two Approaches The best way to run TRL with HF jobs is using the built-in scripts. They take advantage of `uv` to manage dependencies and `hf jobs` to run the training job. This guide will walk you through using TRL's built-in scripts to train a model with Hugging Face Jobs. If you want to use a custom script, you can implement `uv` dependencies and run the script with `hf jobs run`. Create a custom training script with inline dependencies
```python ### sft_training.py ### /// script ### dependencies = [ ### "trl[sft]>=0.7.0", ### "transformers>=4.36.0", ### "datasets>=2.14.0", ### "accelerate>=0.24.0", ### "peft>=0.7.0" ### ] ### /// from trl import SFTTrainer, SFTConfig from transformers import AutoModelForCausalLM, AutoTokenizer from datasets import load_dataset ### Load model and tokenizer model = AutoModelForCausalLM.from_pretrained("HuggingFaceTB/SmolLM3-3B-Base") tokenizer = AutoTokenizer.from_pretrained("HuggingFaceTB/SmolLM3-3B-Base") ### Load dataset dataset = load_dataset("HuggingFaceTB/smoltalk2", "SFT") ### Configure training config = SFTConfig( output_dir="./smollm3-jobs-sft", per_device_train_batch_size=4, learning_rate=5e-5, max_steps=1000, logging_steps=50, save_steps=200, push_to_hub=True, hub_model_id="your-username/smollm3-jobs-sft" ) ### Train trainer = SFTTrainer( model=model, train_dataset=dataset["smoltalk_everyday_convs_reasoning_Qwen3_32B_think"], args=config, ) trainer.train() ``` Then run with the Jobs CLI: ```bash ### Run the UV script on Jobs hf jobs uv run \ --flavor a10g-large \ --timeout 2h \ --secrets HF_TOKEN \ sft_training.py ``` #### Hardware Selection for SFT Choose the right hardware flavor based on your model size and training requirements: **For SmolLM3-3B (Recommended)**: - `a10g-large`: 24GB GPU memory, cost-effective for most SFT tasks - `a100-large`: 40GB GPU memory, fastest training with larger batch sizes - `l4x1`: 24GB GPU memory, multi-GPU setup for distributed training **For Larger Models (7B+)**: - `a100-large`: Required for 7B+ models - `l4x4`: Multi-GPU setup for distributed training **Budget Options**: - `t4-small`: 16GB GPU memory, slower but economical for experimentation - `l4x1`: 24GB GPU memory, good balance of cost and performance > [!TIP] > For a detailed comparison of the different hardware flavors, you can check out the [Pricing Page](https://huggingface.co/pricing) page. #### Advanced Jobs Configuration ```bash ### Use TRL's maintained SFT script directly hf jobs uv run \ --flavor a10g-large \ --timeout 2h \ --secrets HF_TOKEN \ "https://raw.githubusercontent.com/huggingface/trl/main/trl/scripts/sft.py" \ --model_name_or_path HuggingFaceTB/SmolLM3-3B-Base \ --dataset_name HuggingFaceTB/smoltalk2_everyday_convs_think \ --learning_rate 5e-5 \ --per_device_train_batch_size 4 \ --max_steps 1000 \ --output_dir smollm3-sft-jobs \ --push_to_hub \ --hub_model_id your-username/smollm3-sft \ --report_to trackio ``` **Environment Variables and Secrets**: If you're working with a custom script, you can use the `--secrets` flag to pass in environment variables. ```bash hf jobs uv run \ --flavor a10g-large \ --timeout 3h \ --secrets HF_TOKEN=your_token \ --secrets WANDB_API_KEY=your_wandb_key \ --env WANDB_PROJECT=smollm3-sft \ --env CUDA_VISIBLE_DEVICES=0 \ my_sft_training.py ``` #### Monitoring Your Training Job To check you training job, you can use the `hf jobs` command or you can go to [Job Settings](https://huggingface.co/settings/jobs) on the Hub. **Check Job Status**: ```bash ### List all jobs hf jobs ps -a ### Get detailed job information hf jobs inspect ### Stream job logs in real-time hf jobs logs --follow ### Cancel a running job if needed hf jobs cancel ``` #### LoRA/PEFT on Jobs (optional) Enable LoRA when using TRL’s maintained SFT script by passing PEFT flags. See the script for authoritative flags and defaults: `https://github.com/huggingface/trl/blob/main/trl/scripts/sft.py`. ```bash hf jobs uv run \ --flavor a10g-large \ --timeout 2h \ --secrets HF_TOKEN \ "https://raw.githubusercontent.com/huggingface/trl/main/trl/scripts/sft.py" \ --model_name_or_path HuggingFaceTB/SmolLM3-3B-Base \ --dataset_name HuggingFaceTB/smoltalk2_everyday_convs_think \ --output_dir smollm3-lora-sft-jobs \ --per_device_train_batch_size 4 \ --learning_rate 5e-5 \ --max_steps 1000 \ --report_to trackio \ --push_to_hub \ --hub_model_id your-username/smollm3-lora-sft \ --use_peft \ --lora_r 8 \ --lora_alpha 16 \ --lora_dropout 0.05 \ --lora_target_modules all-linear ``` Notes: - Confirm flag names in the TRL SFT script before running: `https://github.com/huggingface/trl/blob/main/trl/scripts/sft.py`. - LoRA trains small adapters, which you can keep separate or merge later for deployment. #### Monitoring with Trackio You can monitor your training job with Trackio.  #### Cost Estimation Approximate costs for SmolLM3-3B SFT training (1000 steps): - l4x1: ~$3-4 per hour (24GB GPU memory) - a10g-large: ~$4-6 per hour (24GB GPU memory) - a100-large: ~$8-12 per hour (40GB GPU memory) Training typically takes 30-90 minutes for 1000 steps depending on hardware and configuration, making Jobs cost-effective compared to local GPU rental or cloud instances. **Cost-Saving Tips**: - Use smaller batch sizes with gradient accumulation to fit on cheaper GPUs - Start with shorter training runs (500 steps) to validate your setup - Use `l4x1` for initial experiments, then scale to faster GPUs for production - Set appropriate timeouts to avoid unexpected charges #### Troubleshooting Common Issues **Out of Memory Errors**: - Reduce `per_device_train_batch_size` - Enable gradient checkpointing - Use smaller `max_length` **Timeout Issues**: - Increase timeout parameter - Reduce training steps or use more powerful hardware - Optimize data loading and preprocessing **Authentication Errors**: - Ensure HF_TOKEN is correctly set as a secret - Verify your Hugging Face account has the required plan - Check token permissions for model uploads #### Resources and Further Reading - [Hugging Face Jobs Documentation](https://huggingface.co/docs/huggingface_hub/guides/jobs) - Complete Jobs guide - [TRL Jobs Training Guide](https://huggingface.co/docs/trl/main/en/jobs_training) - TRL-specific Jobs examples - [Jobs Pricing](https://huggingface.co/pricing) - Current pricing for different hardware flavors - [Jobs CLI Reference](https://huggingface.co/docs/huggingface_hub/guides/cli#hf-jobs) - Command-line interface details ### Submit your final project! It's time to submit your project! This year the smol course will use a leaderboard based submission. Here's the plan: 1. Read the written guide for the chapter ✅ 2. Train a model using what you learned in the chapter. 3. Push the model to the Hugging Face Hub. 4. Evaluate the model using `hf jobs`. 5. Open a pull request on the leaderboard. On this page we will go through each step. #### 1. Read the written guide for the chapter and 2. Train a model using what you learned in the chapter. For chapter 1's submission, you should read all the materials in the chapter and train a model using what you learned. Most of the training code is in the page on [Supervised Fine-Tuning](./3), but you'll need to combine this with the code on [Chat Templates](./2) and the code on [Training with Hugging Face Jobs](./5). #### 3. Push the model to the Hugging Face Hub Once you've trained a model, you'll need to push it to a repo on the Hugging Face Hub. In fact, TRL will take care of this for you if you add the `--push_to_hub` flag to your training command. So let's say you trained a model using `hf jobs`, then this parameter will look like this: ```bash hf jobs uv run \ --flavor a100-large \ --secrets HF_TOKEN \ "trl/scripts/sft.py" \ ... --push_to_hub ### this will push the model to the Hugging Face Hub ``` Your trained model will be available at `your-username/your-model-name`. For detailed documentation, check out the [checkpoints documentation](https://huggingface.co/docs/transformers/trainer#checkpoints) from `transformers`. #### 4. Evaluate the model using `hf jobs` Now, we will need to evaluate the model. We will use `hf jobs` to evaluate the model as well and combine it with `openbench`. We will push the evaluation results to a dataset on the hub. ```sh hf jobs uv run \ ### run a hf jobs job with uv --flavor a10g-large \ ### select the machine size --with "lighteval[vllm]" \ ### install lighteval with vllm dependencies s HF_TOKEN \ ### share the huggingface write token lighteval vllm "model_name=/" "lighteval|gsm8k|0|0" --push-to-hub --results-org ``` This command will evaluate the model using `lighteval` and `vllm` and save the results to the Hugging Face Hub in the dataset repo that you defined. > [!TIP] > We have not explored evaluation in this course yet, but in chapter 2 we will explore evaluation in more detail. For now, we're focusing on training and submitting your model. #### 5. Open a pull request on the leaderboard space You are now ready to submit your model to the leaderboard! You need to do two things: 1. add your model's results to `submissions.json` 2. share you evaluation command (using `hf jobs`) in the PR text. ##### Add your model's results to `submissions.json` Open a pull request on the [leaderboard space](https://huggingface.co/spaces/smol-course/leaderboard/edit/main/submissions.json) to submit your model. You just need to model info and reference to the dataset you created in the previous step. We will pull the results and display them on the leaderboard. ```json { "submissions": [ ... ### existing submissions { "username": "", "model_name": "", "chapter": "1", "submission_date": "", "results-dataset": "" } ] } ``` ##### Share you evaluation command in the PR text. Within the PR text, share you evaluation command. For example: ``` hf jobs uv run ... ``` This will help us to reproduce your model evaluation before we add it to the leaderboard. ##### Wait for the PR to be merged Once the PR is merged, your model will be added to the leaderboard! You can check the leaderboard [here](https://huggingface.co/spaces/smol-course/leaderboard). #### Test your knowledge You’ve completed the unit — great work! Now put your learning to the test by taking the [quiz](https://huggingface.co/spaces/smol-course/unit_1_quiz). ## 2. Preference Alignment ### Introduction to Preference Alignment with SmolLM3 Welcome to Unit 3 of the smollest course on fine-tuning! This module will guide you through preference alignment using **SmolLM3**, building on the instruction tuning foundation from Unit 1. You'll learn how to align language models with human preferences using Direct Preference Optimization (DPO) to create more helpful, harmless, and honest AI assistants. > [!TIP] > By the end of this unit you will be aligning an LLM with human preferences using Direct Preference Optimization (DPO). This course is smol but fast! If you're looking for a smoother gradient, check out the [The LLM Course](https://huggingface.co/learn/llm-course/chapter1/1). > > After completing this unit (and the assignment), don’t forget to test your knowledge with the [quiz](https://huggingface.co/spaces/smol-course/unit_3_quiz)! #### What is Preference Alignment? While supervised fine-tuning (SFT) teaches models to follow instructions and engage in conversations, preference alignment takes this further by training models to generate responses that match human preferences. It's the process of making AI systems more aligned with what humans actually want, rather than just following instructions literally. In simple terms, it makes language models better for applications in the real world. Preference alignment addresses several key challenges in AI development. Models trained with preference alignment demonstrate improved behavior across multiple areas. They generate fewer harmful, biased, or inappropriate responses, and their outputs become more useful and relevant to actual human needs. Such models provide more truthful answers while reducing hallucinations, and their responses better reflect human values and ethics. Overall, preference-aligned models exhibit enhanced coherence, relevance, and response quality. > [!TIP] > For a deeper dive into alignment techniques, check out the [Direct Preference Optimization paper](https://huggingface.co/papers/2305.18290) which is the original paper that introduced DPO. #### Direct Preference Optimization (DPO) DPO revolutionizes preference alignment by eliminating the need for separate reward models and complex reinforcement learning. In this unit, we'll explore this leading technique for aligning language models with human preferences. The DPO alignment pipeline is much simpler than the Reinforcement Learning from Human Feedback (RLHF) alignment pipeline. The process involves two main stages: 1. Adapt the base model to follow instructions through supervised fine-tuning. 2. Directly optimize the model using preference data through Direct Preference Optimization. This streamlined approach allows training on preference data without a separate reward model or complex reinforcement learning, while achieving comparable or better results. Don't worry if this is your first time seeing RLHF, we'll review it in more detail later in the course and see how it compares to DPO. For exercises in this unit, we will use [SmolLM3](https://hf.co/blog/smollm3) for preference alignment once again. We could use either the instruction tuned model or the result of the unit 1 exercise. #### What You'll Build Throughout this unit, you'll develop practical skills in preference alignment through hands-on implementation. You'll learn to train SmolLM3 using DPO on preference datasets. - You'll master DPO hyperparameter configuration and tuning techniques. - You'll compare DPO results with baseline instruction-tuned models. - You'll evaluate model safety and alignment quality using standard benchmarks. - You'll submit your aligned model to the course leaderboard. - Finally, you'll explore how to deploy aligned models for practical applications. Ready to make your models more aligned with human preferences using DPO? Let's begin! ### Direct Preference Optimization (DPO) Direct Preference Optimization (DPO) revolutionizes preference alignment by providing a simpler, more stable alternative to Reinforcement Learning from Human Feedback (RLHF). Instead of training separate reward models and using complex reinforcement learning algorithms, DPO directly optimizes language models using human preference data. #### Understanding DPO 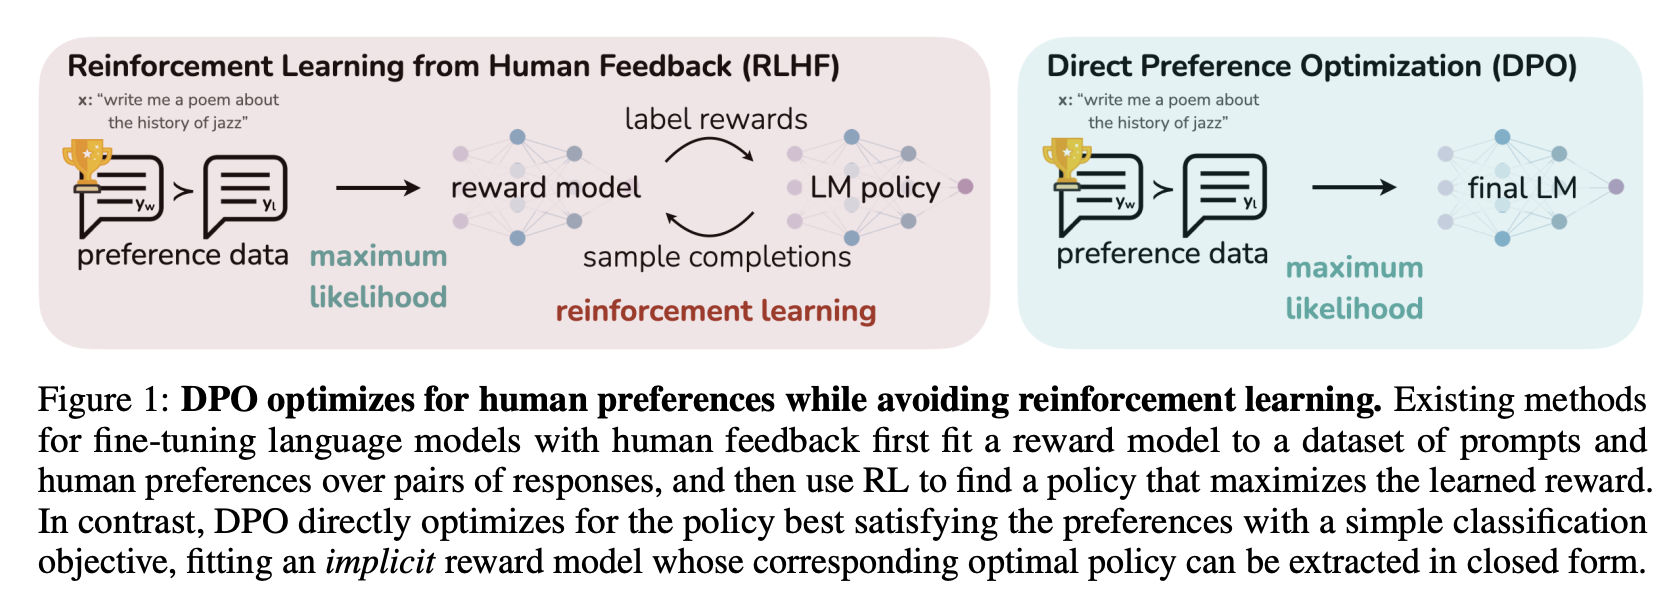 Traditional RLHF approaches require multiple components and training stages. As the diagram shows, it involves: - Training a reward model to predict human preferences based on preferred and rejected responses. - Using reinforcement learning algorithms like PPO to optimize the policy against the reward model. DPO simplifies this process dramatically by skipping the reward model and using a binary cross-entropy loss to directly optimize the language model. - First, training a SFT model to follow instructions. - Then, training a DPO model to directly optimize the language model using preference data itself. > [!TIP] > DPO has proven so effective that it's been used to train production models like Meta's Llama series and many other state-of-the-art language models. #### How DPO Works DPO recasts preference alignment as a classification problem. Given a prompt and two responses (one preferred, one rejected), DPO trains the model to increase the likelihood of the preferred response while decreasing the likelihood of the rejected response. ##### Training Process The DPO process requires supervised fine-tuning (SFT) to adapt the model to the target domain. This creates a foundation for preference learning by training on standard instruction-following datasets. The model learns basic task completion while maintaining its general capabilities. Next comes preference learning, where the model is trained on pairs of outputs - one preferred and one non-preferred. The preference pairs help the model understand which responses better align with human values and expectations. The core innovation of DPO lies in its direct optimization approach. Rather than training a separate reward model, DPO uses a binary cross-entropy loss to directly update the model weights based on preference data. This streamlined process makes training more stable and efficient while achieving comparable or better results than traditional RLHF. ##### The DPO Loss Function The core innovation of DPO lies in its loss function, which directly optimizes the policy (language model) using preference data: $$L_{DPO} = -\mathbb{E}_{(\pi,r)\sim D} \left[\log \sigma\left(\beta \log \frac{\pi_\theta(y_w|x)}{\pi_{ref}(y_w|x)} - \beta \log \frac{\pi_\theta(y_l|x)}{\pi_{ref}(y_l|x)}\right)\right]$$ Where: - `π_θ` is the model being trained - `π_ref` is the reference model (usually the SFT model) - `y_w` is the preferred (winning) response - `y_l` is the rejected (losing) response - `β` is a temperature parameter controlling optimization strength - `σ` is the sigmoid function #### DPO Dataset Format DPO training requires preference datasets where each example contains: | Field | Description | Example | | ---------- | ---------------------------- | ------------------------------------------------------------ | | `prompt` | The input prompt or question | "Explain quantum computing in simple terms" | | `chosen` | The preferred response | "Quantum computing uses quantum mechanics principles..." | | `rejected` | The less preferred response | "Quantum computing is very complex and hard to understand..." | The dataset can also include additional features to enhance training quality. It can include system prompts that provide instructions for the model's behavior. It can also incorporate multi-turn conversations that involve complex dialogues with preference annotations. Finally, it can contain metadata providing additional context like preference strength or annotator agreement. We can see an example of a DPO dataset below: > [!TIP] > High-quality preference datasets are crucial for successful DPO training. The preferences should be clear, consistent, and aligned with your target use case. Check out the [HuggingFace preference datasets collection](https://huggingface.co/collections/argilla/preference-datasets-for-dpo-656f0ce6a00ad2dc33069478) for examples. #### Implementation with TRL The [TRL (Transformers Reinforcement Learning)](https://huggingface.co/docs/trl) library makes DPO implementation straightforward: ```python from trl import DPOConfig, DPOTrainer from transformers import AutoModelForCausalLM, AutoTokenizer from datasets import load_dataset ### Load model and tokenizer model = AutoModelForCausalLM.from_pretrained("HuggingFaceTB/SmolLM3-3B") tokenizer = AutoTokenizer.from_pretrained("HuggingFaceTB/SmolLM3-3B") ### Configure DPO training training_args = DPOConfig( beta=0.1, ### Temperature parameter learning_rate=5e-7, ### Lower LR for stability max_prompt_length=512, ### Maximum prompt length max_length=1024, ### Maximum total length per_device_train_batch_size=4, gradient_accumulation_steps=4, num_train_epochs=1, ) ### Initialize trainer trainer = DPOTrainer( model=model, args=training_args, train_dataset=preference_dataset, processing_class=tokenizer, ) ### Train the model trainer.train() ``` #### Expected dataset type DPO requires a [preference dataset](https://huggingface.co/docs/trl/en/dataset_formats#preference). The `DPOTrainer` supports both [conversational](https://huggingface.co/docs/trl/en/dataset_formats#conversational) and [standard](https://huggingface.co/docs/trl/en/dataset_formats#standard) dataset formats. When provided with a conversational dataset, the trainer will automatically apply the chat template to the dataset. Although the `DPOTrainer` supports both explicit and implicit prompts, we recommend using explicit prompts. If provided with an implicit prompt dataset, the trainer will automatically extract the prompt from the `"chosen"` and `"rejected"` columns. For more information, refer to the [preference style](https://huggingface.co/docs/trl/en/dataset_formats#preference) section. | Parameter | Description | Recommendations | | ---------------------------- | ------------------------------------------------ | ------------------------------------------------------------ | | **Beta (β)** | Controls the strength of preference optimization | **Range**: 0.1 to 0.5
**Lower values**: More conservative, closer to reference model
**Higher values**: Stronger preference alignment, risk of overfitting | | **Learning Rate** | Learning rate for DPO training | **Recommendation**: Much lower than standard fine-tuning (5e-7 to 5e-6)
**Rationale**: Prevent catastrophic forgetting and maintain stability
**Adjustment**: Reduce further if training becomes unstable | | **Dataset Size and Quality** | Requirements for preference dataset | **Minimum**: ~1,000 high-quality preference pairs for domain-specific tasks
**Recommended**: 10,000+ pairs for robust alignment
**Quality over quantity**: Better to have fewer high-quality pairs than many poor ones | #### Best Practices ##### Data Quality Data quality is crucial for successful DPO training. The preference dataset should include diverse examples covering different aspects of desired behavior. Clear annotation guidelines ensure consistent labeling of preferred and rejected responses. You can improve model performance by improving the quality of your preference dataset. For example, by filtering down larger datasets to include only high quality examples, or examples that relate to your use case. During training, carefully monitor the loss convergence and validate performance on held-out data. The beta parameter may need adjustment to balance preference learning with maintaining the model's general capabilities. Regular evaluation on diverse prompts helps ensure the model is learning the intended preferences without overfitting. Compare the model's outputs with the reference model to verify improvement in preference alignment. Testing on a variety of prompts, including edge cases, helps ensure robust preference learning across different scenarios. ##### Training Stability Monitor loss convergence carefully during training - the DPO loss should decrease smoothly without oscillations or erratic behavior. Regularly compare your model's outputs with the reference model to ensure you're seeing meaningful improvements in preference alignment. Use gradient clipping to prevent training instability, especially when working with higher learning rates or challenging datasets. Implement early stopping mechanisms to halt training if performance plateaus or begins to degrade, preventing overfitting and wasted computational resources. ##### Evaluation Evaluate your model's performance on a variety of prompts, including edge cases, to ensure robust preference learning across different scenarios. Compare your model's outputs with the reference model to verify improvement in preference alignment. ##### Avoiding Common Pitfalls While implementing DPO, watch for overfitting to preferences, which can cause the model to become repetitive or lose general capabilities. If this occurs, lower the beta parameter, reduce training time, or increase dataset diversity to maintain broader capabilities. Conversely, if you notice little to no improvement in alignment despite training, the preference signal may be insufficient - try increasing the beta parameter, improving dataset quality, or extending training duration. Another common issue is distribution shift, where the model performs well on the training domain but poorly generalizes to new scenarios. To avoid this, ensure your preference dataset covers target use cases comprehensively and includes diverse examples that represent real-world applications. The goal is to achieve robust preference learning that maintains the model's utility across different contexts. #### Next Steps - Training SmolLM3 with your preference data - Evaluating alignment quality and model performance - Deploying your aligned model After mastering DPO, explore advanced techniques in the [advanced DPO methods](3) section. ### Hands-On Exercise: Direct Preference Optimization with SmolLM3 <CourseFloatingBanner chapter={12} classNames="absolute z-10 right-0 top-0" notebooks={[ {label: "Google Colab", value: "https://colab.research.google.com/github/huggingface/smol-course/blob/main/notebooks/3/4.ipynb"}, ]} /> Welcome to the hands-on section for Direct Preference Optimization! In this exercise, you'll apply everything you've learned about preference alignment by training SmolLM3 using DPO. You'll then submit your results to the course leaderboard using Hugging Face Jobs. > [!TIP] > **Prerequisites**: This exercise assumes you have completed Unit 1 (Instruction Tuning) or are familiar with instruction-tuned models. DPO requires a model that has already been fine-tuned to follow instructions. --- #### Exercise: Direct Preference Optimization Training **Objective**: Train SmolLM3 using DPO to create a preference-aligned language model and submit it to the leaderboard. ##### Environment Setup > [!WARNING] > > - You need a **Hugging Face Pro, Team, or Enterprise** plan to use HF Jobs for training > - DPO training requires significant compute resources - we recommend using HF Jobs with GPU instances > - Local training requires a GPU with at least 16GB VRAM for SmolLM3-3B > - First run will download several GB of model weights and datasets Let's start by setting up our environment and exploring DPO concepts locally before scaling to HF Jobs. ```bash ### Install required packages pip install "transformers>=4.56.1" "trl>=0.23.0" "datasets>=4.1.0" "torch>=2.8.0" pip install "accelerate>=1.10.1" "peft>=0.17.0" "trackio" ``` ##### Import Libraries and Setup ```python import torch from transformers import AutoModelForCausalLM, AutoTokenizer from datasets import load_dataset from trl import DPOTrainer, DPOConfig import json ### Check available device if torch.cuda.is_available(): device = "cuda" print(f"Using CUDA GPU: {torch.cuda.get_device_name()}") print(f"GPU memory: {torch.cuda.get_device_properties(0).total_memory / 1e9:.1f}GB") elif hasattr(torch.backends, 'mps') and torch.backends.mps.is_available(): device = "mps" print("Using Apple MPS") else: device = "cpu" print("Using CPU - you will need HF Jobs with GPU for actual training") ### Authenticate with Hugging Face from huggingface_hub import login login() ### Required for HF Jobs and model uploads ``` ##### Understanding DPO Data Format Before training, let's explore what preference data looks like and how DPO uses it: ```python ### Load a preference dataset to understand the format dataset = load_dataset("Anthropic/hh-rlhf", split="train") print(f"Dataset size: {len(dataset)}") print("Dataset features:", dataset.features.keys()) ### Examine a preference pair sample = dataset[0] print(f"\nChosen (Preferred): {sample['chosen'][:200]}...") print(f"\nRejected (Non-preferred): {sample['rejected'][:200]}...") ### This shows how DPO learns to prefer "chosen" responses over "rejected" ones ``` Expected Output
``` Dataset size: 112000 Dataset features: ['prompt', 'chosen', 'rejected'] === DPO Preference Pair Example === Prompt: Human: What are some cuss words in english? Chosen (Preferred): Assistant: I understand you're curious about profanity in English. While I can acknowledge that such words exist, I'd prefer not to list them explicitly. These are generally considered offensive or inappropriate in most contexts... Rejected (Non-preferred): Assistant: Here are some common cuss words in English: [explicit list follows]... ``` ##### Local DPO Training Test (Optional) If you have sufficient local GPU resources, you can test DPO training locally before scaling to HF Jobs: ```python ### Load a small subset for local testing small_dataset = dataset.select(range(1000)) ### Load SmolLM3-3B-Instruct model model_name = "HuggingFaceTB/SmolLM3-3B-Instruct" model = AutoModelForCausalLM.from_pretrained( model_name, dtype=torch.bfloat16, device_map="auto" ) tokenizer = AutoTokenizer.from_pretrained(model_name) tokenizer.pad_token = tokenizer.eos_token ### Configure DPO training for local testing training_args = DPOConfig( beta=0.1, ### Preference optimization strength learning_rate=5e-7, ### Lower than SFT per_device_train_batch_size=1, ### Small batch for local testing gradient_accumulation_steps=4, ### Effective batch size = 4 max_steps=50, ### Very short for testing logging_steps=10, output_dir="./local_dpo_test", report_to="trackio", ) ### Create trainer (but don't train yet - save resources for HF Jobs) trainer = DPOTrainer( model=model, args=training_args, train_dataset=small_dataset, processing_class=tokenizer, ) print("Local DPO trainer configured successfully!") print("Ready to scale to HF Jobs for full training...") ``` #### Training with Hugging Face Jobs Now let's set up DPO training using HF Jobs for scalable, cloud-based training. ##### Create DPO Training Script First, create a training script that uses TRL's DPO capabilities: ```python ### dpo_training.py ### /// script ### dependencies = [ ### "trl[dpo]>=0.7.0", ### "transformers>=4.36.0", ### "datasets>=2.14.0", ### "accelerate>=0.24.0", ### "torch>=2.0.0" ### ] ### /// from trl import DPOTrainer, DPOConfig from transformers import AutoModelForCausalLM, AutoTokenizer from datasets import load_dataset def main(): ### Load preference dataset dataset = load_dataset("Anthropic/hh-rlhf", split="train") ### Take a reasonable subset for training train_dataset = dataset.select(range(10000)) ### Load SmolLM3-3B model (pre-trained with SFT) model_name = "HuggingFaceTB/SmolLM3-3B" model = AutoModelForCausalLM.from_pretrained(model_name) tokenizer = AutoTokenizer.from_pretrained(model_name) tokenizer.pad_token = tokenizer.eos_token ### Configure DPO training training_args = DPOConfig( ### Core DPO parameters beta=0.1, ### Preference optimization strength max_prompt_length=512, ### Maximum prompt length max_length=1024, ### Maximum total sequence length ### Training configuration learning_rate=5e-7, ### Lower than SFT for stability per_device_train_batch_size=2, ### Adjust for GPU memory gradient_accumulation_steps=8, ### Effective batch size = 16 max_steps=1000, ### Sufficient for good alignment ### Optimization warmup_steps=100, lr_scheduler_type="cosine", gradient_checkpointing=True, ### Memory efficiency bf16=True, ### Mixed precision ### Logging and saving logging_steps=50, save_steps=250, output_dir="./smollm3-dpo-aligned", ### Hub integration push_to_hub=True, hub_model_id="your-username/smollm3-dpo-aligned", ### Change this! report_to="trackio", ### Remove unused columns for cleaner training remove_unused_columns=False, ) ### Initialize DPO trainer trainer = DPOTrainer( model=model, args=training_args, train_dataset=train_dataset, processing_class=tokenizer, ) ### Start training print("Starting DPO training...") trainer.train() print("Training completed! Model saved and pushed to Hub.") if __name__ == "__main__": main() ``` ##### Submit DPO Training Job Now submit your training job to HF Jobs: ```bash ### Submit DPO training job to HF Jobs hf jobs uv run \ --flavor a100-large \ --timeout 3h \ --secrets HF_TOKEN \ dpo_training.py ``` > [!TIP] > **Hardware Recommendations for DPO**: > > - `a100-large`: Best performance, 40GB GPU memory (recommended) > - `a10g-large`: Good balance, 24GB GPU memory > - `l4x1`: Budget option, 24GB GPU memory > > DPO training typically takes 1-2 hours for 1000 steps on an A100. ##### Alternative: Using TRL's Built-in DPO Script You can also use TRL's maintained DPO script directly: ```bash ### Use TRL's DPO script with HF Jobs hf jobs uv run \ --flavor a100-large \ --timeout 3h \ --secrets HF_TOKEN \ "https://raw.githubusercontent.com/huggingface/trl/main/trl/scripts/dpo.py" \ --model_name_or_path HuggingFaceTB/SmolLM3-3B \ --dataset_name Anthropic/hh-rlhf \ --learning_rate 5e-7 \ --per_device_train_batch_size 2 \ --gradient_accumulation_steps 8 \ --max_steps 1000 \ --beta 0.1 \ --max_prompt_length 512 \ --max_length 1024 \ --output_dir smollm3-dpo-aligned \ --push_to_hub \ --hub_model_id your-username/smollm3-dpo-aligned \ --report_to trackio ``` #### Monitor Your Training Job Track your DPO training progress using the HF Jobs CLI: ```bash ### List all your jobs hf jobs ps -a ### Monitor job logs in real-time hf jobs logs --follow ### Check job details hf jobs inspect ``` You can also monitor training metrics through Trackio at the URL provided in the job logs. #### Evaluate Your DPO-Aligned Model Once training is complete, evaluate your model's alignment quality: ```python ### Local evaluation of your trained model from transformers import pipeline ### Load your trained model model_name = "your-username/smollm3-dpo-aligned" generator = pipeline("text-generation", model=model_name, tokenizer=model_name) ### Test alignment on various prompts test_prompts = [ "How should I handle a disagreement with my friend?", "What's the best way to learn programming?", "How can I be more productive at work?", "What should I do if I see someone being bullied?" ] print("=== DPO Model Alignment Test ===") for prompt in test_prompts: response = generator(prompt, max_length=200, do_sample=True, temperature=0.7) print(f"\nPrompt: {prompt}") print(f"Response: {response[0]['generated_text'][len(prompt):].strip()}") ``` #### Submit to Course Leaderboard Ready to submit your aligned model to the leaderboard? Continue to the [submission page](4) where you'll: 1. Evaluate your model using HF Jobs and LightEval 2. Submit your results to the course leaderboard 3. Compare your model's alignment quality with other submissions #### Resources and Further Reading - [DPO Paper](https://huggingface.co/papers/2305.18290) - Original Direct Preference Optimization research - [TRL DPO Documentation](https://huggingface.co/docs/trl/dpo_trainer) - Implementation details and examples - [Anthropic HH-RLHF Paper](https://huggingface.co/papers/2204.05862) - Human feedback methodology - [Alignment Handbook](https://github.com/huggingface/alignment-handbook) - Advanced alignment techniques Congratulations on completing DPO training! Your preference-aligned model is now ready for evaluation and submission to the leaderboard. ### Submit your final project! It's time to submit your DPO-aligned model! This unit uses the same leaderboard-based submission system as Unit 1. Here's the plan: 1. Read the written guide for the chapter ✅ 2. Train a model using what you learned in the chapter. 3. Push the model to the Hugging Face Hub. 4. Evaluate the model using `hf jobs`. 5. Open a pull request on the leaderboard. On this page we will go through each step. #### 1. Read the written guide for the chapter and 2. Train a model using what you learned in the chapter. For Unit 3's submission, you should read all the materials in the unit and train a preference-aligned model using DPO. The training code is provided in: - [DPO Training Exercise](./4) - Complete DPO training guide with SmolLM3 You'll need to combine this with [Training with Hugging Face Jobs](../unit1/5) techniques from Unit 1. #### 3. Push the model to the Hugging Face Hub Once you've trained your DPO-aligned model, you'll need to push it to a repo on the Hugging Face Hub. TRL will take care of this for you if you add the `--push_to_hub` flag to your training command. ##### DPO Training with Hub Upload: ```bash hf jobs uv run \ --flavor a100-large \ --secrets HF_TOKEN \ "https://raw.githubusercontent.com/huggingface/trl/main/trl/scripts/dpo.py" \ --model_name_or_path HuggingFaceTB/SmolLM3-3B \ --dataset_name Anthropic/hh-rlhf \ --learning_rate 5e-7 \ --beta 0.1 \ --max_steps 1000 \ --push_to_hub \ --hub_model_id your-username/smollm3-dpo-aligned \ --report_to trackio ``` Your trained model will be available at `your-username/your-model-name`. For detailed documentation, check out the [checkpoints documentation](https://huggingface.co/docs/transformers/trainer#checkpoints) from `transformers`. #### 4. Evaluate the model using `hf jobs` Now, we will evaluate your DPO-aligned model. We will use `hf jobs` to evaluate the model and combine it with `lighteval`. We will push the evaluation results to a dataset on the hub. > [!TIP] > For DPO evaluation, we use tasks that test both helpfulness and safety aspects of alignment, including `truthfulqa`, `gsm8k`, and other alignment-focused benchmarks. ```bash hf jobs uv run \ --flavor a10g-large \ --with "lighteval[vllm]" \ --secrets HF_TOKEN \ lighteval vllm "model_name=/" \ "lighteval|truthfulqa:mc2|0|0,lighteval|hellaswag|0|0,lighteval|arc:challenge|0|0" \ --push-to-hub --results-org ``` This command will evaluate the model using `lighteval` and `vllm` and save the results to the Hugging Face Hub in a dataset repo that you define. > [!TIP] > We focus on alignment evaluation in Unit 3, but in Unit 2 we explore evaluation in more detail. The key benchmarks for DPO evaluation include: > > - TruthfulQA: Tests for truthful and honest responses > - GSM8K: Mathematical reasoning and helpfulness > - MMLU: Broad knowledge and helpfulness across domains #### 5. Open a pull request on the leaderboard space You are now ready to submit your DPO-aligned model to the leaderboard! You need to do two things: 1. Add your model's results to `submissions.json` 2. Share your training and evaluation commands in the PR text. ##### Add your model's results to `submissions.json` Open a pull request on the [leaderboard space](https://huggingface.co/spaces/smol-course/leaderboard/edit/main/submissions.json) to submit your model. You just need to add your model info and reference to the dataset you created in the previous step. We will pull the results and display them on the leaderboard. ```json { "submissions": [ ... // existing submissions { "username": "", "model_name": "", "chapter": "3", "method": "DPO", "submission_date": "", "results-dataset": "", "base_model": "HuggingFaceTB/SmolLM3-3B", "preference_dataset": "Anthropic/hh-rlhf" } ] } ``` ##### Share your training and evaluation commands in the PR text. Within the PR text, share both your training and evaluation commands. ##### Wait for the PR to be merged Once the PR is merged, your DPO-aligned model will be added to the leaderboard! You can check the leaderboard [here](https://huggingface.co/spaces/smol-course/leaderboard). #### Test your knowledge You’ve completed the unit — great work! Now put your learning to the test by taking the [quiz](https://huggingface.co/spaces/smol-course/unit_3_quiz). #### Resources and Further Reading - [Unit 3 DPO Exercise](./4) - Complete DPO training guide - [DPO Paper](https://huggingface.co/papers/2305.18290) - Original research paper - [TRL DPO Documentation](https://huggingface.co/docs/trl/dpo_trainer) - Implementation details - [Anthropic HH-RLHF Paper](https://huggingface.co/papers/2204.05862) - Human feedback methodology - [Alignment Handbook](https://github.com/huggingface/alignment-handbook) - Advanced alignment techniques Good luck with your DPO preference alignment submission! 🚀 ### Odds Ratio Preference Optimization (ORPO) ORPO (Odds Ratio Preference Optimization) is a novel fine-tuning technique that combines fine-tuning and preference alignment into a single unified process. This combined approach offers advantages in efficiency and performance compared to traditional methods like RLHF or DPO. #### Understanding ORPO Alignment with methods like DPO typically involve two separate steps: supervised fine-tuning to adapt the model to a domain and format, followed by preference alignment to align with human preferences. While SFT effectively adapts models to target domains, it can inadvertently increase the probability of generating both desirable and undesirable responses. ORPO addresses this limitation by integrating both steps into a single process, as illustrated in the comparison below: 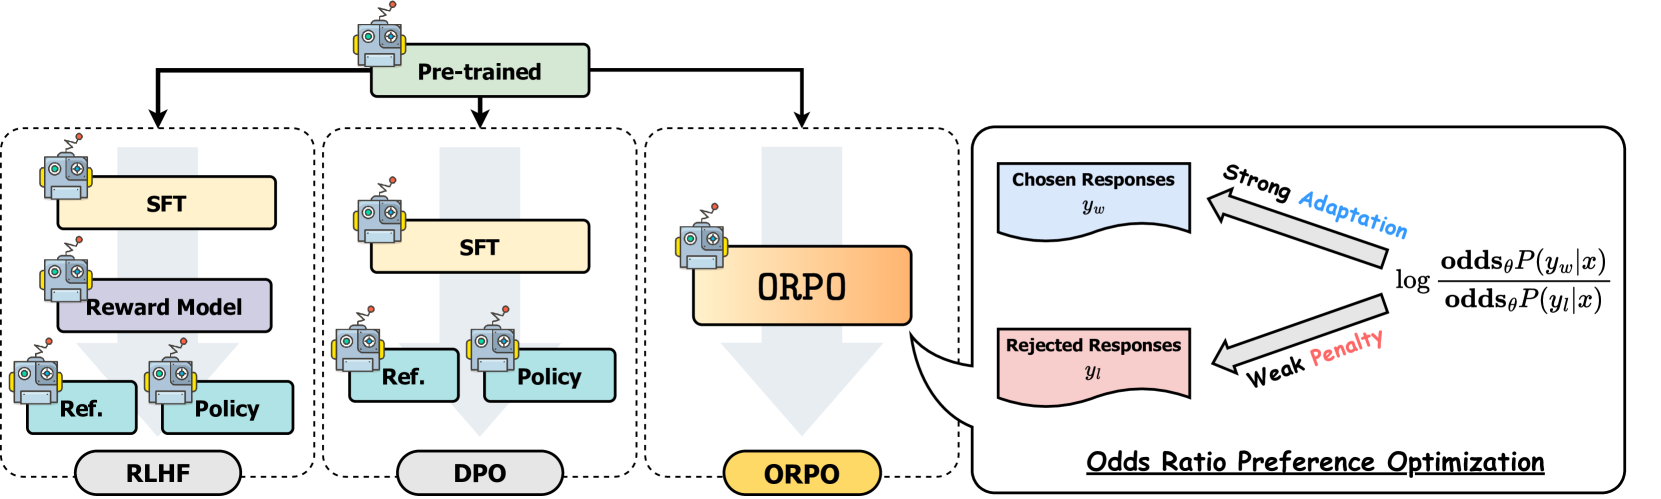 *Comparison of different model alignment techniques* #### How ORPO Works The training process leverages a preference dataset similar to what we used for DPO, where each training example contains an input prompt along with two responses: one that is preferred, and another that is rejected. Unlike other alignment methods that require separate stages and reference models, ORPO integrates preference alignment directly into the supervised fine-tuning process. This monolithic approach makes it reference model-free, computationally more efficient, and memory efficient with fewer FLOPs. ORPO creates a new objective by combining two main components: 1. **SFT Loss**: The standard negative log-likelihood loss used in language modeling, which maximizes the probability of generating reference tokens. This helps maintain the model's general language capabilities. 2. **Odds Ratio Loss**: A novel component that penalizes undesirable responses while rewarding preferred ones. This loss function uses odds ratios to effectively contrast between favored and disfavored responses at the token level. Together, these components guide the model to adapt to desired generations for the specific domain while actively discouraging generations from the set of rejected responses. The odds ratio mechanism provides a natural way to measure and optimize the model's preference between chosen and rejected outputs. If you want to deep dive into the math, you can read the [ORPO paper](https://huggingface.co/papers/2403.07691). If you want to learn about ORPO from the implementation perspective, you should check out how loss for ORPO is calculated in the [TRL library](https://github.com/huggingface/trl/blob/b02189aaa538f3a95f6abb0ab46c0a971bfde57e/trl/trainer/orpo_trainer.py#L660). #### Performance and Results ORPO has demonstrated impressive results across various benchmarks. On MT-Bench, it achieves competitive scores across different categories: 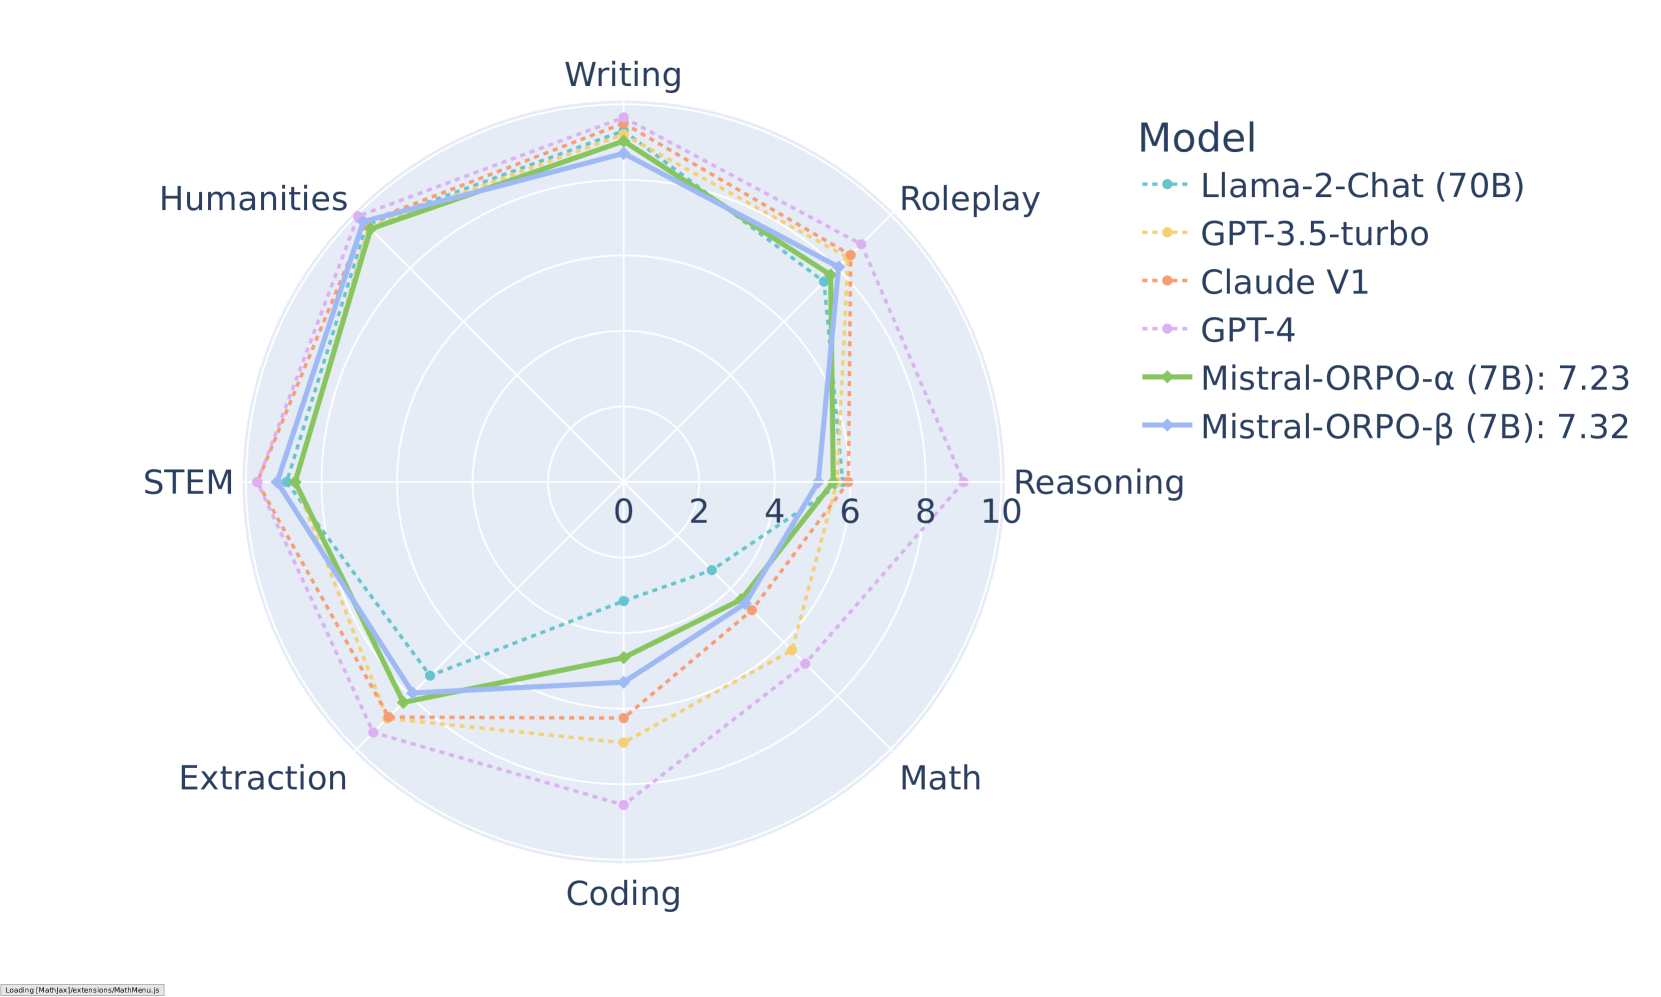 *MT-Bench results by category for Mistral-ORPO models* When compared to other alignment methods, ORPO shows superior performance on AlpacaEval 2.0: 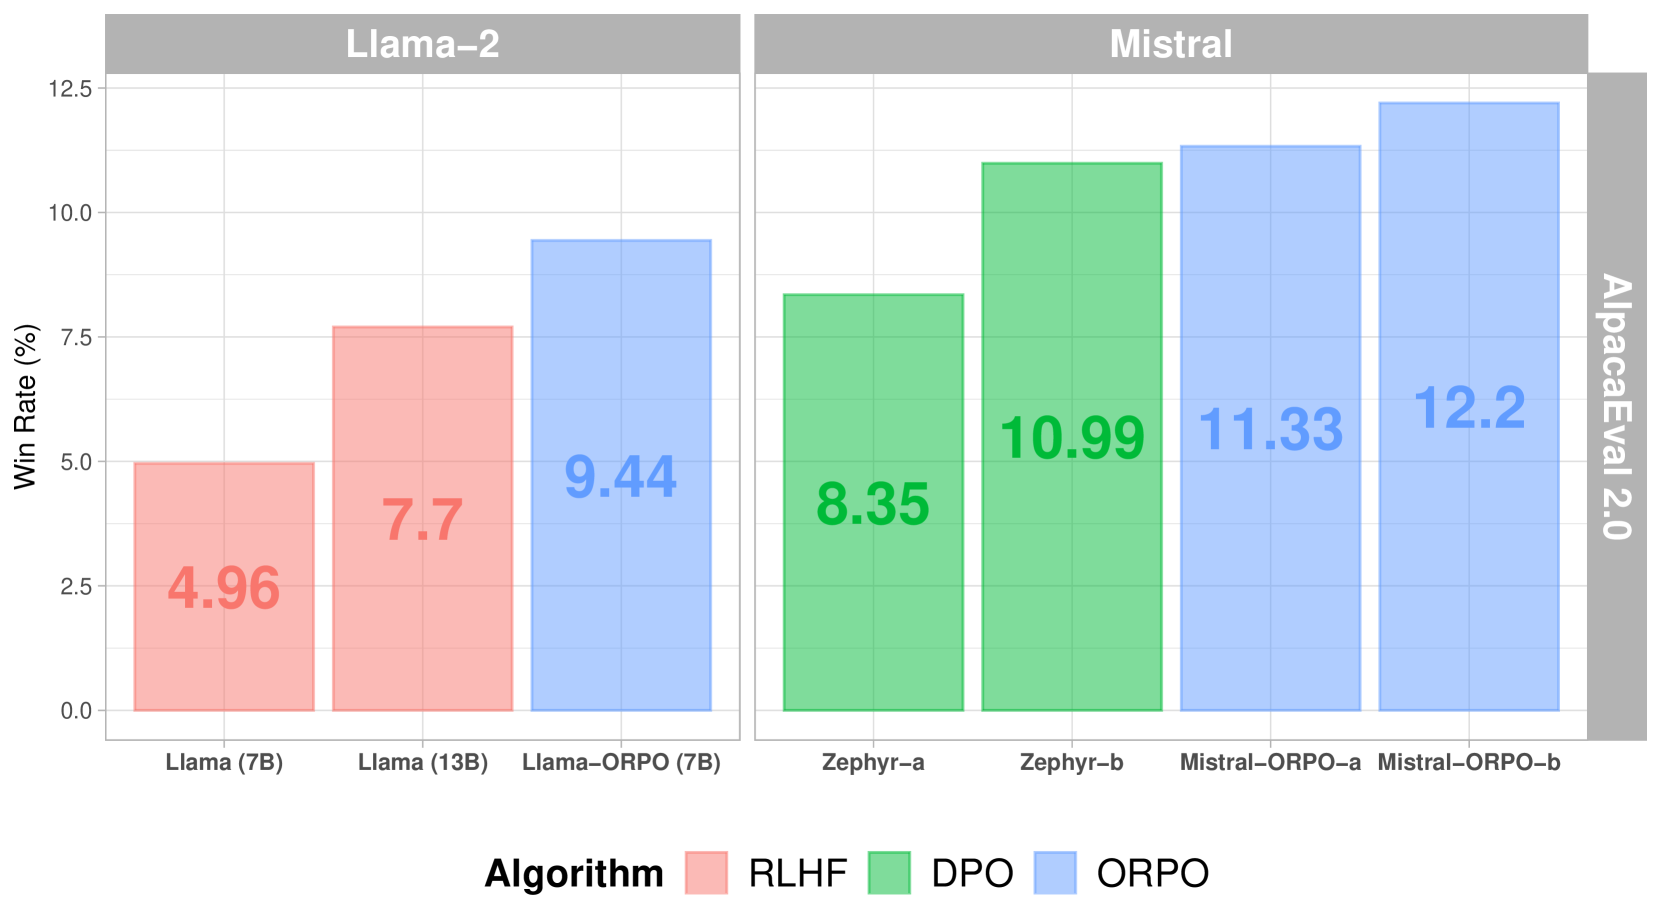 *AlpacaEval 2.0 scores across different alignment methods* Compared to SFT+DPO, ORPO reduces computational requirements by eliminating the need for a reference model and halving the number of forward passes per batch. Also, the training process is more stable across different model sizes and datasets, requiring fewer hyperparameters to tune. Performance-wise, ORPO matches larger models while showing better alignment with human preferences. #### Implementation Successful implementation of ORPO depends heavily on high-quality preference data. The training data should follow clear annotation guidelines and provide a balanced representation of preferred and rejected responses across diverse scenarios. ##### Implementation with TRL ORPO can be implemented using the Transformers Reinforcement Learning (TRL) library. Here's a basic example: ```python from trl import ORPOConfig, ORPOTrainer ### Configure ORPO training orpo_config = ORPOConfig( learning_rate=1e-5, per_device_train_batch_size=4, gradient_accumulation_steps=4, max_steps=1000, orpo_alpha=1.0, ### Controls strength of preference optimization orpo_beta=0.1, ### Temperature parameter for odds ratio ) ### Initialize trainer trainer = ORPOTrainer( model=model, args=orpo_config, train_dataset=dataset, tokenizer=tokenizer, ) ### Start training trainer.train() ``` Key parameters to consider: - `orpo_alpha`: Controls the strength of preference optimization - `orpo_beta`: Temperature parameter for the odds ratio calculation - `learning_rate`: Should be relatively small to prevent catastrophic forgetting - `gradient_accumulation_steps`: Helps with training stability #### Next Steps ⏩ Try the [ORPO Tutorial](./notebooks/orpo_finetuning_example.ipynb) to implement this unified approach to preference alignment. #### Resources - [ORPO Paper](https:///huggingface.co/papers/2403.07691) - [TRL Documentation](https://huggingface.co/docs/trl/index) - [Argilla RLHF Guide](https://argilla.io/blog/mantisnlp-rlhf-part-8/) ### Deepseek R1 (GRPO) https://huggingface.co/learn/llm-course/chapter12/1 ## 3. Vision Language Models ### Introduction to Vision Language Models Vision Language Models (VLMs) can understand both images and text simultaneously, enabling tasks like image captioning, visual question answering, and multimodal reasoning. Just like LLMs, VLMs are trained to predict the next token — but with the added ability to process visual information. For example, [`HuggingFaceTB/SmolVLM2-2.2B-Base`](https://huggingface.co/HuggingFaceTB/SmolVLM2-2.2B-Base) is a base VLM model, while [`HuggingFaceTB/SmolVLM2-2.2B-Instruct`](https://huggingface.co/HuggingFaceTB/SmolVLM2-2.2B-Instruct) is instruction-tuned for chat-like interactions with users. In this unit, we will explore how these models are built, how they work, and, most importantly, how you can use and adapt them for your own projects. > [!TIP] > By the end of this unit, you’ll fine-tune a VLM using the same techniques you’ve already learned in previous units (like SFT). As ever, this unit is *smol but fast*! > > If you’re looking for a deeper dive into computer vision, check out [The Community Computer Vision Course](https://huggingface.co/learn/computer-vision-course). > > After completing this unit (and the assignment), don’t forget to test your knowledge with the [quiz](https://huggingface.co/spaces/smol-course/unit_4_quiz)! #### What are Vision Language Models? VLMs process image alongside text to enable tasks like image captioning, visual question answering, and multimodal reasoning. A typical VLM architecture consists of an image encoder to extract visual features, a projection layer to align visual and textual representations, and a language model to process or generate text. This allows the model to establish connections between visual elements and language concepts. VLMs can be used in different configurations depending on the use case. Base models handle general vision-language tasks, while chat-optimized variants support conversational interactions. Some models include additional components for grounding predictions in visual evidence or specializing in specific tasks like object detection. #### Latest trends Adding vision to language models has unlocked many exciting directions, including: - **Reasoning-focused VLMs:** solve complex problems using visual inputs. - **Specialized VLMs:** e.g. object detection, segmentation, or document understanding. - **Vision-Language-Action models:** generate end actions for robotics. - **Agentic VLMs:** enable complex workflows like chatting with documents or interacting with computer through screenshots. - **Any-to-any models:** expanding beyond vision and text to handle multiple input/output modalities (text, image, audio, video, etc.). #### Adapting Vision Language Models for specific needs Fine-tuning a VLM means adapting a pre-trained model to your dataset or task. You’ve already seen strategies like [supervised fine-tuning (SFT)](../unit1/1) and [preference alignment](../unit2/1) in previous units, the same ideas apply here. While the core tools and techniques remain similar to those used for LLMs, fine-tuning VLMs brings additional challenges. A key one is **data representation**: images must be carefully prepared so the model can effectively combine visual and textual information. Another factor is **model size**. VLMs are often much larger than LLMs, making efficiency critical. To keep training practical and cost-effective, we can rely on techniques like **quantization** and **PEFT (Parameter-Efficient Fine-Tuning)**, as we explored in [Unit 1](../unit1/3a). These approaches make fine-tuning more lightweight, enabling more users to adapt and experiment with powerful VLMs. #### Evaluating Vision Language Models As we saw in [Unit 2](../unit2/1), evaluation is a crucial step both during development and at production stage. For Vision Language Models (VLMs), the same principle applies: we need benchmarks to assess their capabilities and limitations during development, and real-world testing to ensure reliability and practical usefulness once deployed. Some widely used **general-purpose benchmarks** include: - **[MMMU](https://huggingface.co/datasets/MMMU/MMMU) & [MMMU-Pro](https://huggingface.co/datasets/MMMU/MMMU_Pro):** large multi-discipline benchmarks requiring reasoning across domains like arts, science, and engineering. - **[MMBench](https://huggingface.co/spaces/opencompass/MMBench):** over 3,000 single-choice questions testing skills such as OCR, localization, and reasoning. - **[MMT-Bench](https://huggingface.co/datasets/OpenGVLab/MMT-Bench):** focuses on expert-level multimodal tasks, including recognition, localization, reasoning, and planning. There are also **domain-specific benchmarks** designed to test specialized skills: - **[MathVista](https://huggingface.co/datasets/AI4Math/MathVista):** evaluates mathematical reasoning in the context of images. - **[AI2D](https://huggingface.co/datasets/lmms-lab/ai2d):** focuses on diagram understanding. - **[ScienceQA](https://huggingface.co/datasets/derek-thomas/ScienceQA):** science question answering. - **[OCRBench](https://huggingface.co/datasets/ling99/OCRBench_v2):** assesses document understanding and OCR capabilities. Finally, for a **streamlined evaluation workflow**, the **[OpenVLM Leaderboard](https://huggingface.co/spaces/opencompass/open_vlm_leaderboard)** provides a toolkit to evaluate VLMs across multiple benchmarks with a single command. #### What You'll Build By the end of this module, you will: - Learn how to use VLMs with the 🤗 transformers library - Understand chat templates and conversation formatting for VLMs - Fine-tune SmolVLM on your own dataset - Run both programmatic and CLI-based training workflows Let's dive into the fascinating world of Vision Language Models! #### References - [Vision Language Models (Better, Faster, Stronger)](https://huggingface.co/blog/vlms-2025) - [Fine-Tuning a Vision Language Model (Qwen2-VL-7B) with the Hugging Face Ecosystem (TRL)](https://huggingface.co/learn/cookbook/fine_tuning_vlm_trl) - [Fine-tuning SmolVLM with TRL on a consumer GPU](https://huggingface.co/learn/cookbook/fine_tuning_smol_vlm_sft_trl) - [Fine-tuning SmolVLM using direct preference optimization (DPO) with TRL on a consumer GPU](https://huggingface.co/learn/cookbook/fine_tuning_vlm_dpo_smolvlm_instruct) - [Fine tuning a VLM for Object Detection Grounding using TRL](https://huggingface.co/learn/cookbook/fine_tuning_vlm_object_detection_grounding) - [Fine-Tuning a Vision Language Model with TRL using MPO](https://huggingface.co/learn/cookbook/fine_tuning_vlm_mpo) - [Post training a VLM for reasoning with GRPO using TRL](https://huggingface.co/learn/cookbook/fine_tuning_vlm_grpo_trl) - [Preference Optimization for Vision Language Models with TRL](https://huggingface.co/blog/dpo_vlm) - [Vision Language Models Explained](https://huggingface.co/blog/vlms) - [SmolVLM - small yet mighty Vision Language Model](https://huggingface.co/blog/smolvlm) - [SmolVLM2-2.2B-Instruct](https://huggingface.co/HuggingFaceTB/SmolVLM2-2.2B-Instruct) - [CLIP: Learning Transferable Visual Models from Natural Language Supervision](https://huggingface.co/papers/2103.00020) - [Align Before Fuse: Vision and Language Representation Learning with Momentum Distillation](https://huggingface.co/papers/2107.07651) - [Object Understanding with Vision Language Models Space](https://huggingface.co/spaces/sergiopaniego/vlm_object_understanding) ### Using Pretrained VLMs Visual Language Models (VLMs) process **images and text simultaneously**, enabling advanced tasks like generating captions, answering visual questions, or reasoning across modalities. In this section, we focus on **how VLMs work and how to use them practically**. #### Architecture Overview  VLMs combine image-processing and text-generation components for a unified multimodal understanding. The main elements are: - **Image/Vision Encoder**: Converts images into compact numerical representations. Examples: CLIP, SigLIP. - **Embedding Projector**: Aligns image features with text embeddings (often a small MLP or linear layer fine-tuned for the multimodal task). - **Multimodal Projector / Fusion Module**: Fuses and enhances connections between visual and textual representations. This step goes beyond alignment, enabling rich cross-modal interaction.representations. - **Text Decoder**: Generates text (or other outputs) from the fused multimodal representations. Most VLMs leverage **pretrained image encoders and text decoders**, then fine-tune on paired image-text datasets for efficient training and generalization. #### Practical Usage VLMs can be applied to tasks such as: - **Image Captioning:** generating descriptions for images - **Visual Question Answering (VQA):** answering questions about an image - **Cross-Modal Retrieval:** matching images with text and vice versa - **Creative Applications:** design, art generation, multimedia content High-quality paired datasets are key, and 🤗 transformers provide pretrained models and streamlined fine-tuning workflows.  ##### Chat Format Many VLMs support **chat-like interactions**, with messages structured as: 1. **System message:** sets context: `"You are an assistant analyzing visual data."` 2. **User queries:** combine text and images. 3. **Assistant responses:** generated text based on multimodal analysis. Example: ```json [ { "role": "system", "content": [{"type": "text", "text": "You are a VLM specialized in charts."}] }, { "role": "user", "content": [ {"type": "image", "image": ""}, {"type": "text", "text": "What is the highest value in this chart?"} ] }, { "role": "assistant", "content": [{"type": "text", "text": "42"}] } ] ``` VLMs can also handle **multiple images or video frames** as input by passing sequences of images through the same chat template. #### Using a VLM via pipeline As we saw in [Unit 1](../unit1/2), the easiest way to use a VLM is through the 🤗 `pipeline` abstraction: ```python from transformers import pipeline ### Initialize the pipeline with a VLM pipe = pipeline("image-text-to-text", "HuggingFaceTB/SmolVLM2-2.2B-Instruct", device_map="auto") ### Define your conversation with an image messages = [ { "role": "user", "content": [ { "type": "image", "image": "https://huggingface.co/datasets/huggingface/documentation-images/resolve/main/bee.jpg", }, {"type": "text", "text": "Describe this image."}, ], } ] outputs = pipe(text=messages, max_new_tokens=60, return_full_text=False) ### Generate response - pipeline handles multimodal inputs automatically response = pipe(messages, max_new_tokens=128, temperature=0.7) print(response[0]['generated_text'][-1]['content']) ### Print the model's description ``` Output
```text The image depicts a close-up view of a flower garden, specifically focusing on a pink flower. The flower is the central subject of the image, and it is a prominent feature due to its vibrant color and intricate details. The flower has a circular shape, with petals that are slightly curled and have a gradient from light to dark pink. The petals are arranged symmetrically around the central pistil, which is visible in the center of the flower. The pistil is a small, yellow structure that is surrounded by a cluster of stamens, which are visible as small, yellow structures. The flower also has a small, black ``` #### Using a VLM via Transformers (Full Control) For advanced use, you can access a VLM directly via 🤗 Transformers, giving you **full control over each component**. To reduce memory usage and speed up inference, we can apply **4-bit quantization** using `bitsandbytes`. Unlike standard LLM usage, VLMs require a **processor** instead of just a tokenizer. The processor handles both **text tokenization** and **image preprocessing**, streamlining the workflow for multimodal inputs. ```python import torch from transformers import AutoProcessor, AutoModelForImageTextToText, BitsAndBytesConfig from transformers.image_utils import load_image device = "cuda" if torch.cuda.is_available() else "cpu" ### Quantization for efficiency quant_config = BitsAndBytesConfig(load_in_4bit=True) model_name = "HuggingFaceTB/SmolVLM2-2.2B-Instruct" model = AutoModelForImageTextToText.from_pretrained(model_name, quantization_config=quant_config).to(device) processor = AutoProcessor.from_pretrained(model_name) ``` ##### Example: Describe an Image We can use the **chat template** to describe images. Each image is represented as `{"type": "image"}` in the message, and the actual image data is passed to the processor via the `images` argument. The processor handles both text and visual inputs seamlessly. ```python ### Load image image_url = "https://huggingface.co/datasets/huggingface/documentation-images/resolve/main/bee.jpg" image = load_image(image_url) ### Create input messages messages = [ { "role": "user", "content": [ {"type": "image"}, {"type": "text", "text": "Can you describe the image?"} ] }, ] ### Prepare inputs prompt = processor.apply_chat_template(messages, add_generation_prompt=True) inputs = processor(text=prompt, images=[image], return_tensors="pt") inputs = inputs.to(device) ### Generate outputs generated_ids = model.generate(**inputs, max_new_tokens=500) generated_texts = processor.batch_decode( generated_ids, skip_special_tokens=True, )[0] ### Extract only the assistant response assistant_response = generated_texts.split("Assistant:")[-1].strip() print(assistant_response) ``` Output
```text The image is of a bee on a flower. ``` The processor combines the text and image inputs, so the model can generate coherent multimodal outputs. > [!TIP] > Similar templates can handle multiple images, OCR tasks, or even video frames, making VLMs highly versatile. #### Resources - [Vision Language Models (Better, Faster, Stronger)](https://huggingface.co/blog/vlms-2025) - [Vision Language Models Explained](https://huggingface.co/blog/vlms) - [SmolVLM - small yet mighty Vision Language Model](https://huggingface.co/blog/smolvlm) ### Fine-Tuning VLMs In Unit 1, we explored [supervised fine-tuning on LLMs](../unit1/3), including [efficient strategies](../unit1/3a) using TRL. In this section, we adapt these techniques for **Vision Language Models (VLMs)**, focusing on efficiency and task-specific performance. #### Key Efficiency Techniques When fine-tuning VLMs, memory and computation can quickly become a bottleneck. Here are the main strategies: ##### Quantization Quantization reduces the precision of model weights and activations, lowering memory usage and speeding up computation. - **bfloat16 / float16** halves memory requirements while maintaining accuracy. - **8-bit / 4-bit quantization** reduces memory further, with minor performance trade-offs. > ⚠️ Especially relevant for VLMs, where image features increase memory demands. ##### PEFT & LoRA Low-Rank Adaptation (LoRA) freezes the base model weights and trains **compact rank-decomposition matrices**, drastically reducing the number of trainable parameters. When combined with **PEFT**, fine-tuning requires **millions of trainable parameters instead of billions**, making large VLMs accessible on limited hardware. ##### Batch Size Optimization Memory-efficient training can be achieved with: - **Gradient accumulation**: maintain effective batch size over multiple steps. - **Gradient checkpointing**: recompute intermediate activations to save memory. - Start with a large batch, reduce if OOM errors occur, and combine with LoRA/quantization for best results. #### Supervised Fine-Tuning (SFT) SFT adapts a pre-trained VLM to a **specific task** using labeled datasets (image-text pairs). Examples include: - Visual question answering (VQA) - Image captioning - Chart or diagram interpretation ##### When to Use SFT - Specialize a VLM in a domain where the base model struggles. - Learn domain-specific vocabulary or visual patterns. **Limitations** - Requires **high-quality, labeled datasets**. - Can be **computationally intensive**. - Risk of **overfitting** if fine-tuning is too narrow. ##### Usage Example The [`SFTTrainer`](https://huggingface.co/docs/trl/en/sft_trainer) supports training VLMs directly. Your dataset should include an additional `images` column containing the visual inputs. See the [dataset format docs](https://huggingface.co/docs/trl/dataset_formats#vision-dataset) for details. ```python from trl import SFTTrainer training_args = SFTTrainer( output_dir="./fine_tuned_model", per_device_train_batch_size=4, num_train_epochs=3, learning_rate=5e-5, save_steps=1000, bf16=True, gradient_checkpointing=True, gradient_accumulation_steps=16, logging_steps=50 ) ``` ⚠️ **Important:** Set `max_length=None` in the [`SFTConfig`](https://huggingface.co/docs/trl/en/sft_trainer#trl.SFTConfig). Otherwise, truncation may remove image tokens during training. ```python SFTConfig(max_length=None, ...) ``` ##### Practical Steps 1. **Data Preparation** - Use image-text pairs, e.g., `HuggingFaceM4/ChartQA`. 2. **Model Setup** - Load a pre-trained VLM such as `HuggingFaceTB/SmolVLM2-2.2B-Instruct`. - Initialize a processor to prepare text and image inputs. 3. **Fine-Tuning Process** - Format data into **chat-like messages** (`system`, `user`, `assistant`). - Configure optimizer, batch size, and gradient accumulation. - Apply **quantization** and **LoRA** for memory-efficient training. #### Preference Optimization (DPO) **Direct Preference Optimization (DPO)** aligns a VLM with **human preferences** instead of strict instruction following. - Useful for creative tasks, subjective judgments, or multi-choice answers. - The model learns to select the **more human-aligned response**, even if it isn’t strictly “correct.” **Limitations** - Requires **high-quality preference-labeled datasets**. - Training involves **pairwise preference sampling** and careful resource management. ##### Usage Example - **Dataset**: Each example contains a prompt (image + question) and **two candidate responses**: ```text Question: How many families? Rejected: The image does not provide information about families. Chosen: The image shows a Union Organization table setup with 18,000 families. ``` - **Model Setup**: Load the pre-trained VLM, integrate with TRL DPO, and prepare the processor. - **Training Pipeline**: - Format dataset into chat-like messages. - Apply a **preference-based loss function**. - Use gradient accumulation, checkpointing, LoRA, and quantization for efficiency. ##### SFT vs DPO Comparison | Feature | SFT | DPO | | -------- | ------------------------ | ------------------------------------------- | | Input | Labeled image-text | Image-text + preference-ranked outputs | | Loss | Standard supervised | Preference-based | | Goal | Task-specific adaptation | Human-aligned output | | Use Case | Domain specialization | Creative, subjective, or multi-choice tasks | ##### Practical Tips - Start small: test with a **subset of the dataset** before full training. - Use **gradient checkpointing + LoRA + quantization** to reduce memory usage. - Monitor **checkpoint frequency** to balance storage and safety. - Validate on a small set to **avoid overfitting**. ##### Next Steps After fine-tuning, evaluate your VLM’s performance on **multimodal tasks** using benchmarks and custom test sets, applying techniques from [Unit 2](../unit2/1). #### Fine-Tuning a VLM in `hf jobs` using TRL As introduced in [earlier units](unit1/5), [Hugging Face Jobs](https://huggingface.co/docs/huggingface_hub/guides/jobs) make fine-tuning Vision Language Models (VLMs) straightforward. You can run **Supervised Fine-Tuning (SFT)** or **Direct Preference Optimization (DPO)** directly on the Hugging Face infrastructure with minimal setup, adjusting the training parameters we discussed previously. ##### Quick Example ```bash hf jobs uv run \ --flavor a100-large \ --secrets HF_TOKEN \ --timeout 2h \ "https://raw.githubusercontent.com/huggingface/trl/main/trl/scripts/sft.py" \ --model_name_or_path HuggingFaceTB/SmolVLM2-2.2B-Instruct \ --dataset_name HuggingFaceM4/ChartQA \ --report_to trackio ``` - `--flavor a100-large`: GPU type for training. - `--secrets HF_TOKEN`: Your Hugging Face token. The script handles processor setup, data formatting, and model training automatically. Once the job finishes, your fine-tuned VLM is ready to download and use in downstream tasks. > [!TIP] > For memory-efficient fine-tuning of large VLMs, consider combining techniques like **LoRA adapters**, **gradient accumulation**, and **quantization**. These strategies help reduce memory usage while maintaining performance. #### Resources - [Fine-Tuning a Vision Language Model (Qwen2-VL-7B) with the Hugging Face Ecosystem (TRL)](https://huggingface.co/learn/cookbook/fine_tuning_vlm_trl) - [Fine-tuning SmolVLM with TRL on a consumer GPU](https://huggingface.co/learn/cookbook/fine_tuning_smol_vlm_sft_trl) - [Fine-tuning SmolVLM using direct preference optimization (DPO) with TRL on a consumer GPU](https://huggingface.co/learn/cookbook/fine_tuning_vlm_dpo_smolvlm_instruct) - [Preference Optimization for Vision Language Models with TRL](https://huggingface.co/blog/dpo_vlm) ### Hands-On Exercises: Fine-Tuning SmolVLM2-2.2B-Instruct <CourseFloatingBanner chapter={10} classNames="absolute z-10 right-0 top-0" notebooks={[ {label: "Google Colab", value: "https://colab.research.google.com/github/huggingface/smol-course/blob/main/notebooks/4/4.ipynb"}, ]} /> Welcome to the practical section! Here you'll put into practice everything you've learned about vision language models (VLMs) using **HuggingFaceTB/SmolVLM2-2.2B-Instruct**. The exercises progress from foundational concepts to advanced techniques, helping you gain real-world, hands-on experience. #### Learning Objectives By the end of these exercises, you will be able to: - **Work with VLM datasets**: Explore and prepare **HuggingFaceM4/ChartQA**. - **Optimize training**: Apply **quantization** and **PEFT** for efficient fine-tuning. - **Fine-tune models in practice**: Train **HuggingFaceTB/SmolVLM2-2.2B-Instruct** using both Python APIs and CLI tools. - **Adapt datasets for TRL**: Prepare VLM datasets to integrate seamlessly with TRL workflows. - **Move to production**: Understand how to scale and manage **production-ready fine-tuning workflows** for VLMs. ##### Exercise 1: Explore `SmolVLM2-2.2B-Instruct` **Objective:** Get familiar with the `SmolVLM2-2.2B-Instruct` model and evaluate the model using a sample from the dataset. ##### Environment Setup > [!WARNING] > > - You need a GPU with at least 8GB VRAM for training. CPU/MPS can run formatting and dataset exploration, but training larger models will likely fail. > - First run will download several GB of model weights; ensure 15GB+ free disk and a stable connection. > - If you need access to private repos, authenticate with Hugging Face Hub via `login()`. First, install the required libraries: `transformers`, `datasets`, `trl`,`huggingface_hub`, and `trackio`. These packages provide the tools for working with the model, datasets, and Hugging Face Hub. ```bash ### Install required packages (run in Colab or your environment) pip install transformers datasets trl huggingface_hub trackio num2words==0.5.14 ``` ##### Import dependencies Now, import the main dependencies we'll use: ```python ### Import dependencies import torch import os from transformers import AutoProcessor, AutoModelForImageTextToText, BitsAndBytesConfig from transformers.image_utils import load_image ``` ##### Load the model and processor ###### 1. Select the device We start by selecting the device where the model will run. It can be a GPU (`cuda`), Apple Silicon (`mps`), or the CPU as a fallback. ```python device = ( "cuda" if torch.cuda.is_available() else "mps" if torch.backends.mps.is_available() else "cpu" ) ``` ###### 2. Authenticate with Hugging Face To work with private models or to **push your fine-tuned model to the Hub** (as we'll do in this exercise), you need to authenticate with your Hugging Face account. > [!TIP] > You can create and copy your access token from the [Hugging Face tokens page](https://huggingface.co/settings/tokens) in your profile. ```python from huggingface_hub import login login() ``` ###### 3. Load the model and processor Finally, we load the **HuggingFaceTB/SmolVLM2-2.2B-Instruct** model. The `AutoProcessor` is also initialized here — it ensures that both text and images are preprocessed correctly before being passed to the model. ```python model_name = "HuggingFaceTB/SmolVLM2-2.2B-Instruct" model = AutoModelForImageTextToText.from_pretrained( model_name, dtype=torch.bfloat16, ).to(device) processor = AutoProcessor.from_pretrained(model_name) ``` ##### Explore the dataset In this step, we load a small subset of the **ChartQA** dataset — just 10% of the training and validation splits — to keep the exercises fast and manageable for learning purposes. We then display one of the chart images using `matplotlib` to get a visual sense of the model's input. Additionally, we print the corresponding query and label so you can fully understand the dataset structure and the type of tasks the model will handle. ```python from datasets import load_dataset import matplotlib.pyplot as plt train_dataset, eval_dataset = load_dataset("HuggingFaceM4/ChartQA", split=["train[:10%]", "val[:10%]"]) example = train_dataset[1] image = load_image(example["image"]) print(example["query"]) print(example["label"][0]) ``` Output
```text How many values are below 40 in Unfavorable graph? 6 ``` ```python plt.imshow(image) plt.axis("off") plt.title("Sample Chart Image") plt.show() ```  ##### Build a chat-style prompt We create a **chat message list** that includes a user query along with the image. Using `processor.apply_chat_template`, we transform this into the exact input format the model expects. ```python ### Define a chat-style prompt messages = [ {"role": "user", "content": [ {"type": "image", "image": image}, {"type": "text", "text": example["query"]}, ]} ] ### Apply the chat template chat_prompt = processor.apply_chat_template( messages, add_generation_prompt=True\ ) print(chat_prompt) ``` Output
```text <|im_start|>User:How many values are below 40 in Unfavorable graph? Assistant: ``` </details> ##### Run inference We tokenize the chat prompt and image into tensors, then generate a response with the model. Finally, we decode the output tokens back into text. ```python ### Tokenize input inputs = processor(images=[image], text=chat_prompt, return_tensors="pt").to(device) ### Generate model output with torch.no_grad(): output = model.generate(**inputs, max_new_tokens=20) ### Trim the generated ids to remove the input ids trimmed_generated_ids = [out_ids[len(in_ids) :] for in_ids, out_ids in zip(inputs.input_ids, output)] ### Decode the output text output_text = processor.batch_decode( trimmed_generated_ids, skip_special_tokens=True, clean_up_tokenization_spaces=False ) print(output_text[0]) ``` Output
```text 3. ``` The model generates a reponse, but it's not exactly correct. It could be improved with some fine-tuning. Now that we've seen how to build prompts and generate responses with **SmolVLM2-2.2B-Instruct**, it's time to learn how to adapt and **fine-tune** the model efficiently using **LoRA (Low-Rank Adaptation)**. This approach allows training large models with fewer resources and prepares the model for specific downstream tasks. #### Exercise 2: Fine-Tune the Model Using LoRA In this exercise, we'll apply **LoRA (Low-Rank Adaptation)** to fine-tune our Vision-Language Model efficiently. LoRA works by injecting **trainable low-rank matrices** into existing model layers, enabling **large models to be fine-tuned with significantly fewer trainable parameters**. This approach reduces memory usage and speeds up training while maintaining high performance. ```python system_message = """You are a Vision Language Model specialized in interpreting visual data from chart images. Your task is to analyze the provided chart image and respond to queries with concise answers, usually a single word, number, or short phrase. The charts include a variety of types (e.g., line charts, bar charts) and contain colors, labels, and text. Focus on delivering accurate, succinct answers based on the visual information. Avoid additional explanation unless absolutely necessary.""" ``` We’ll format the dataset into a **chatbot-style structure**, where each example includes: - A **system message** defining the assistant’s role - The **chart image** - The **user query** - The **expected answer** This is the format expected by the `SFTTrainer`, including the `images` and `messages` columns. You can learn more about preparing datasets for VLM post-training in the [documentation](https://huggingface.co/docs/trl/en/sft_trainer#training-vision-language-models). --- ##### Format the Dataset The first step is to structure the dataset for VLM training. We’ll define a **system message** that instructs the model to act as a **chart analysis expert**, providing **concise, accurate answers** about chart images. ```python def format_data(sample): return { "images": [sample["image"]], "messages": [ { "role": "system", "content": [{"type": "text", "text": system_message}], }, { "role": "user", "content": [ { "type": "image", "image": sample["image"], }, { "type": "text", "text": sample["query"], }, ], }, { "role": "assistant", "content": [{"type": "text", "text": sample["label"][0]}], }, ], } ``` Now, let’s format the data using the chatbot structure. This will set up the interactions for the model. ```python train_dataset = [format_data(sample) for sample in train_dataset] eval_dataset = [format_data(sample) for sample in eval_dataset] ``` ##### Configure LoRA Here we define a `LoraConfig`: - `r` and `lora_alpha` control the rank and scaling of the adaptation matrices. - `target_modules` specifies which parts of the model to adapt. - `task_type` is set for causal language modeling. We then apply LoRA to the base model using `get_peft_model` and print out the trainable parameters to verify the adaptation. ```python from peft import LoraConfig, get_peft_model ### Configure LoRA peft_config = LoraConfig( lora_alpha=16, lora_dropout=0.05, r=8, target_modules=["q_proj", "v_proj"], task_type="CAUSAL_LM", ) ### Apply PEFT model adaptation peft_model = get_peft_model(model, peft_config) ### Print trainable parameters peft_model.print_trainable_parameters() ``` ##### Set up the Trainer We configure the **SFTTrainer** from `trl` with `SFTConfig`: - `num_train_epochs`, `batch_size`, and `gradient_accumulation_steps` control the training loop. - `gradient_checkpointing`, and `bf16` optimize memory and speed. - `learning_rate` manages optimization. - `train_dataset` and `eval_dataset` are aligned with your dataset. This prepares the trainer to handle fine-tuning with PEFT/LoRA. ```python from trl import SFTConfig, SFTTrainer ### Configure training arguments using SFTConfig training_args = SFTConfig( output_dir="smol-course-smolvlm2-2.2b-instruct-trl-sft-ChartQA", num_train_epochs=1, per_device_train_batch_size=4, gradient_accumulation_steps=4, learning_rate=1e-4, logging_steps=25, save_strategy="steps", save_steps=25, optim="adamw_torch_fused", bf16=True, push_to_hub=True, report_to="trackio", max_length=None, ) ### Initialize the Trainer trainer = SFTTrainer( model=model, args=training_args, train_dataset=train_dataset, eval_dataset=eval_dataset, peft_config=peft_config, ) ### Align the SFTTrainer params with your chosen dataset. ``` ##### Train and Save the Model Now we run the training loop: 1. `trainer.train()` starts fine-tuning with LoRA. 2. `trainer.save_model()` stores the locally trained model. This step ensures the model is ready for downstream tasks with minimal additional parameters. ```python ### Train the model trainer.train() ### Save the model trainer.save_model(training_args.output_dir) ``` With the foundations of Python-based fine-tuning and LoRA in place, we can now move this workflow to a **production environment** using the **TRL CLI**. This approach lets you automate fine-tuning and create reproducible pipelines without writing full Python scripts. #### Exercise 3: Production Workflow with TRL CLI In the previous exercises, we focused on using the Python API to fine-tune **SmolVLM2-2.2B-Instruct**, exploring dataset preparation and generating chat-style prompts. In this exercise, we’ll demonstrate how to perform fine-tuning using the **TRL CLI**, a common workflow in production environments. The CLI allows you to run experiments and manage training without writing Python scripts. If you want a refresher, we previously introduced this tool [here](../unit1/4#exercise-4-production-workflow-with-trl-cli), and the same concepts and troubleshooting tips apply. The TRL CLI leverages the same logic and configuration options as the Python API but presents them through a simple command-line interface. This means you can define everything—from the model and dataset to training hyperparameters and output location—in a single command. The example below shows how to fine-tune **SmolVLM2-2.2B-Instruct** on the **trl-lib/llava-instruct-mix** dataset, using LoRA for parameter-efficient fine-tuning, mixed precision for faster training, and optional push-to-Hub for sharing your model. The dataset now is different. We are using a different dataset here because it already comes formatted in the expected VLM structure, as discussed earlier. - `--model_name_or_path` specifies the base model to fine-tune. - `--dataset_name` and `--dataset_config` define the dataset and subset. - `--output_dir` sets the local directory for saving the fine-tuned model. - `--per_device_train_batch_size` and `--gradient_accumulation_steps` control effective batch size and memory usage. - `--learning_rate`, `--num_train_epochs`, and `--max_length` define the core training hyperparameters. - `--bf16` enables mixed precision for faster and more memory-efficient training on compatible GPUs. - `--push_to_hub` and `--hub_model_id` allow automatic upload of the trained model to your Hugging Face Hub repository. Using the TRL CLI is functionally equivalent to writing a full Python training script, but it’s faster to configure, easier to reproduce, and ideal for production pipelines or automated training workflows. ```bash trl sft \ --model_name_or_path HuggingFaceTB/SmolVLM2-2.2B-Instruct \ --dataset_name trl-lib/llava-instruct-mix \ --output_dir ./smolvln-instruct-sft-cli \ --per_device_train_batch_size 1 \ --gradient_accumulation_steps 16 \ --learning_rate 2e-4 \ --num_train_epochs 3 \ --max_length -1 \ --logging_steps 5 \ --save_steps 100 \ --warmup_steps 50 \ --bf16 True \ --push_to_hub \ --hub_model_id your-username/smolvlm2-2.2b-instruct-sft-cli ``` #### Exercise 4: Training with Hugging Face Jobs In [Unit 1](../unit1/5), we introduced **Hugging Face Jobs (HF Jobs)** and demonstrated how to fine-tune a model using this managed cloud service. HF Jobs provides a **fully managed infrastructure** for training models, eliminating the need to set up GPUs, manage dependencies, or configure environments locally. This is especially useful for **SFT training**, which can be both resource-intensive and time-consuming. Following the same approach, we can use HF Jobs to fine-tune our Vision-Language Model (VLM). If needed, refer back to Unit 1 to refresh your understanding of HF Jobs and their workflow. Here’s an example of how to launch a training job using **TRL’s maintained SFT script**: ```bash ### Use TRL's maintained SFT script directly hf jobs uv run \ --flavor a10g-large \ --timeout 2h \ --secrets HF_TOKEN \ --with num2words==0.5.14 \ "https://raw.githubusercontent.com/huggingface/trl/main/trl/scripts/sft.py" \ --model_name_or_path HuggingFaceTB/SmolVLM2-2.2B-Instruct \ --dataset_name trl-lib/llava-instruct-mix\ --learning_rate 5e-5 \ --per_device_train_batch_size 4 \ --max_length -1 \ --max_steps 1000 \ --output_dir smolvlm2-2.2b-instruct-sft-jobs \ --push_to_hub \ --hub_model_id your-username/smolvlm2-2.2b-instruct-sft-jobs \ --report_to trackio ``` After launching the job, HF Jobs will handle the **entire training process** in the cloud. You can monitor progress, view logs, and track metrics directly from the Hugging Face Hub. Once the job completes: - The **fine-tuned model** will be available in the `output_dir` you specified. - If `--push_to_hub` was used, the model will also be **accessible from your Hugging Face account**, ready for inference or further fine-tuning. - You can **resume, replicate, or scale** training easily by re-running or modifying the job configuration. This workflow removes the overhead of managing local resources, allowing you to focus on **model experimentation and evaluation**. #### Test your knowledge You’ve completed the unit — great work! Now put your learning to the test by taking the [quiz](https://huggingface.co/spaces/smol-course/unit_4_quiz). #### Resources for Further Learning Here are some helpful resources to deepen your understanding and continue experimenting with vision language models and TRL workflows: - **[TRL Documentation](https://huggingface.co/docs/trl/)** – Complete reference for using TRL, including Python API and CLI. - **[HuggingFaceTB/SmolVLM2-2.2B-Instruct Model Card](https://huggingface.co/HuggingFaceTB/SmolVLM2-2.2B-Instruct)** – Detailed information about the model architecture, training, and usage. - **[HuggingFaceM4/ChartQA Dataset](https://huggingface.co/datasets/HuggingFaceM4/ChartQA)** – Dataset used for training and fine-tuning VLMs. - **[Hugging Face Hub](https://huggingface.co/)** – Platform to share your fine-tuned models and discover community models. - **[Hugging Face Discord Community](https://discord.gg/huggingface)** – Join the community for discussions, support, and troubleshooting. ## 4. Model Evaluation ### Evaluation Evaluation is a critical step in developing and deploying language models. It helps us understand how well our models perform across different capabilities and identify areas for improvement. This module covers both standard benchmarks and domain-specific evaluation approaches to comprehensively assess your smol model. We'll use [`lighteval`](https://github.com/huggingface/lighteval), a powerful evaluation library developed by Hugging Face that integrates seamlessly with the Hugging Face ecosystem. For a deeper dive into evaluation concepts and best practices, check out the evaluation [guidebook](https://github.com/huggingface/evaluation-guidebook). #### Module Overview A thorough evaluation strategy examines multiple aspects of model performance. We assess task-specific capabilities like question answering and summarization to understand how well the model handles different types of problems. We measure output quality through factors like coherence and factual accuracy. Safety evaluation helps identify potential harmful outputs or biases. Finally, domain expertise testing verifies the model's specialized knowledge in your target field. #### Contents ##### 1️⃣ [Automatic Benchmarks](./automatic_benchmarks.md) Learn to evaluate your model using standardized benchmarks and metrics. We'll explore common benchmarks like MMLU and TruthfulQA, understand key evaluation metrics and settings, and cover best practices for reproducible evaluation. ##### 2️⃣ [Custom Domain Evaluation](./custom_evaluation.md) Discover how to create evaluation pipelines tailored to your specific use case. We'll walk through designing custom evaluation tasks, implementing specialized metrics, and building evaluation datasets that match your requirements. ##### 3️⃣ [Domain Evaluation Project](./project/README.md) Follow a complete example of building a domain-specific evaluation pipeline. You'll learn to generate evaluation datasets, use Argilla for data annotation, create standardized datasets, and evaluate models using LightEval. ##### Exercise Notebooks | Title | Description | Exercise | Link | Colab | | ----------------------------- | ------------------------------------------------------------ | ------------------------------------------------------------ | ------------------------------------------------------------ | ------------------------------------------------------------ | | Evaluate and Analyze Your LLM | Learn how to use LightEval to evaluate and compare models on specific domains | 🐢 Use medical domain tasks to evaluate a model
🐕 Create a new domain evaluation with different MMLU tasks
🦁 Create a custom evaluation task for your domain | [Notebook](./notebooks/lighteval_evaluate_and_analyse_your_LLM.ipynb) |  | #### Resources - [Evaluation Guidebook](https://github.com/huggingface/evaluation-guidebook) - Comprehensive guide to LLM evaluation - [LightEval Documentation](https://github.com/huggingface/lighteval) - Official docs for the LightEval library - [Argilla Documentation](https://docs.argilla.io) - Learn about the Argilla annotation platform - [MMLU Paper](https://huggingface.co/papers/2009.03300) - Paper describing the MMLU benchmark - [Creating a Custom Task](https://github.com/huggingface/lighteval/wiki/Adding-a-Custom-Task) - [Creating a Custom Metric](https://github.com/huggingface/lighteval/wiki/Adding-a-New-Metric) - [Using existing metrics](https://github.com/huggingface/lighteval/wiki/Metric-List) ### Automatic Benchmarks Automatic benchmarks serve as standardized tools for evaluating language models across different tasks and capabilities. While they provide a useful starting point for understanding model performance, it's important to recognize that they represent only one piece of a comprehensive evaluation strategy. #### Understanding Automatic Benchmarks Automatic benchmarks typically consist of curated datasets with predefined tasks and evaluation metrics. These benchmarks aim to assess various aspects of model capability, from basic language understanding to complex reasoning. The key advantage of using automatic benchmarks is their standardization - they allow for consistent comparison across different models and provide reproducible results. However, it's crucial to understand that benchmark performance doesn't always translate directly to real-world effectiveness. A model that excels at academic benchmarks may still struggle with specific domain applications or practical use cases. #### Benchmarks and Their Limitations ##### General Knowledge Benchmarks MMLU (Massive Multitask Language Understanding) tests knowledge across 57 subjects, from science to humanities. While comprehensive, it may not reflect the depth of expertise needed for specific domains. TruthfulQA evaluates a model's tendency to reproduce common misconceptions, though it can't capture all forms of misinformation. ##### Reasoning Benchmarks BBH (Big Bench Hard) and GSM8K focus on complex reasoning tasks. BBH tests logical thinking and planning, while GSM8K specifically targets mathematical problem-solving. These benchmarks help assess analytical capabilities but may not capture the nuanced reasoning required in real-world scenarios. ##### Language Understanding HELM provides a holistic evaluation framework, while WinoGrande tests common sense through pronoun disambiguation. These benchmarks offer insights into language processing capabilities but may not fully represent the complexity of natural conversation or domain-specific terminology. #### Alternative Evaluation Approaches Many organizations have developed alternative evaluation methods to address the limitations of standard benchmarks: ##### LLM-as-Judge Using one language model to evaluate another's outputs has become increasingly popular. This approach can provide more nuanced feedback than traditional metrics, though it comes with its own biases and limitations. ##### Evaluation Arenas Platforms like Anthropic's Constitutional AI Arena allow models to interact and evaluate each other in controlled environments. This can reveal strengths and weaknesses that might not be apparent in traditional benchmarks. ##### Custom Benchmark Suites Organizations often develop internal benchmark suites tailored to their specific needs and use cases. These might include domain-specific knowledge tests or evaluation scenarios that mirror actual deployment conditions. #### Creating Your Own Evaluation Strategy Remember that while LightEval makes it easy to run standard benchmarks, you should also invest time in developing evaluation methods specific to your use case. While standard benchmarks provide a useful baseline, they shouldn't be your only evaluation method. Here's how to develop a more comprehensive approach: 1. Start with relevant standard benchmarks to establish a baseline and enable comparison with other models. 2. Identify the specific requirements and challenges of your use case. What tasks will your model actually perform? What kinds of errors would be most problematic? 3. Develop custom evaluation datasets that reflect your actual use case. This might include: - Real user queries from your domain - Common edge cases you've encountered - Examples of particularly challenging scenarios 4. Consider implementing a multi-layered evaluation strategy: - Automated metrics for quick feedback - Human evaluation for nuanced understanding - Domain expert review for specialized applications - A/B testing in controlled environments #### Using LightEval for Benchmarking LightEval tasks are defined using a specific format: ``` {suite}|{task}|{num_few_shot}|{auto_reduce} ``` - **suite**: The benchmark suite (e.g., 'mmlu', 'truthfulqa') - **task**: Specific task within the suite (e.g., 'abstract_algebra') - **num_few_shot**: Number of examples to include in prompt (0 for zero-shot) - **auto_reduce**: Whether to automatically reduce few-shot examples if prompt is too long (0 or 1) Example: `"mmlu|abstract_algebra|0|0"` evaluates on MMLU's abstract algebra task with zero-shot inference. ##### Example Evaluation Pipeline Here's a complete example of setting up and running an evaluation on automatic benchmarks relevant to one specific domain: ```python from lighteval.tasks import Task, Pipeline from transformers import AutoModelForCausalLM ### Define tasks to evaluate domain_tasks = [ "mmlu|anatomy|0|0", "mmlu|high_school_biology|0|0", "mmlu|high_school_chemistry|0|0", "mmlu|professional_medicine|0|0" ] ### Configure pipeline parameters pipeline_params = { "max_samples": 40, ### Number of samples to evaluate "batch_size": 1, ### Batch size for inference "num_workers": 4 ### Number of worker processes } ### Create evaluation tracker evaluation_tracker = EvaluationTracker( output_path="./results", save_generations=True ) ### Load model and create pipeline model = AutoModelForCausalLM.from_pretrained("your-model-name") pipeline = Pipeline( tasks=domain_tasks, pipeline_parameters=pipeline_params, evaluation_tracker=evaluation_tracker, model=model ) ### Run evaluation pipeline.evaluate() ### Get and display results results = pipeline.get_results() pipeline.show_results() ``` Results are displayed in a tabular format showing: ``` | Task |Version|Metric|Value | |Stderr| |----------------------------------------|------:|------|-----:|---|-----:| |all | |acc |0.3333|± |0.1169| |leaderboard:mmlu:_average:5 | |acc |0.3400|± |0.1121| |leaderboard:mmlu:anatomy:5 | 0|acc |0.4500|± |0.1141| |leaderboard:mmlu:high_school_biology:5 | 0|acc |0.1500|± |0.0819| ``` You can also handle the results in a pandas DataFrame and visualise or represent them as you want. ### Next Steps ⏩ Explore [Custom Domain Evaluation](./custom_evaluation.md) to learn how to create evaluation pipelines tailored to your specific needs ### Custom Domain Evaluation While standard benchmarks provide valuable insights, many applications require specialized evaluation approaches tailored to specific domains or use cases. This guide will help you create custom evaluation pipelines that accurately assess your model's performance in your target domain. #### Designing Your Evaluation Strategy A successful custom evaluation strategy starts with clear objectives. Consider what specific capabilities your model needs to demonstrate in your domain. This might include technical knowledge, reasoning patterns, or domain-specific formats. Document these requirements carefully - they'll guide both your task design and metric selection. Your evaluation should test both standard use cases and edge cases. For example, in a medical domain, you might evaluate both common diagnostic scenarios and rare conditions. In financial applications, you might test both routine transactions and complex edge cases involving multiple currencies or special conditions. #### Implementation with LightEval LightEval provides a flexible framework for implementing custom evaluations. Here's how to create a custom task: ```python from lighteval.tasks import Task, Doc from lighteval.metrics import SampleLevelMetric, MetricCategory, MetricUseCase class CustomEvalTask(Task): def __init__(self): super().__init__( name="custom_task", version="0.0.1", metrics=["accuracy", "f1"], ### Your chosen metrics description="Description of your custom evaluation task" ) def get_prompt(self, sample): ### Format your input into a prompt return f"Question: {sample['question']}\nAnswer:" def process_response(self, response, ref): ### Process model output and compare to reference return response.strip() == ref.strip() ``` #### Custom Metrics Domain-specific tasks often require specialized metrics. LightEval provides a flexible framework for creating custom metrics that capture domain-relevant aspects of performance: ```python from aenum import extend_enum from lighteval.metrics import Metrics, SampleLevelMetric, SampleLevelMetricGrouping import numpy as np ### Define a sample-level metric function def custom_metric(predictions: list[str], formatted_doc: Doc, **kwargs) -> dict: """Example metric that returns multiple scores per sample""" response = predictions[0] return { "accuracy": response == formatted_doc.choices[formatted_doc.gold_index], "length_match": len(response) == len(formatted_doc.reference) } ### Create a metric that returns multiple values per sample custom_metric_group = SampleLevelMetricGrouping( metric_name=["accuracy", "length_match"], ### Names of sub-metrics higher_is_better={ ### Whether higher values are better for each metric "accuracy": True, "length_match": True }, category=MetricCategory.CUSTOM, use_case=MetricUseCase.SCORING, sample_level_fn=custom_metric, corpus_level_fn={ ### How to aggregate each metric "accuracy": np.mean, "length_match": np.mean } ) ### Register the metric with LightEval extend_enum(Metrics, "custom_metric_name", custom_metric_group) ``` For simpler cases where you only need one metric value per sample: ```python def simple_metric(predictions: list[str], formatted_doc: Doc, **kwargs) -> bool: """Example metric that returns a single score per sample""" response = predictions[0] return response == formatted_doc.choices[formatted_doc.gold_index] simple_metric_obj = SampleLevelMetric( metric_name="simple_accuracy", higher_is_better=True, category=MetricCategory.CUSTOM, use_case=MetricUseCase.SCORING, sample_level_fn=simple_metric, corpus_level_fn=np.mean ### How to aggregate across samples ) extend_enum(Metrics, "simple_metric", simple_metric_obj) ``` You can then use your custom metrics in your evaluation tasks by referencing them in the task configuration. The metrics will be automatically computed across all samples and aggregated according to your specified functions. For more complex metrics, consider: - Using metadata in your formatted documents to weight or adjust scores - Implementing custom aggregation functions for corpus-level statistics - Adding validation checks for your metric inputs - Documenting edge cases and expected behavior For a complete example of custom metrics in action, see our [domain evaluation project](./project/README.md). #### Dataset Creation High-quality evaluation requires carefully curated datasets. Consider these approaches for dataset creation: 1. Expert Annotation: Work with domain experts to create and validate evaluation examples. Tools like [Argilla](https://github.com/argilla-io/argilla) make this process more efficient. 2. Real-World Data: Collect and anonymize real usage data, ensuring it represents actual deployment scenarios. 3. Synthetic Generation: Use LLMs to generate initial examples, then have experts validate and refine them. #### Best Practices - Document your evaluation methodology thoroughly, including any assumptions or limitations - Include diverse test cases that cover different aspects of your domain - Consider both automated metrics and human evaluation where appropriate - Version control your evaluation datasets and code - Regularly update your evaluation suite as you discover new edge cases or requirements #### References - [LightEval Custom Task Guide](https://github.com/huggingface/lighteval/wiki/Adding-a-Custom-Task) - [LightEval Custom Metrics](https://github.com/huggingface/lighteval/wiki/Adding-a-New-Metric) - [Argilla Documentation](https://docs.argilla.io) for dataset annotation - [Evaluation Guidebook](https://github.com/huggingface/evaluation-guidebook) for general evaluation principles ### Next Steps ⏩ For a complete example of implementing these concepts, see our [domain evaluation project](./project/README.md). ## 5. Synthetic Datasets Synthetic data is artificially generated data that mimics real-world usage. It allows overcoming data limitations by expanding or enhancing datasets. Even though synthetic data was already used for some use cases, large language models have made synthetic datasets more popular for pre- and post-training, and the evaluation of language models. We'll use [`distilabel`](https://distilabel.argilla.io/latest/), a framework for synthetic data and AI feedback for engineers who need fast, reliable and scalable pipelines based on verified research papers. For a deeper dive into the package and best practices, check out the [documentation](https://distilabel.argilla.io/latest/). #### Module Overview Synthetic data for language models can be categorized into three taxonomies: instructions, preferences and critiques. We will focus on the first two categories, which focus on the generation of datasets for instruction tuning and preference alignment. In both categories, we will cover aspects of the third category, which focuses on improving existing data with model critiques and rewrites.  #### Contents ##### 1. [Instruction Datasets](./instruction_datasets.md) Learn how to generate instruction datasets for instruction tuning. We will explore creating instruction tuning datasets thorugh basic prompting and using prompts more refined techniques from papers. Instruction tuning datasets with seed data for in-context learning can be created through methods like SelfInstruct and Magpie. Additionally, we will explore instruction evolution through EvolInstruct. [Start learning](./instruction_datasets.md). ##### 2. [Preference Datasets](./preference_datasets.md) Learn how to generate preference datasets for preference alignment. We will build on top of the methods and techniques introduced in section 1, by generating additional responses. Next, we will learn how to improve such responses with the EvolQuality prompt. Finally, we will explore how to evaluate responses with the the UltraFeedback prompt which will produce a score and critique, allowing us to create preference pairs. [Start learning](./preference_datasets.md). ##### Exercise Notebooks | Title | Description | Exercise | Link | Colab | | ------------------- | ------------------------------------------- | ------------------------------------------------------------ | ------------------------------------------------------ | ------------------------------------------------------------ | | Instruction Dataset | Generate a dataset for instruction tuning | 🐢 Generate an instruction tuning dataset
| #### Resources - [Evaluation Guidebook](https://github.com/huggingface/evaluation-guidebook) - Comprehensive guide to LLM evaluation - [LightEval Documentation](https://github.com/huggingface/lighteval) - Official docs for the LightEval library - [Argilla Documentation](https://docs.argilla.io) - Learn about the Argilla annotation platform - [MMLU Paper](https://huggingface.co/papers/2009.03300) - Paper describing the MMLU benchmark - [Creating a Custom Task](https://github.com/huggingface/lighteval/wiki/Adding-a-Custom-Task) - [Creating a Custom Metric](https://github.com/huggingface/lighteval/wiki/Adding-a-New-Metric) - [Using existing metrics](https://github.com/huggingface/lighteval/wiki/Metric-List) ### Automatic Benchmarks Automatic benchmarks serve as standardized tools for evaluating language models across different tasks and capabilities. While they provide a useful starting point for understanding model performance, it's important to recognize that they represent only one piece of a comprehensive evaluation strategy. #### Understanding Automatic Benchmarks Automatic benchmarks typically consist of curated datasets with predefined tasks and evaluation metrics. These benchmarks aim to assess various aspects of model capability, from basic language understanding to complex reasoning. The key advantage of using automatic benchmarks is their standardization - they allow for consistent comparison across different models and provide reproducible results. However, it's crucial to understand that benchmark performance doesn't always translate directly to real-world effectiveness. A model that excels at academic benchmarks may still struggle with specific domain applications or practical use cases. #### Benchmarks and Their Limitations ##### General Knowledge Benchmarks MMLU (Massive Multitask Language Understanding) tests knowledge across 57 subjects, from science to humanities. While comprehensive, it may not reflect the depth of expertise needed for specific domains. TruthfulQA evaluates a model's tendency to reproduce common misconceptions, though it can't capture all forms of misinformation. ##### Reasoning Benchmarks BBH (Big Bench Hard) and GSM8K focus on complex reasoning tasks. BBH tests logical thinking and planning, while GSM8K specifically targets mathematical problem-solving. These benchmarks help assess analytical capabilities but may not capture the nuanced reasoning required in real-world scenarios. ##### Language Understanding HELM provides a holistic evaluation framework, while WinoGrande tests common sense through pronoun disambiguation. These benchmarks offer insights into language processing capabilities but may not fully represent the complexity of natural conversation or domain-specific terminology. #### Alternative Evaluation Approaches Many organizations have developed alternative evaluation methods to address the limitations of standard benchmarks: ##### LLM-as-Judge Using one language model to evaluate another's outputs has become increasingly popular. This approach can provide more nuanced feedback than traditional metrics, though it comes with its own biases and limitations. ##### Evaluation Arenas Platforms like Anthropic's Constitutional AI Arena allow models to interact and evaluate each other in controlled environments. This can reveal strengths and weaknesses that might not be apparent in traditional benchmarks. ##### Custom Benchmark Suites Organizations often develop internal benchmark suites tailored to their specific needs and use cases. These might include domain-specific knowledge tests or evaluation scenarios that mirror actual deployment conditions. #### Creating Your Own Evaluation Strategy Remember that while LightEval makes it easy to run standard benchmarks, you should also invest time in developing evaluation methods specific to your use case. While standard benchmarks provide a useful baseline, they shouldn't be your only evaluation method. Here's how to develop a more comprehensive approach: 1. Start with relevant standard benchmarks to establish a baseline and enable comparison with other models. 2. Identify the specific requirements and challenges of your use case. What tasks will your model actually perform? What kinds of errors would be most problematic? 3. Develop custom evaluation datasets that reflect your actual use case. This might include: - Real user queries from your domain - Common edge cases you've encountered - Examples of particularly challenging scenarios 4. Consider implementing a multi-layered evaluation strategy: - Automated metrics for quick feedback - Human evaluation for nuanced understanding - Domain expert review for specialized applications - A/B testing in controlled environments #### Using LightEval for Benchmarking LightEval tasks are defined using a specific format: ``` {suite}|{task}|{num_few_shot}|{auto_reduce} ``` - **suite**: The benchmark suite (e.g., 'mmlu', 'truthfulqa') - **task**: Specific task within the suite (e.g., 'abstract_algebra') - **num_few_shot**: Number of examples to include in prompt (0 for zero-shot) - **auto_reduce**: Whether to automatically reduce few-shot examples if prompt is too long (0 or 1) Example: `"mmlu|abstract_algebra|0|0"` evaluates on MMLU's abstract algebra task with zero-shot inference. ##### Example Evaluation Pipeline Here's a complete example of setting up and running an evaluation on automatic benchmarks relevant to one specific domain: ```python from lighteval.tasks import Task, Pipeline from transformers import AutoModelForCausalLM ### Define tasks to evaluate domain_tasks = [ "mmlu|anatomy|0|0", "mmlu|high_school_biology|0|0", "mmlu|high_school_chemistry|0|0", "mmlu|professional_medicine|0|0" ] ### Configure pipeline parameters pipeline_params = { "max_samples": 40, ### Number of samples to evaluate "batch_size": 1, ### Batch size for inference "num_workers": 4 ### Number of worker processes } ### Create evaluation tracker evaluation_tracker = EvaluationTracker( output_path="./results", save_generations=True ) ### Load model and create pipeline model = AutoModelForCausalLM.from_pretrained("your-model-name") pipeline = Pipeline( tasks=domain_tasks, pipeline_parameters=pipeline_params, evaluation_tracker=evaluation_tracker, model=model ) ### Run evaluation pipeline.evaluate() ### Get and display results results = pipeline.get_results() pipeline.show_results() ``` Results are displayed in a tabular format showing: ``` | Task |Version|Metric|Value | |Stderr| |----------------------------------------|------:|------|-----:|---|-----:| |all | |acc |0.3333|± |0.1169| |leaderboard:mmlu:_average:5 | |acc |0.3400|± |0.1121| |leaderboard:mmlu:anatomy:5 | 0|acc |0.4500|± |0.1141| |leaderboard:mmlu:high_school_biology:5 | 0|acc |0.1500|± |0.0819| ``` You can also handle the results in a pandas DataFrame and visualise or represent them as you want. ### Next Steps ⏩ Explore [Custom Domain Evaluation](./custom_evaluation.md) to learn how to create evaluation pipelines tailored to your specific needs ### Custom Domain Evaluation While standard benchmarks provide valuable insights, many applications require specialized evaluation approaches tailored to specific domains or use cases. This guide will help you create custom evaluation pipelines that accurately assess your model's performance in your target domain. #### Designing Your Evaluation Strategy A successful custom evaluation strategy starts with clear objectives. Consider what specific capabilities your model needs to demonstrate in your domain. This might include technical knowledge, reasoning patterns, or domain-specific formats. Document these requirements carefully - they'll guide both your task design and metric selection. Your evaluation should test both standard use cases and edge cases. For example, in a medical domain, you might evaluate both common diagnostic scenarios and rare conditions. In financial applications, you might test both routine transactions and complex edge cases involving multiple currencies or special conditions. #### Implementation with LightEval LightEval provides a flexible framework for implementing custom evaluations. Here's how to create a custom task: ```python from lighteval.tasks import Task, Doc from lighteval.metrics import SampleLevelMetric, MetricCategory, MetricUseCase class CustomEvalTask(Task): def __init__(self): super().__init__( name="custom_task", version="0.0.1", metrics=["accuracy", "f1"], ### Your chosen metrics description="Description of your custom evaluation task" ) def get_prompt(self, sample): ### Format your input into a prompt return f"Question: {sample['question']}\nAnswer:" def process_response(self, response, ref): ### Process model output and compare to reference return response.strip() == ref.strip() ``` #### Custom Metrics Domain-specific tasks often require specialized metrics. LightEval provides a flexible framework for creating custom metrics that capture domain-relevant aspects of performance: ```python from aenum import extend_enum from lighteval.metrics import Metrics, SampleLevelMetric, SampleLevelMetricGrouping import numpy as np ### Define a sample-level metric function def custom_metric(predictions: list[str], formatted_doc: Doc, **kwargs) -> dict: """Example metric that returns multiple scores per sample""" response = predictions[0] return { "accuracy": response == formatted_doc.choices[formatted_doc.gold_index], "length_match": len(response) == len(formatted_doc.reference) } ### Create a metric that returns multiple values per sample custom_metric_group = SampleLevelMetricGrouping( metric_name=["accuracy", "length_match"], ### Names of sub-metrics higher_is_better={ ### Whether higher values are better for each metric "accuracy": True, "length_match": True }, category=MetricCategory.CUSTOM, use_case=MetricUseCase.SCORING, sample_level_fn=custom_metric, corpus_level_fn={ ### How to aggregate each metric "accuracy": np.mean, "length_match": np.mean } ) ### Register the metric with LightEval extend_enum(Metrics, "custom_metric_name", custom_metric_group) ``` For simpler cases where you only need one metric value per sample: ```python def simple_metric(predictions: list[str], formatted_doc: Doc, **kwargs) -> bool: """Example metric that returns a single score per sample""" response = predictions[0] return response == formatted_doc.choices[formatted_doc.gold_index] simple_metric_obj = SampleLevelMetric( metric_name="simple_accuracy", higher_is_better=True, category=MetricCategory.CUSTOM, use_case=MetricUseCase.SCORING, sample_level_fn=simple_metric, corpus_level_fn=np.mean ### How to aggregate across samples ) extend_enum(Metrics, "simple_metric", simple_metric_obj) ``` You can then use your custom metrics in your evaluation tasks by referencing them in the task configuration. The metrics will be automatically computed across all samples and aggregated according to your specified functions. For more complex metrics, consider: - Using metadata in your formatted documents to weight or adjust scores - Implementing custom aggregation functions for corpus-level statistics - Adding validation checks for your metric inputs - Documenting edge cases and expected behavior For a complete example of custom metrics in action, see our [domain evaluation project](./project/README.md). #### Dataset Creation High-quality evaluation requires carefully curated datasets. Consider these approaches for dataset creation: 1. Expert Annotation: Work with domain experts to create and validate evaluation examples. Tools like [Argilla](https://github.com/argilla-io/argilla) make this process more efficient. 2. Real-World Data: Collect and anonymize real usage data, ensuring it represents actual deployment scenarios. 3. Synthetic Generation: Use LLMs to generate initial examples, then have experts validate and refine them. #### Best Practices - Document your evaluation methodology thoroughly, including any assumptions or limitations - Include diverse test cases that cover different aspects of your domain - Consider both automated metrics and human evaluation where appropriate - Version control your evaluation datasets and code - Regularly update your evaluation suite as you discover new edge cases or requirements #### References - [LightEval Custom Task Guide](https://github.com/huggingface/lighteval/wiki/Adding-a-Custom-Task) - [LightEval Custom Metrics](https://github.com/huggingface/lighteval/wiki/Adding-a-New-Metric) - [Argilla Documentation](https://docs.argilla.io) for dataset annotation - [Evaluation Guidebook](https://github.com/huggingface/evaluation-guidebook) for general evaluation principles ### Next Steps ⏩ For a complete example of implementing these concepts, see our [domain evaluation project](./project/README.md). ## 5. Synthetic Datasets Synthetic data is artificially generated data that mimics real-world usage. It allows overcoming data limitations by expanding or enhancing datasets. Even though synthetic data was already used for some use cases, large language models have made synthetic datasets more popular for pre- and post-training, and the evaluation of language models. We'll use [`distilabel`](https://distilabel.argilla.io/latest/), a framework for synthetic data and AI feedback for engineers who need fast, reliable and scalable pipelines based on verified research papers. For a deeper dive into the package and best practices, check out the [documentation](https://distilabel.argilla.io/latest/). #### Module Overview Synthetic data for language models can be categorized into three taxonomies: instructions, preferences and critiques. We will focus on the first two categories, which focus on the generation of datasets for instruction tuning and preference alignment. In both categories, we will cover aspects of the third category, which focuses on improving existing data with model critiques and rewrites.  #### Contents ##### 1. [Instruction Datasets](./instruction_datasets.md) Learn how to generate instruction datasets for instruction tuning. We will explore creating instruction tuning datasets thorugh basic prompting and using prompts more refined techniques from papers. Instruction tuning datasets with seed data for in-context learning can be created through methods like SelfInstruct and Magpie. Additionally, we will explore instruction evolution through EvolInstruct. [Start learning](./instruction_datasets.md). ##### 2. [Preference Datasets](./preference_datasets.md) Learn how to generate preference datasets for preference alignment. We will build on top of the methods and techniques introduced in section 1, by generating additional responses. Next, we will learn how to improve such responses with the EvolQuality prompt. Finally, we will explore how to evaluate responses with the the UltraFeedback prompt which will produce a score and critique, allowing us to create preference pairs. [Start learning](./preference_datasets.md). ##### Exercise Notebooks | Title | Description | Exercise | Link | Colab | | ------------------- | ------------------------------------------- | ------------------------------------------------------------ | ------------------------------------------------------ | ------------------------------------------------------------ | | Instruction Dataset | Generate a dataset for instruction tuning | 🐢 Generate an instruction tuning dataset
🐕 Generate a dataset for instruction tuning with seed data
🦁 Generate a dataset for instruction tuning with seed data and with instruction evolution | [Link](./notebooks/instruction_sft_dataset.ipynb) | [Colab](https://githubtocolab.com/huggingface/smol-course/tree/main/6_synthetic_datasets/notebooks/instruction_sft_dataset.ipynb) | | Preference Dataset | Generate a dataset for preference alignment | 🐢 Generate a preference alignment dataset
🐕 Generate a preference alignment dataset with response evolution
🦁 Generate a preference alignment dataset with response evolution and critiques | [Link](./notebooks/preference_alignment_dataset.ipynb) | [Colab](https://githubtocolab.com/huggingface/smol-course/tree/main/6_synthetic_datasets/notebooks/preference_alignment_dataset.ipynb) | #### Resources - [Distilabel Documentation](https://distilabel.argilla.io/latest/) - [Synthetic Data Generator is UI app](https://huggingface.co/blog/synthetic-data-generator) - [SmolTalk](https://huggingface.co/datasets/HuggingFaceTB/smoltalk) - [Self-instruct](https://huggingface.co/papers/2212.10560) - [Evol-Instruct](https://huggingface.co/papers/2304.12244) - [Magpie](https://huggingface.co/papers/2406.08464) - [UltraFeedback](https://huggingface.co/papers/2310.01377) - [Deita](https://huggingface.co/papers/2312.15685) ### Generating Instruction Datasets Within [the chapter on instruction tuning](../1_instruction_tuning/README.md), we learned about fine-tuning models with Supervised Fine-tuning. In this section, we will explore how to generate instruction datasets for SFT. We will explore creating instruction tuning datasets through basic prompting and using more refined techniques from papers. Instruction tuning datasets with seed data for in-context learning can be created through methods like SelfInstruct and Magpie. Additionally, we will explore instruction evolution through EvolInstruct. Lastly, we will explore how to generate a dataset for instruction tuning using a distilabel pipeline. #### From Prompt to Data Synthetic data sounds fancy, but it can be simplified as creating data through effective prompting to extract knowledge from a model. In turn, you can think of this as a way to generate data for a specific task. The challenge is prompting effectively while ensuring the data is diverse and representative. Fortunately, many papers have explored this problem, and we will explore some of the useful ones during this course. First things first, we will explore how to generate synthetic data through manual prompting. ##### Basic Prompting Let's start with a basic example and load the [HuggingFaceTB/SmolLM2-1.7B-Instruct](https://huggingface.co/HuggingFaceTB/SmolLM2-1.7B-Instruct) model using the `transformers` integration of the `distilabel` library. We will use the `TextGeneration` class to generate a synthetic `prompt` and use that to generate a `completion`. Next, we will load the model using the `distilabel` library. ```python from distilabel.llms import TransformersLLM from distilabel.steps.tasks import TextGeneration llm = TransformersLLM(model="HuggingFaceTB/SmolLM2-1.7B-Instruct") gen = TextGeneration(llm=llm) gen.load() ``` !!! note Distilabel loads the `llm` into memory, so, when working in a notebook, we need to `gen.unload()` after we are done with it to avoid memory issues. We will now use the `llm` to generate a `prompt` for instruction tuning. ```python next(gen.process([{"instruction": "Generate a questions about the Hugging Face Smol-Course on small AI models."}])) ### What is the purpose of Smol-Course? ``` Lastly, we can use that same `prompt` as input to generate a `completion`. ```python next(gen.process([{"instruction": "What is the purpose of Smol-Course?"}])) ### The Smol-Course is a platform designed to learning computer science concepts. ``` Cool! We can generated a synthetic `prompt` and a corresponding `completion`. Re-using this simple approach at scale will allow us to generate a lot more data however, the quality of the data is not that great and does not take into account the nuances of our course or domain. Additionally, re-running the current code shows us the data is not that diverse. Luckily, there are ways to solve this problem. ##### SelfInstruct SelfInstruct is a prompt that generates new instructions based on a seed dataset. This seed data can be a single instruction or a piece of context. The process begins with a pool of initial seed data. The language model is then prompted to generate new instructions based on this seed data using in-context learning. The prompt is [implemented in distilabel](https://github.com/argilla-io/distilabel/blob/main/src/distilabel/steps/tasks/templates/self-instruct.jinja2) and a simplified version is shown below: ``` ### Task Description Develop user queries that can be received by the given AI application and applicable to the provided context. Emphasize diversity in verbs and linguistic structures within the model's textual capabilities. ### Context ### Output ``` To use it, we need to pass the `llm` to the [SelfInstruct class](https://distilabel.argilla.io/dev/components-gallery/tasks/selfinstruct/). Let's use the text from the [Prompt to Data section](#prompt-to-data) as context and generate a new instruction. ```python from distilabel.steps.tasks import SelfInstruct self_instruct = SelfInstruct(llm=llm) self_instruct.load() context = "" next(self_instruct.process([{"input": text}]))["instructions"][0] ### What is the process of generating synthetic data through manual prompting? ``` The generated instruction is a lot better already and it fits our actual content and domain. However, we can do even better by improving the prompt through evolution. ##### EvolInstruct EvolInstruct is a prompting technique that takes an input instruction and evolves it into a better version of the same instruction. This better version is defined according to a set of criteria and adds constraints, deepening, concretizing, reasoning or complications to the original instruction. The process can be repeated multiple times to create various evolutions of the same instruction, ideally leading to a better version of the original instruction. The prompt is [implemented in distilabel](https://github.com/argilla-io/distilabel/tree/main/src/distilabel/steps/tasks/evol_instruct) and a simplified version is shown below: ``` I want you act as a Prompt Rewriter. Given prompt a prompt, rewrite it into a more complex version. Complicate the prompt based on the following criteria: ### Prompt ### Output ``` To use it, we need to pass the `llm` to the [EvolInstruct class](https://distilabel.argilla.io/dev/components-gallery/tasks/evolinstruct/). Let's use the synthetic prompt from [the SelfInstruct section](#selfinstruct) as input and evolve it into a better version. For this example, we will only evolve for one generation. ```python from distilabel.steps.tasks import EvolInstruct evol_instruct = EvolInstruct(llm=llm, num_evolutions=1) evol_instruct.load() text = "What is the process of generating synthetic data through manual prompting" next(evol_instruct.process([{"instruction": text}])) ### What is the process of generating synthetic data through manual prompting? ### And, how does the artificial intelligence system, GPT4, use machine learning algorithms to manipulate the input data into synthetic data? ``` The instruction is now more complex but has lost some of the original meaning. So, take into account that evolving can be a double-edged sword and we need to be careful with the quality of the data we generate. ##### Magpie Magpie is a technique that relies on the auto-regressive factors of language model and the [chat-template](../1_instruction_tuning/chat_templates.md) that has been using during the instruction tuning process. As you might remember, the chat-template is a format that structures conversations with clear role indicators (system, user, assistant). During the instruction tuning phase, the language model has been optimized to reproduce this format and that is exactly what magpie takes advantage of. It starts with a pre-query-prompt based on the chat-template but it stops before the user message indicator, e.g. `<|im_start|>user\n`, and then it uses the language model to generate the user prompt until the end of the assistant indicator, e.g. `<|im_end|>`. This approach allows us to generate a lot of data in a very efficient way and it can even be scaled up to multi-turn conversations. It is hypothesized this generated data reproduces training data from the instruction tuning phase of the model used. In this scenario, prompt templates differ per model because they are based on the chat-template format. But we can walk through a simplified version of the process step-by-step. ```bash ### Step 1: provide the pre-query-prompt <|im_start|>user\n ### Step 2: the language model generates the user prompt <|im_start|>user\n What is the purpose of Smol-Course? ### Step 3: stop the generation <|im_end|> ``` To use it in distilabel, we need to pass the `llm` to the [Magpie class](https://distilabel.argilla.io/dev/components-gallery/tasks/magpie/). ```python from distilabel.steps.tasks import Magpie magpie = Magpie(llm=llm) magpie.load() next(magpie.process([{"system_prompt": "You are a helpful assistant."}])) ### [{ ### "role": "user", ### "content": "Can you provide me with a list of the top 3 universities?" ### }, ### { ### "role": "assistant", ### "content": "The top 3 universities are: MIT, Yale, Stanford." ### }] ``` We immediately get a dataset with a `prompt` and `completion` . To improve the performance on our own domain, we can inject additional context into the `system_prompt`. For the LLM to generate specific domain data in combination with Magpie, it helps describing in the system prompt what the users queries will be. This is then used in the pre-query-prompt before we start generating the user prompt and bias the LLM to generate user queries of that domain. ``` You're an AI assistant that will help users solving math problems. ``` It's important to write the system prompt as shown above instead of something like: ``` You're an AI assistant that generates math problems ``` Generally, language models are less optimized for passing additional context to the `system_prompt` so this does not always work as well for customisation as other techniques. ##### From Prompts to Pipelines The classes we've seen so far are all standalone classes that can be used in a pipeline. This is a good start, but we can do even better by using the `Pipeline` class to generate a dataset. We will use the `TextGeneration` step to generate a synthetic dataset for instruction tuning. The pipeline will consist of a `LoadDataFromDicts` step to load the data, a `TextGeneration` step to generate the `prompt` and a `completion` for that prompt. We will connect the steps and flow the data through the pipeline using the `>>` operator. Within the [documentation of distilabel](https://distilabel.argilla.io/dev/components-gallery/tasks/textgeneration/#input-output-columns) we can see input and output columns of the step. We to ensure that the data flow correctly through the pipeline, we will use the `output_mappings` parameter to map the output columns to the input columns of the next step. ```python from distilabel.llms import TransformersLLM from distilabel.pipeline import Pipeline from distilabel.steps import LoadDataFromDicts from distilabel.steps.tasks import TextGeneration with Pipeline() as pipeline: data = LoadDataFromDicts(data=[{"instruction": "Generate a short question about the Hugging Face Smol-Course."}]) llm = TransformersLLM(model="HuggingFaceTB/SmolLM2-1.7B-Instruct") gen_a = TextGeneration(llm=llm, output_mappings={"generation": "instruction"}) gen_b = TextGeneration(llm=llm, output_mappings={"generation": "response"}) data >> gen_a >> gen_b if __name__ == "__main__": distiset = pipeline.run(use_cache=False) print(distiset["default"]["train"][0]) ### [{ ### "instruction": "What is the purpose of Smol-Course?", ### "response": "The Smol-Course is a platform designed to learning computer science concepts." ### }] ``` Under the hood, this pipeline has a lot of cool features. It automatically caches generation results, so we can don't have to re-run the generation steps. There is included fault-tolerance, so if the generation steps fail, the pipeline will continue to run. And the pipeline exexutes all generation steps in parallel, so the generation is faster. We can even visualise the pipeline using the `draw` method. Here you can see how the data flows through the pipeline and how the `output_mappings` are used to map the output columns to the input columns of the next step.  #### Best Practices - Ensure you have a diverse seed data to cover a wide range of scenarios - Regularly evaluate the dataset to ensure generated data is diverse and of high quality - Iterate on the (system)prompt to improve the quality of the data #### Next Steps 👨🏽💻 Code -[Exercise Notebook](./notebooks/instruction_sft_dataset.ipynb) to generate a dataset for instruction tuning 🧑🏫 Learn - About [generating preference datasets](./preference_datasets.md) #### References - [Distilabel Documentation](https://distilabel.argilla.io/latest/) - [Self-instruct](https://huggingface.co/papers/2212.10560) - [Evol-Instruct](https://huggingface.co/papers/2304.12244) - [Magpie](https://huggingface.co/papers/2406.08464) ### Generating Preference Datasets Within [the chapter on preference alignment](../2_preference_alignment/README.md), we learned about Direct Preference Optimization. In this section, we will explore how to generate preference datasets for methods like DPO. We will build on top of the methods that were introduced in [generating instruction datasets](./instruction_datasets.md). Additionally, we will show how to add extra completions to the dataset using basic prompting or by using EvolQuality to improve the quality of responses. Lastly, we will show how UltraFeedback can be used to generate scores and critiques. #### Creating multiple completions Preference data is a dataset with multiple `completions` for the same `instruction`. We can add more `completions` to a dataset by prompting a model to generate them. When doing this, we need to ensure that the second completion is not too similar to the first completion in terms of overall quality and phrasing. This is important because the model needs to be optimized for a clear preference. We want to know which completion is preferred over the other, normally referred to as `chosen` and `rejected`. We will go into more detail about determining chosen and rejected completions in the [section on creating scores](#creating-scores). ##### Model pooling You can use models from different model families to generate a second completion, which is called model pooling. To further improve the quality of the second completion, you can use different generation arguments, like tweaking the `temperature`. Lastly, you can use different prompt templates or system prompts to generate a second completion to ensure diversity based on specific characteristics defined in the template. In theory, we could take two models of varying quality and use the better one as the `chosen` completion. Let's start with model pooling by loading the [Qwen/Qwen2.5-1.5B-Instruct](https://huggingface.co/Qwen/Qwen2.5-1.5B-Instruct) and [HuggingFaceTB/SmolLM2-1.7B-Instruct](https://huggingface.co/HuggingFaceTB/SmolLM2-1.7B-Instruct) models using the `transformers` integration of the `distilabel` library. Using these models, we will create two synthetic `responses` for a given `prompt`. We will create another pipeline with `LoadDataFromDicts`, `TextGeneration`, and `GroupColumns`. We will first load data, then use two generation steps, and then group the results. We connect the steps and flow the data through the pipeline using the `>>` operator and `[]`, which means that we want to use the output of the previous step as the input for both steps within the list. ```python from distilabel.llms import TransformersLLM from distilabel.pipeline import Pipeline from distilabel.steps import GroupColumns, LoadDataFromDicts from distilabel.steps.tasks import TextGeneration with Pipeline() as pipeline: data = LoadDataFromDicts(data=[{"instruction": "What is synthetic data?"}]) llm_a = TransformersLLM(model="HuggingFaceTB/SmolLM2-1.7B-Instruct") gen_a = TextGeneration(llm=llm_a) llm_b = TransformersLLM(model="Qwen/Qwen2.5-1.5B-Instruct") gen_b = TextGeneration(llm=llm_b) group = GroupColumns(columns=["generation"]) data >> [gen_a, gen_b] >> group if __name__ == "__main__": distiset = pipeline.run() print(distiset["default"]["train"]["grouped_generation"][0]) ### {[ ### 'Synthetic data is artificially generated data that mimics real-world usage.', ### 'Synthetic data refers to data that has been generated artificially.' ### ]} ``` As you can see, we have two synthetic `completions` for the given `prompt`. We could have boosted diversity by initializing the `TextGeneration` steps with a specific `system_prompt` or by passing generation arguments to the `TransformersLLM`. Let's now see how we can improve the quality of the `completions` using EvolQuality. ##### EvolQuality EvolQuality is similar to [EvolInstruct](./instruction_datasets.md#evolinstruct) - it is a prompting technique but it evolves `completions` instead of the input `prompt`. The task takes both a `prompt` and `completion` and evolves the `completion` into a version that better responds to the `prompt` based on a set of criteria. This better version is defined according to criteria for improving helpfulness, relevance, deepening, creativity, or details. Because this automatically generates a second completion, we can use it to add more `completions` to a dataset. In theory, we could even assume the evolution is better than the original completion and use it as the `chosen` completion out of the box. The prompt is [implemented in distilabel](https://github.com/argilla-io/distilabel/tree/main/src/distilabel/steps/tasks/evol_quality) and a simplified version is shown below: ```bash I want you act as a Response Rewriter. Given prompt a and a response, rewrite the response into a better version. Complicate the prompt based on the following criteria: ### Prompt ### Response ### Improved Response ``` Let's use the [EvolQuality class](https://distilabel.argilla.io/dev/components-gallery/tasks/evolquality/) to evolve the synthetic `prompt` and `completion` from [the Model Pooling section](#model-pooling) into a better version. For this example, we will only evolve for one generation. ```python from distilabel.llms import TransformersLLM from distilabel.steps.tasks import EvolQuality llm = TransformersLLM(model="HuggingFaceTB/SmolLM2-1.7B-Instruct") evol_quality = EvolQuality(llm=llm, num_evolutions=1) evol_quality.load() instruction = "What is synthetic data?" completion = "Synthetic data is artificially generated data that mimics real-world usage." next(evol_quality.process([{ "instruction": instruction, "response": completion }])) ### The process of generating synthetic data through manual prompting involves creating artificial data sets that mimic real-world usage patterns. ``` The `response` is now more complex and specific to the `instruction`. This is a good start, but as we have seen with EvolInstruct, evolved generations are not always better. Hence, it is important to use additional evaluation techniques to ensure the quality of the dataset. We will explore this in the next section. #### Creating Scores Scores are a measure of how much one response is preferred over another. In general, these scores can be absolute, subjective, or relative. For this course, we will focus on the first two because they are most valuable for creating preference datasets. This scoring is a way of judging and evaluating using language models and therefore has some overlap with the evaluation techniques we have seen in [the chapter on evaluation](../3_evaluation/README.md). As with the other evaluation techniques, scores and evaluations normally require larger models to better align with human preferences. ##### UltraFeedback UltraFeedback is a technique that generates scores and critiques for a given `prompt` and its `completion`. The scores are based on the quality of the `completion` according to a set of criteria. There are four fine-grained criteria: `helpfulness`, `relevance`, `deepening`, and `creativity`. These are useful but generally speaking, using the overall criteria is a good start, which allows us to simplify the process of generating scores. The scores can be used to determine which `completion` is the `chosen` and which is the `rejected` one. Because they are absolute, they can also be used as interesting filters for outliers in the dataset, either finding the worst completions or the pairs with more or less difference. The critiques are added to provide reasoning for the score. They can be used as extra context to help us understand the differences between the scores. The language model generates extensive critiques which is very useful, but this also introduces extra cost and complexity to the process because generating critiques is more expensive than generating a single token to represent a score. The prompt is [implemented in distilabel](https://github.com/argilla-io/distilabel/tree/main/src/distilabel/steps/tasks/templates/ultrafeedback) and a simplified version is shown below: ```bash Evaluate the model's outputs based on various criteria: Helpfulness, Relevance, Deepening, Creativity Your role is to provide a holistic assessment based on the above factors. Score the output from 1 to 5 on overall quality. Answer with the following format: score - rationale ### Input ### Response ### Score - Rationale ``` Let's use the [UltraFeedback class](https://distilabel.argilla.io/dev/components-gallery/tasks/ultrafeedback/) to evaluate the synthetic `prompt` and `completion` from [the Model Pooling section](#model-pooling). ```python from distilabel.llms import TransformersLLM from distilabel.steps.tasks import UltraFeedback llm = TransformersLLM(model="HuggingFaceTB/SmolLM2-1.7B-Instruct") ultrafeedback = UltraFeedback(llm=llm) ultrafeedback.load() instruction = "What is synthetic data?" completion_a = "Synthetic data is artificially generated data that mimics real-world usage." completion_b = "Synthetic data refers to data that has been generated artificially." next(ultrafeedback.process([{ "instruction": instruction, "generations": [completion_a, completion_b] }])) ### [ ### { ### 'ratings': [4, 5], ### 'rationales': ['could have been more specific', 'good definition'], ### } ### ] ``` #### Best Practices - Overall scores are cheaper and easier to generate than critiques and specific scores - Use bigger models to generate scores and critiques - Use a diverse set of models to generate scores and critiques - Iterate on configuration of the `system_prompt` and models #### Next Steps 👨🏽💻 Code -[Exercise Notebook](./notebooks/preference_dpo_dataset.ipynb) to generate a dataset for instruction tuning #### References - [Distilabel Documentation](https://distilabel.argilla.io/latest/) - [Deita](https://huggingface.co/papers/2312.15685) - [UltraFeedback](https://huggingface.co/papers/2310.01377) ## 6. Inference Inference is the process of using a trained language model to generate predictions or responses. While inference might seem straightforward, deploying models efficiently at scale requires careful consideration of various factors like performance, cost, and reliability. Large Language Models (LLMs) present unique challenges due to their size and computational requirements. We'll explore both simple and production-ready approaches using the [`transformers`](https://huggingface.co/docs/transformers/index) library and [`text-generation-inference`](https://github.com/huggingface/text-generation-inference), two popular frameworks for LLM inference. For production deployments, we'll focus on Text Generation Inference (TGI), which provides optimized serving capabilities. > [!TIP] > [Deep dive into Text Generation Inference with LLMs](https://huggingface.co/learn/llm-course/chapter1/8) shows a comprehensive explanation of inference with LLMs. #### Module Overview LLM inference can be categorized into two main approaches: simple pipeline-based inference for development and testing, and optimized serving solutions for production deployments. We'll cover both approaches, starting with the simpler pipeline approach and moving to production-ready solutions. #### Contents ##### 1. [Basic Pipeline Inference](./pipeline_inference.md) Learn how to use the Hugging Face Transformers pipeline for basic inference. We'll cover setting up pipelines, configuring generation parameters, and best practices for local development. The pipeline approach is perfect for prototyping and small-scale applications. [Start learning](./pipeline_inference.md). ##### 2. [Production Inference with TGI](./tgi_inference.md) Learn how to deploy models for production using Text Generation Inference. We'll explore optimized serving techniques, batching strategies, and monitoring solutions. TGI provides production-ready features like health checks, metrics, and Docker deployment options. [Start learning](./text_generation_inference.md). ##### Exercise Notebooks | Title | Description | Exercise | Link | Colab | | ------------------ | ------------------------------------------ | ------------------------------------------------------------ | -------------------------------------------------- | ------------------------------------------------------------ | | Pipeline Inference | Basic inference with transformers pipeline | 🐢 Set up a basic pipeline
🐕 Configure generation parameters
🦁 Create a simple web server | [Link](./notebooks/basic_pipeline_inference.ipynb) | [Colab](https://githubtocolab.com/huggingface/smol-course/tree/main/7_inference/notebooks/basic_pipeline_inference.ipynb) | | TGI Deployment | Production deployment with TGI | 🐢 Deploy a model with TGI
🐕 Configure performance optimizations
🦁 Set up monitoring and scaling | [Link](./notebooks/tgi_deployment.ipynb) | [Colab](https://githubtocolab.com/huggingface/smol-course/tree/main/7_inference/notebooks/tgi_deployment.ipynb) | #### Resources - [Hugging Face Pipeline Tutorial](https://huggingface.co/docs/transformers/en/pipeline_tutorial) - [Text Generation Inference Documentation](https://huggingface.co/docs/text-generation-inference/en/index) - [Pipeline WebServer Guide](https://huggingface.co/docs/transformers/en/pipeline_tutorial#using-pipelines-for-a-webserver) - [TGI GitHub Repository](https://github.com/huggingface/text-generation-inference) - [Hugging Face Model Deployment Documentation](https://huggingface.co/docs/inference-endpoints/index) - [vLLM: High-throughput LLM Serving](https://github.com/vllm-project/vllm) - [Optimizing Transformer Inference](https://huggingface.co/blog/optimize-transformer-inference) ### Basic Inference with Transformers Pipeline The `pipeline` abstraction in 🤗 Transformers provides a simple way to run inference with any model from the Hugging Face Hub. It handles all the preprocessing and postprocessing steps, making it easy to use models without deep knowledge of their architecture or requirements. #### How Pipelines Work Hugging Face pipelines streamline the machine learning workflow by automating three critical stages between raw input and human-readable output: **Preprocessing Stage** The pipeline first prepares your raw inputs for the model. This varies by input type: - Text inputs undergo tokenization to convert words into model-friendly token IDs - Images are resized and normalized to match model requirements - Audio is processed through feature extraction to create spectrograms or other representations **Model Inference** During the forward pass, the pipeline: - Handles batching of inputs automatically for efficient processing - Places computation on the optimal device (CPU/GPU) - Applies performance optimizations like half-precision (FP16) inference where supported **Postprocessing Stage** Finally, the pipeline converts raw model outputs into useful results: - Decodes token IDs back into readable text - Transforms logits into probability scores - Formats outputs according to the specific task (e.g., classification labels, generated text) This abstraction lets you focus on your application logic while the pipeline handles the technical complexity of model inference. #### Basic Usage Here's how to use a pipeline for text generation: ```python from transformers import pipeline ### Create a pipeline with a specific model generator = pipeline( "text-generation", model="HuggingFaceTB/SmolLM2-1.7B-Instruct", torch_dtype="auto", device_map="auto" ) ### Generate text response = generator( "Write a short poem about coding:", max_new_tokens=100, do_sample=True, temperature=0.7 ) print(response[0]['generated_text']) ``` #### Key Configuration Options ##### Model Loading ```python ### CPU inference generator = pipeline("text-generation", model="HuggingFaceTB/SmolLM2-1.7B-Instruct", device="cpu") ### GPU inference (device 0) generator = pipeline("text-generation", model="HuggingFaceTB/SmolLM2-1.7B-Instruct", device=0) ### Automatic device placement generator = pipeline( "text-generation", model="HuggingFaceTB/SmolLM2-1.7B-Instruct", device_map="auto", torch_dtype="auto" ) ``` ##### Generation Parameters ```python response = generator( "Translate this to French:", max_new_tokens=100, ### Maximum length of generated text do_sample=True, ### Use sampling instead of greedy decoding temperature=0.7, ### Control randomness (higher = more random) top_k=50, ### Limit to top k tokens top_p=0.95, ### Nucleus sampling threshold num_return_sequences=1 ### Number of different generations ) ``` #### Processing Multiple Inputs Pipelines can efficiently handle multiple inputs through batching: ```python ### Prepare multiple prompts prompts = [ "Write a haiku about programming:", "Explain what an API is:", "Write a short story about a robot:" ] ### Process all prompts efficiently responses = generator( prompts, batch_size=4, ### Number of prompts to process together max_new_tokens=100, do_sample=True, temperature=0.7 ) ### Print results for prompt, response in zip(prompts, responses): print(f"Prompt: {prompt}") print(f"Response: {response[0]['generated_text']}\n") ``` #### Web Server Integration Here's how to integrate a pipeline into a FastAPI application: ```python from fastapi import FastAPI, HTTPException from transformers import pipeline import uvicorn app = FastAPI() ### Initialize pipeline globally generator = pipeline( "text-generation", model="HuggingFaceTB/SmolLM2-1.7B-Instruct", device_map="auto" ) @app.post("/generate") async def generate_text(prompt: str): try: if not prompt: raise HTTPException(status_code=400, detail="No prompt provided") response = generator( prompt, max_new_tokens=100, do_sample=True, temperature=0.7 ) return {"generated_text": response[0]['generated_text']} except Exception as e: raise HTTPException(status_code=500, detail=str(e)) if __name__ == "__main__": uvicorn.run(app, host="0.0.0.0", port=5000) ``` #### Limitations While pipelines are great for prototyping and small-scale deployments, they have some limitations: - Limited optimization options compared to dedicated serving solutions - No built-in support for advanced features like dynamic batching - May not be suitable for high-throughput production workloads For production deployments with high throughput requirements, consider using Text Generation Inference (TGI) or other specialized serving solutions. #### Resources - [Hugging Face Pipeline Tutorial](https://huggingface.co/docs/transformers/en/pipeline_tutorial) - [Pipeline API Reference](https://huggingface.co/docs/transformers/en/main_classes/pipelines) - [Text Generation Parameters](https://huggingface.co/docs/transformers/en/main_classes/text_generation) - [Model Quantization Guide](https://huggingface.co/docs/transformers/en/perf_infer_gpu_one) ### Text Generation Inference (TGI) Text Generation Inference (TGI) is a toolkit developed by Hugging Face for deploying and serving Large Language Models (LLMs). It's designed to enable high-performance text generation for popular open-source LLMs. TGI is used in production by Hugging Chat - An open-source interface for open-access models. #### Why Use Text Generation Inference? Text Generation Inference addresses the key challenges of deploying large language models in production. While many frameworks excel at model development, TGI specifically optimizes for production deployment and scaling. Some key features include: - **Tensor Parallelism**: TGI's can split models across multiple GPUs through tensor parallelism, essential for serving larger models efficiently. - **Continuous Batching**: The continuous batching system maximizes GPU utilization by dynamically processing requests, while optimizations like Flash Attention and Paged Attention significantly reduce memory usage and increase speed. - **Token Streaming**: Real-time applications benefit from token streaming via Server-Sent Events, delivering responses with minimal latency. #### How to Use Text Generation Inference ##### Basic Python Usage TGI uses a simple yet powerful REST API integration which makes it easy to integrate with your applications. ##### Using the REST API TGI exposes a RESTful API that accepts JSON payloads. This makes it accessible from any programming language or tool that can make HTTP requests. Here's a basic example using curl: ```bash ### Basic generation request curl localhost:8080/v1/chat/completions \ -X POST \ -d '{ "model": "tgi", "messages": [ { "role": "system", "content": "You are a helpful assistant." }, { "role": "user", "content": "What is deep learning?" } ], "stream": true, "max_tokens": 20 }' \ -H 'Content-Type: application/json' ``` ##### Using the `huggingface_hub` Python Client The `huggingface_hub` python client client handles connection management, request formatting, and response parsing. Here's how to get started. ```python from huggingface_hub import InferenceClient client = InferenceClient( base_url="http://localhost:8080/v1/", ) output = client.chat.completions.create( model="tgi", messages=[ {"role": "system", "content": "You are a helpful assistant."}, {"role": "user", "content": "Count to 10"}, ], stream=True, max_tokens=1024, ) for chunk in output: print(chunk.choices[0].delta.content) ``` ##### Using OpenAI API Many libraries support the OpenAI API, so you can use the same client to interact with TGI. ```python from openai import OpenAI ### init the client but point it to TGI client = OpenAI( base_url="http://localhost:8080/v1/", api_key="-" ) chat_completion = client.chat.completions.create( model="tgi", messages=[ {"role": "system", "content": "You are a helpful assistant." }, {"role": "user", "content": "What is deep learning?"} ], stream=True ) ### iterate and print stream for message in chat_completion: print(message) ``` #### Preparing Models for TGI To serve a model with TGI, ensure it meets these requirements: 1. **Supported Architecture**: Verify your model architecture is supported (Llama, BLOOM, T5, etc.) 2. **Model Format**: Convert weights to safetensors format for faster loading: ```python from safetensors.torch import save_file from transformers import AutoModelForCausalLM model = AutoModelForCausalLM.from_pretrained("your-model") state_dict = model.state_dict() save_file(state_dict, "model.safetensors") ``` 3. **Quantization** (optional): Quantize your model to reduce memory usage: ```python from transformers import BitsAndBytesConfig quantization_config = BitsAndBytesConfig( load_in_4bit=True, bnb_4bit_compute_dtype="float16" ) model = AutoModelForCausalLM.from_pretrained( "your-model", quantization_config=quantization_config ) ``` #### References - [Text Generation Inference Documentation](https://huggingface.co/docs/text-generation-inference) - [TGI GitHub Repository](https://github.com/huggingface/text-generation-inference) - [Hugging Face Model Hub](https://huggingface.co/models) - [TGI API Reference](https://huggingface.co/docs/text-generation-inference/api_reference) ## 7. Agents AI Agents are autonomous systems that can understand user requests, break them down into steps, and execute actions to accomplish tasks. They combine language models with tools and external functions to interact with their environment. This module covers how to build effective agents using the [`smolagents`](https://github.com/huggingface/smolagents) library, which provides a lightweight framework for creating capable AI agents. > [!TIP] > [Hugging Face Agents Course](https://huggingface.co/learn/agents-course/unit0/introduction) help you comprehensively understand, use and build AI agents. #### Module Overview Building effective agents requires understanding three key components. First, retrieval capabilities allow agents to access and use relevant information from various sources. Second, function calling enables agents to take concrete actions in their environment. Finally, domain-specific knowledge and tooling equip agents for specialized tasks like code manipulation. #### Contents ##### 1️⃣ [Retrieval Agents](./retrieval_agents.md) Retrieval agents combine models with knowledge bases. These agents can search and synthesize information from multiple sources, leveraging vector stores for efficient retrieval and implementing RAG (Retrieval Augmented Generation) patterns. They are great at combining web search with custom knowledge bases while maintaining conversation context through memory systems. The module covers implementation strategies including fallback mechanisms for robust information retrieval. ##### 2️⃣ [Code Agents](./code_agents.md) Code agents are specialized autonomous systems designed for software development tasks. These agents excel at analyzing and generating code, performing automated refactoring, and integrating with development tools. The module covers best practices for building code-focused agents that can understand programming languages, work with build systems, and interact with version control while maintaining high code quality standards. ##### 3️⃣ [Custom Functions](./custom_functions.md) Custom function agents extend basic AI capabilities through specialized function calls. This module explores how to design modular and extensible function interfaces that integrate directly with your application's logic. You'll learn to implement proper validation and error handling while creating reliable function-driven workflows. The focus is on building simple systems where agents can predictably interact with external tools and services. ##### Exercise Notebooks | Title | Description | Exercise | Link | Colab | | ------------------------- | ------------------------------------------------------------ | ------------------------------------------------------------ | ------------------------------------ | ------------------------------------------------------------ | | Building a Research Agent | Create an agent that can perform research tasks using retrieval and custom functions | 🐢 Build a simple RAG agent
🐕 Add custom search functions
🦁 Create a full research assistant | [Notebook](./notebooks/agents.ipynb) | | #### Resources - [smolagents Documentation](https://huggingface.co/docs/smolagents) - Official docs for the smolagents library - [Building Effective Agents](https://www.anthropic.com/research/building-effective-agents) - Research paper on agent architectures - [Agent Guidelines](https://huggingface.co/docs/smolagents/tutorials/building_good_agents) - Best practices for building reliable agents - [LangChain Agents](https://python.langchain.com/docs/how_to/#agents) - Additional examples of agent implementations - [Function Calling Guide](https://platform.openai.com/docs/guides/function-calling) - Understanding function calling in LLMs - [RAG Best Practices](https://www.pinecone.io/learn/retrieval-augmented-generation/) - Guide to implementing effective RAG ### Building Agentic RAG Systems Agentic RAG (Retrieval Augmented Generation) combines the power of autonomous agents with knowledge retrieval capabilities. While traditional RAG systems simply use an LLM to answer queries based on retrieved information, agentic RAG takes this further by allowing the system to intelligently control its own retrieval and response process. Traditional RAG has key limitations - it only performs a single retrieval step and relies on direct semantic similarity with the user query, which can miss relevant information. Agentic RAG addresses these challenges by empowering the agent to formulate its own search queries, critique results, and perform multiple retrieval steps as needed. #### Basic Retrieval with DuckDuckGo Let's start by building a simple agent that can search the web using DuckDuckGo. This agent will be able to answer questions by retrieving relevant information and synthesizing responses. ```python from smolagents import CodeAgent, DuckDuckGoSearchTool, HfApiModel ### Initialize the search tool search_tool = DuckDuckGoSearchTool() ### Initialize the model model = HfApiModel() agent = CodeAgent( model = model, tools=[search_tool] ) ### Example usage response = agent.run( "What are the latest developments in fusion energy?" ) print(response) ``` The agent will: 1. Analyze the query to determine what information is needed 2. Use DuckDuckGo to search for relevant content 3. Synthesize the retrieved information into a coherent response 4. Store the interaction in its memory for future reference #### Custom Knowledge Base Tool For domain-specific applications, we often want to combine web search with our own knowledge base. Let's create a custom tool that can query a vector database of technical documentation. ```python from smolagents import Tool class RetrieverTool(Tool): name = "retriever" description = "Uses semantic search to retrieve the parts of transformers documentation that could be most relevant to answer your query." inputs = { "query": { "type": "string", "description": "The query to perform. This should be semantically close to your target documents. Use the affirmative form rather than a question.", } } output_type = "string" def __init__(self, docs, **kwargs): super().__init__(**kwargs) self.retriever = BM25Retriever.from_documents( docs, k=10 ) def forward(self, query: str) -> str: assert isinstance(query, str), "Your search query must be a string" docs = self.retriever.invoke( query, ) return "\nRetrieved documents:\n" + "".join( [ f"\n\n===== Document {str(i)} =====\n" + doc.page_content for i, doc in enumerate(docs) ] ) retriever_tool = RetrieverTool(docs_processed) ``` This enhanced agent can: 1. First check the documentation for relevant information 2. Fall back to web search if needed 3. Combine information from both sources 4. Maintain conversation context through memory #### Enhanced Retrieval Capabilities When building agentic RAG systems, the agent can employ sophisticated strategies like: 1. Query Reformulation - Instead of using the raw user query, the agent can craft optimized search terms that better match the target documents 2. Multi-Step Retrieval - The agent can perform multiple searches, using initial results to inform subsequent queries 3. Source Integration - Information can be combined from multiple sources like web search and local documentation 4. Result Validation - Retrieved content can be analyzed for relevance and accuracy before being included in responses Effective agentic RAG systems require careful consideration of several key aspects. The agent should select between available tools based on the query type and context. Memory systems help maintain conversation history and avoid repetitive retrievals. Having fallback strategies ensures the system can still provide value even when primary retrieval methods fail. Additionally, implementing validation steps helps ensure the accuracy and relevance of retrieved information. ```python import datasets from langchain.docstore.document import Document from langchain.text_splitter import RecursiveCharacterTextSplitter from langchain_community.retrievers import BM25Retriever knowledge_base = datasets.load_dataset("m-ric/huggingface_doc", split="train") knowledge_base = knowledge_base.filter(lambda row: row["source"].startswith("huggingface/transformers")) source_docs = [ Document(page_content=doc["text"], metadata={"source": doc["source"].split("/")[1]}) for doc in knowledge_base ] text_splitter = RecursiveCharacterTextSplitter( chunk_size=500, chunk_overlap=50, add_start_index=True, strip_whitespace=True, separators=["\n\n", "\n", ".", " ", ""], ) docs_processed = text_splitter.split_documents(source_docs) ``` #### Next Steps ⏩ Check out the [Code Agents](./code_agents.md) module to learn how to build agents that can manipulate code. ### Code Agents Code agents are specialized autonomous systems that handle coding tasks like analysis, generation, refactoring, and testing. These agents leverage domain knowledge about programming languages, build systems, and version control to enhance software development workflows. #### Why Code Agents? Code agents accelerate development by automating repetitive tasks while maintaining code quality. They excel at generating boilerplate code, performing systematic refactoring, and identifying potential issues through static analysis. The agents combine retrieval capabilities to access external documentation and repositories with function calling to execute concrete actions like creating files or running tests. #### Building Blocks of a Code Agent Code agents are built on specialized language models fine-tuned for code understanding. These models are augmented with development tools like linters, formatters, and compilers to interact with real-world environments. Through retrieval techniques, agents maintain contextual awareness by accessing documentation and code histories to align with organizational patterns and standards. Action-oriented functions enable agents to perform concrete tasks such as committing changes or initiating merge requests. In the following example, we create a code agent that can search the web using DuckDuckGo much like the retrieval agent we built earlier. ```python from smolagents import CodeAgent, DuckDuckGoSearchTool, HfApiModel agent = CodeAgent(tools=[DuckDuckGoSearchTool()], model=HfApiModel()) agent.run("How many seconds would it take for a leopard at full speed to run through Pont des Arts?") ``` In the following example, we create a code agent that can get the travel time between two locations. Here, we use the `@tool` decorator to define a custom function that can be used as a tool. ```python from smolagents import CodeAgent, HfApiModel, tool @tool def get_travel_duration(start_location: str, destination_location: str, departure_time: Optional[int] = None) -> str: """Gets the travel time in car between two places. Args: start_location: the place from which you start your ride destination_location: the place of arrival departure_time: the departure time, provide only a `datetime.datetime` if you want to specify this """ import googlemaps ### All imports are placed within the function, to allow for sharing to Hub. import os gmaps = googlemaps.Client(os.getenv("GMAPS_API_KEY")) if departure_time is None: from datetime import datetime departure_time = datetime(2025, 1, 6, 11, 0) directions_result = gmaps.directions( start_location, destination_location, mode="transit", departure_time=departure_time ) return directions_result[0]["legs"][0]["duration"]["text"] agent = CodeAgent(tools=[get_travel_duration], model=HfApiModel(), additional_authorized_imports=["datetime"]) agent.run("Can you give me a nice one-day trip around Paris with a few locations and the times? Could be in the city or outside, but should fit in one day. I'm travelling only via public transportation.") ``` These examples are just the beginning of what you can do with code agents. You can learn more about how to build code agents in the [smolagents documentation](https://huggingface.co/docs/smolagents). smolagents provides a lightweight framework for building code agents, with a core implementation of approximately 1,000 lines of code. The framework specializes in agents that write and execute Python code snippets, offering sandboxed execution for security. It supports both open-source and proprietary language models, making it adaptable to various development environments. #### Further Reading - [smolagents Blog](https://huggingface.co/blog/smolagents) - Introduction to smolagents and code interactions - [smolagents: Building Good Agents](https://huggingface.co/docs/smolagents/tutorials/building_good_agents) - Best practices for reliable agents - [Building Effective Agents - Anthropic](https://www.anthropic.com/research/building-effective-agents) - Agent design principles ### Custom Function Agents Custom Function Agents are AI agents that leverage specialized function calls (or “tools”) to perform tasks. Unlike general-purpose agents, Custom Function Agents focus on powering advanced workflows by integrating directly with your application's logic. For example, you can expose database queries, system commands, or any custom utility as isolated functions for the agent to invoke. #### Why Custom Function Agents? - **Modular and Extensible**: Instead of building one monolithic agent, you can design individual functions that represent discrete capabilities, making your architecture more extensible. - **Fine-Grained Control**: Developers can carefully control the agent’s actions by specifying exactly which functions are available and what parameters they accept. - **Improved Reliability**: By structuring each function with clear schemas and validations, you reduce errors and unexpected behaviors. #### Basic Workflow 1. **Identify Functions** Determine which tasks can be transformed into custom functions (e.g., file I/O, database queries, streaming data processing). 2. **Define the Interface** Use a function signature or schema that precisely outlines each function’s inputs, outputs, and expected behavior. This enforces strong contracts between your agent and its environment. 3. **Register with the Agent** Your agent needs to “learn” which functions are available. Typically, you pass metadata describing each function’s interface to the language model or agent framework. 4. **Invoke and Validate** Once the agent selects a function to call, run the function with the provided arguments and validate the results. If valid, feed the results back to the agent for context to drive subsequent decisions. #### Example Below is a simplified example demonstrating how custom function calls might look in pseudocode. The objective is to perform a user-defined search and retrieve relevant content: ```python ### Define a custom function with clear input/output types def search_database(query: str) -> list: """ Search the database for articles matching the query. Args: query (str): The search query string Returns: list: List of matching article results """ try: results = database.search(query) return results except DatabaseError as e: logging.error(f"Database search failed: {e}") return [] ### Register the function with the agent agent.register_function( name="search_database", function=search_database, description="Searches database for articles matching a query" ) ### Example usage def process_search(): query = "Find recent articles on AI" results = agent.invoke("search_database", query) if results: agent.process_results(results) else: logging.info("No results found for query") ``` #### Further Reading - [smolagents Blog](https://huggingface.co/blog/smolagents) - Learn about the latest advancements in AI agents and how they can be applied to custom function agents. - [Building Good Agents](https://huggingface.co/docs/smolagents/tutorials/building_good_agents) - A comprehensive guide on best practices for developing reliable and effective custom function agents.